Welcome to Semaphore UI
What is Semaphore UI?
Semaphore UI is a modern UI and powerful API for Ansible, Terraform, OpenTofu, PowerShell and other DevOps tools.
Semaphore is written in pure Go and available for Windows, macOS and Linux (x64, ARM, ARM64). Semaphore is an open-source project with concise and high-quality code.
Semaphore supports the following databases:
- MySQL
- PostgreSQL
- BoltDB – embedded key/value database
With Semaphore you can:
- Build, deploy and rollback
- Group playbooks to projects
- Manage environments, inventories, repositories and access keys
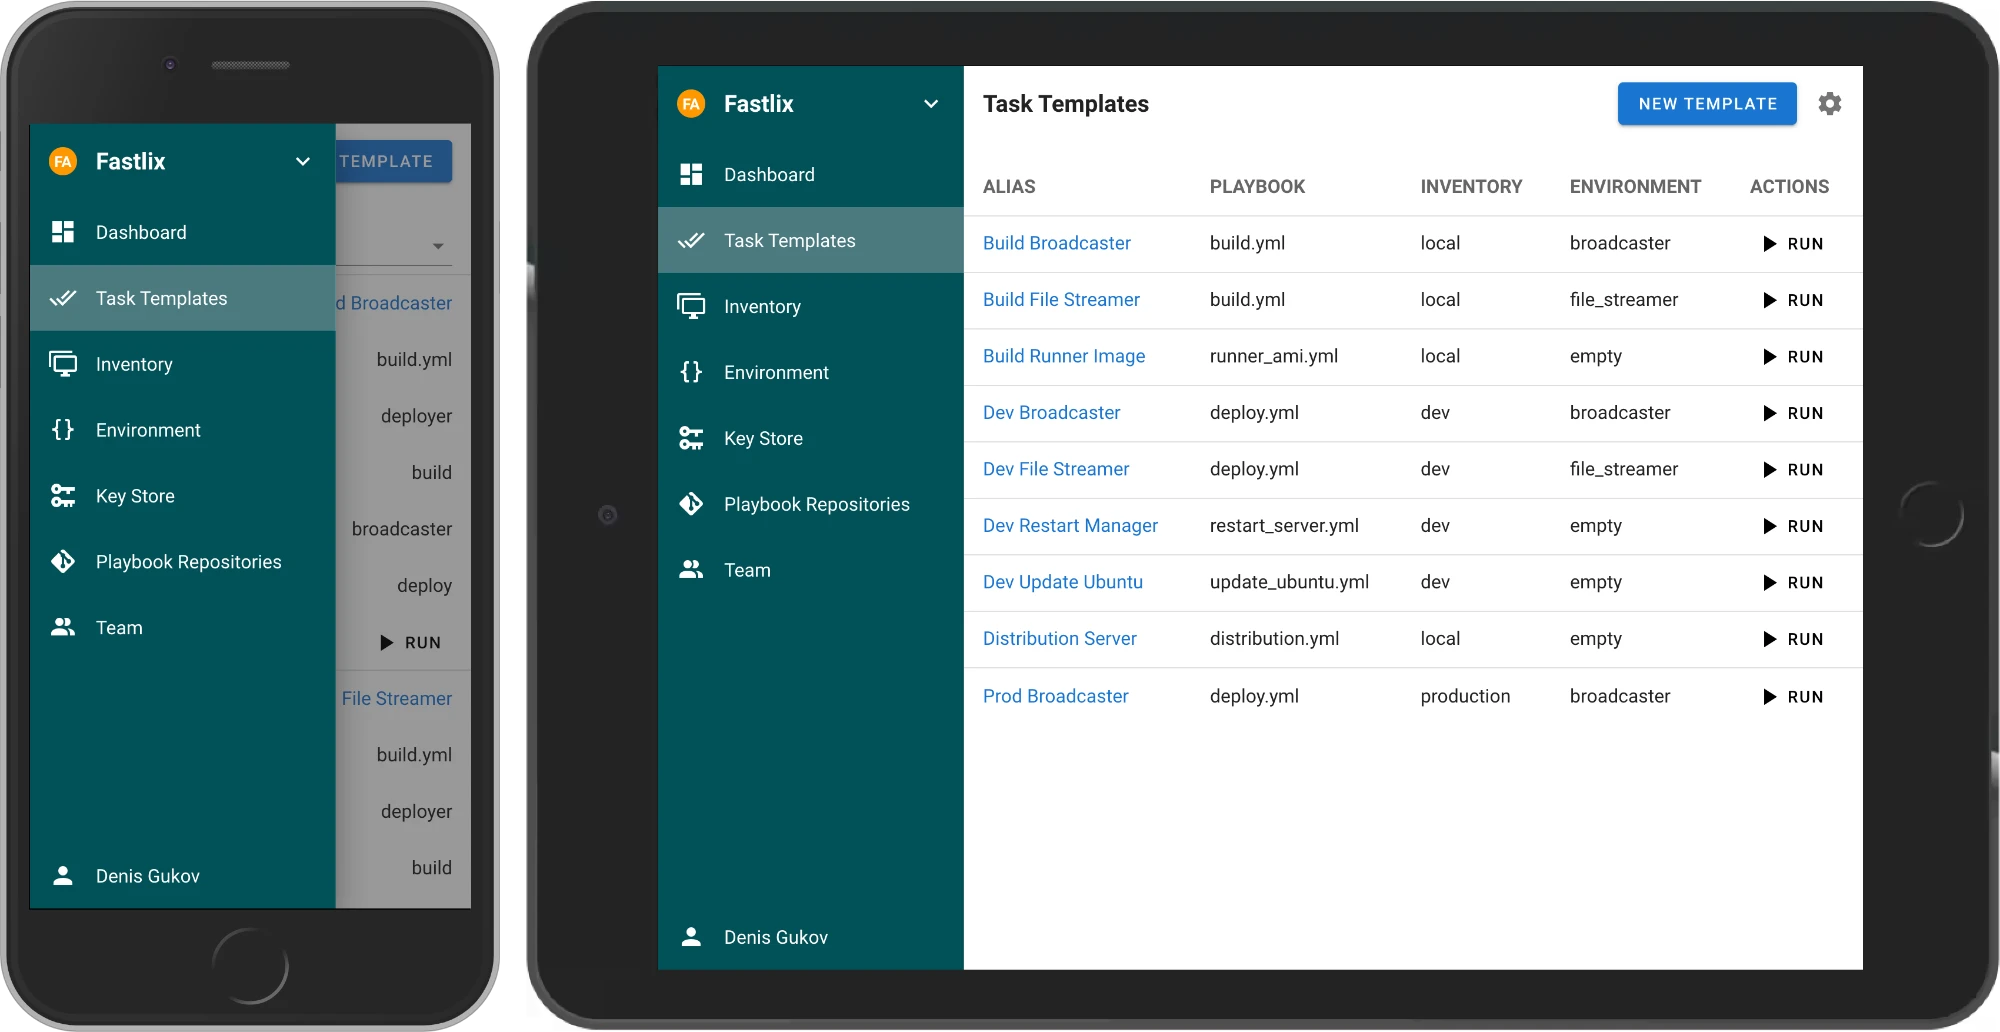
- Run playbooks from the browser. Responsive UI allows the use of Semaphore on mobile devices
- Run playbooks by schedule
- View detailed logs of any playbook runs, at any time
- Delegate other users the running of playbooks
- Get notifications about playbook runs
Links
-
Source code: https://github.com/semaphoreui/semaphore
-
Issue tracking: https://github.com/semaphoreui/semaphore/issues
-
Contact: [email protected]
-
Docker container configurator:
-
Our responsive community:
Administration Guide
Welcome to the Semaphore UI Administration Guide. This guide provides comprehensive information for installing, configuring, and maintaining your Semaphore instance.
What is Semaphore UI?
Semaphore UI is a modern, open-source web interface for running automation tasks. It is designed to be a lightweight, fast, and easy-to-use alternative to more complex automation platforms.
It allows you to securely manage and execute tasks for:
- Ansible playbooks
- Terraform/OpenTofu infrastructure-as-code
- PowerShell and Shell scripts
- Python scripts
Core Features & Philosophy
Understanding Semaphore's design principles can help you get the most out of it:
- Lightweight and Performant: Semaphore is written in Go and distributed as a single binary file. It has minimal resource requirements (CPU/RAM) and does not require external dependencies like Kubernetes, Docker, or a JVM. This makes it fast, efficient, and easy to deploy.
- Simple to Install and Maintain: You can get Semaphore running in minutes. Installation can be as simple as downloading the binary and running it. The simple architecture makes upgrades and maintenance straightforward.
- Flexible Deployment: Run it as a binary, as a systemd service, or in a Docker container. It's suitable for everything from a personal homelab to enterprise environments.
- Self-Hosted and Secure: Semaphore is a self-hosted solution. All your data, credentials, and logs remain on your own infrastructure, giving you full control. Credentials are always encrypted in the database.
- Powerful Integrations: While simple, Semaphore supports powerful features like LDAP/OpenID authentication, detailed role-based access control (RBAC) per project, remote runners for scaling out task execution, and a full REST API for programmatic access.
This guide will walk you through setting up and managing these features for your specific needs.
Quick links
- Installation: Overview
- Configuration: Overview
- Security: Overview
- Authentication:
- Operations:
- Maintenance:
Installation
You can install Semaphore in multiple ways, depending on your operating system, environment, and preferences:
-
Package manager
Install Semaphore using a native package for your distribution (e.g., apt for Debian/Ubuntu or dnf for RHEL-based systems). This is the easiest way to get started on Linux servers and integrates well with system services.
Learn more » -
Docker
Run Semaphore as a container using Docker or Docker Compose. Ideal for fast setup, sandboxed environments, and CI/CD pipelines. Recommended for users who prefer infrastructure as code.
Learn more » -
Cloud
Guidance for deploying Semaphore to cloud platforms using VMs, containers, or Kubernetes with managed services.
Learn more » -
Binary file
Download a precompiled binary from the releases page. Great for manual installation or embedding in custom workflows. Works across Linux, macOS, and Windows (via WSL).
Learn more » -
Kubernetes (Helm chart)
Deploy Semaphore into a Kubernetes cluster using Helm. Best suited for production-grade, scalable infrastructure. Supports easy configuration and upgrades via Helm values.
Learn more » -
Snap (deprecated)
Previously available as a Snap package. This method is deprecated and no longer maintained. Users are advised to switch to one of the supported methods above.
Learn more »
See also:
Installing Additional Python Packages
Some Ansible modules and roles require additional python packages to run. To install additional python packages, create a requirements.txt file and mount it in the /etc/semaphore directory on the container. For example, you could add the following lines to your docker-compose.yml file:
volumes:
  - /path/to/requirements.txt:/etc/semaphore/requirements.txt
The packages specified in the requirements file will be installed when the container starts up.
For more information about Python requirements files, see the Pip Requirements File Format reference
Package manager
Download package file from Releases page.
*.deb for Debian and Ubuntu, *.rpm for CentOS and RedHat.
Here are several installation commands, depending on the package manager:
wget https://github.com/semaphoreui/semaphore/releases/\
download/v2.15.0/semaphore_2.15.0_linux_amd64.deb

sudo dpkg -i semaphore_2.15.0_linux_amd64.deb
Setup Semaphore by using the following command:
semaphore setup
Now you can run Semaphore:
semaphore server --config=./config.json
Semaphore will be available via this URL https://localhost:3000.
Docker
Create a docker-compose.yml file with following content:
services:
  # uncomment this section and comment out the mysql section to use postgres instead of mysql
  #postgres:
    #restart: unless-stopped
    #image: postgres:14
    #hostname: postgres
    #volumes:
    #  - semaphore-postgres:/var/lib/postgresql/data
    #environment:
    #  POSTGRES_USER: semaphore
    #  POSTGRES_PASSWORD: semaphore
    #  POSTGRES_DB: semaphore
  # if you wish to use postgres, comment the mysql service section below
  mysql:
    restart: unless-stopped
    image: mysql:8.0
    hostname: mysql
    volumes:
      - semaphore-mysql:/var/lib/mysql
    environment:
      MYSQL_RANDOM_ROOT_PASSWORD: 'yes'
      MYSQL_DATABASE: semaphore
      MYSQL_USER: semaphore
      MYSQL_PASSWORD: semaphore
  semaphore:
    restart: unless-stopped
    ports:
      - 3000:3000
    image: semaphoreui/semaphore:latest
    environment:
      SEMAPHORE_DB_USER: semaphore
      SEMAPHORE_DB_PASS: semaphore
      SEMAPHORE_DB_HOST: mysql # for postgres, change to: postgres
      SEMAPHORE_DB_PORT: 3306 # change to 5432 for postgres
      SEMAPHORE_DB_DIALECT: mysql # for postgres, change to: postgres
      SEMAPHORE_DB: semaphore
      # To use SQLite instead of MySQL/Postgres (v2.16+)
      # SEMAPHORE_DB_DIALECT: sqlite
      # SEMAPHORE_DB: "/etc/semaphore/semaphore.sqlite"
      SEMAPHORE_PLAYBOOK_PATH: /tmp/semaphore/
      SEMAPHORE_ADMIN_PASSWORD: changeme
      SEMAPHORE_ADMIN_NAME: admin
      SEMAPHORE_ADMIN_EMAIL: admin@localhost
      SEMAPHORE_ADMIN: admin
      SEMAPHORE_ACCESS_KEY_ENCRYPTION: gs72mPntFATGJs9qK0pQ0rKtfidlexiMjYCH9gWKhTU=
      SEMAPHORE_LDAP_ACTIVATED: 'no' # if you wish to use ldap, set to: 'yes'
      SEMAPHORE_LDAP_HOST: dc01.local.example.com
      SEMAPHORE_LDAP_PORT: '636'
      SEMAPHORE_LDAP_NEEDTLS: 'yes'
      SEMAPHORE_LDAP_DN_BIND: 'uid=bind_user,cn=users,cn=accounts,dc=local,dc=shiftsystems,dc=net'
      SEMAPHORE_LDAP_PASSWORD: 'ldap_bind_account_password'
      SEMAPHORE_LDAP_DN_SEARCH: 'dc=local,dc=example,dc=com'
      SEMAPHORE_LDAP_SEARCH_FILTER: "(\u0026(uid=%s)(memberOf=cn=ipausers,cn=groups,cn=accounts,dc=local,dc=example,dc=com))"
      TZ: UTC
    depends_on:
      - mysql # for postgres, change to: postgres
volumes:
  semaphore-mysql: # to use postgres, switch to: semaphore-postgres
You must specify following confidential variables:
MYSQL_PASSWORDandSEMAPHORE_DB_PASS— password for the MySQL user.SEMAPHORE_ADMIN_PASSWORD— password for the Semaphore's admin user.SEMAPHORE_ACCESS_KEY_ENCRYPTION— key for encrypting access keys in database. It must be generated by using the following command:head -c32 /dev/urandom | base64.
If you are using Docker Swarm, it is strongly recommended that you don't embed credentials directly in the Compose file (nor in environment variables generally) and instead use Docker Secrets. Semaphore supports a common Docker container pattern for retrieving settings from files instead of the environment by appending _FILE to the end of the environment variable name. See the Docker documentation for an example.
A limited example using secrets:
secrets:
  semaphore_admin_pw:
    file: semaphore_admin_password.txt

services:
  semaphore:
    restart: unless-stopped
    ports:
      - 3000:3000
    image: semaphoreui/semaphore:latest
    environment:
      SEMAPHORE_ADMIN_PASSWORD_FILE: /run/secrets/semaphore_admin_pw
      SEMAPHORE_ADMIN_NAME: admin
      SEMAPHORE_ADMIN_EMAIL: admin@localhost
      SEMAPHORE_ADMIN: admin
Run the following command to start Semaphore with configured database (MySQL or Postgres):
docker-compose up
Semaphore will be available via the following URL http://localhost:3000.
Installing Additional Python Dependencies
When the Semaphore container starts, it can automatically install additional Python packages that you may need for your Ansible playbooks. To use this feature:
- Create a
requirements.txtfile with your Python dependencies - Mount this file to the container at the path specified by
SEMAPHORE_CONFIG_PATH(defaults to/etc/semaphore)
Example update to your docker-compose.yml:
services:
  semaphore:
    restart: unless-stopped
    ports:
      - 3000:3000
    image: semaphoreui/semaphore:latest
    volumes:
      - ./requirements.txt:/etc/semaphore/requirements.txt
During container startup, Semaphore will detect the requirements.txt file and automatically run pip3 install --upgrade -r ${SEMAPHORE_CONFIG_PATH}/requirements.txt to install the specified packages.
Cloud deployment
You can run Semaphore in any cloud environment using the same supported installation methods:
- Virtual machines: install via package manager or binary, and run behind a reverse proxy such as NGINX. Use a managed database (e.g., Amazon RDS, Cloud SQL) for reliability.
- Containers: deploy with Docker or Docker Compose on a VM or container service. See persistent volumes and environment configuration in the Docker guide.
- Kubernetes: deploy with the official Helm chart. Use cloud storage classes and managed databases.
Essentials:
- Configure external URL and TLS at your load balancer or reverse proxy.
- Store sensitive values (DB credentials, OAuth secrets) in a secure secret manager or Kubernetes Secrets.
- Use managed databases for production and enable regular backups.
- Put runners close to your workloads to reduce latency and egress.
Related guides:
Binary file
Download the *.tar.gz for your platform from Releases page. Unpack it and setup Semaphore using the following commands:
download/v2.15.0/semaphore_2.15.0_linux_amd64.tar.gz

tar xf semaphore_2.15.0_linux_amd64.tar.gz

./semaphore setup
Now you can run Semaphore:
./semaphore server --config=./config.json
Semaphore will be available via the following URL https://localhost:3000.
Run as a service
For more detailed information — look into the extended Systemd service documentation.
If you installed Semaphore via a package manager, or by downloading a binary file, you should create the Semaphore service manually.
Create the systemd service file:
/path/to/semaphore and /path/to/config.json to your semaphore and config file path.
sudo cat > /etc/systemd/system/semaphore.service <<EOF
[Unit]
Description=Semaphore Ansible
Documentation=https://github.com/semaphoreui/semaphore
Wants=network-online.target
After=network-online.target

[Service]
Type=simple
ExecReload=/bin/kill -HUP $MAINPID
ExecStart=/path/to/semaphore server --config=/path/to/config.json
SyslogIdentifier=semaphore
Restart=always
RestartSec=10s

[Install]
WantedBy=multi-user.target
EOF
Start the Semaphore service:
sudo systemctl daemon-reload
sudo systemctl start semaphore
Check the Semaphore service status:
sudo systemctl status semaphore
To make the Semaphore service auto start:
sudo systemctl enable semaphore
Kubernetes (Helm chart)
Semaphore provides a helm chart for installation on Kubernetes.
A thorough documentation can be found on artifacthub.io: Semaphore Helm Chart.
Snap (deprecated)
To install Semaphore via snap, run following command in terminal:
sudo snap install semaphore
Semaphore will be available by URL https://localhost:3000.
But to log in, you should create an admin user. Use the following commands:
sudo snap stop semaphore

sudo semaphore user add --admin \
--login john \
--name=John \
[email protected] \
--password=12345

sudo snap start semaphore
You can check the status of the Semaphore service using the following command:
sudo snap services semaphore
It should print the following table:
Service               Startup  Current  Notes
semaphore.semaphored  enabled  active   -
After installation, you can set up Semaphore via Snap Configuration. Use the following command to see your Semaphore configuration:
sudo snap get semaphore
List of available options you can find in Configuration options reference.
Manually installing Semaphore
Content:
This documentation goes into the details on how to set-up Semaphore when using these installation methods:
The Semaphore software-package is just a part of the whole system needed to successfully run Ansible with it.
The Python3- and Ansible-Execution-Environment are also very important!
NOTE: There are existing Ansible-Galaxy Roles that handle this setup-logic for you or can be used as a base-template for your own Ansible Role!
Service User
Semaphore does not need to be run as user root - so you shouldn't.
Benefits of using a service user:
- Has its own user-config
- Has its own environment
- Processes easily identifiable
- Gained system security
You can create a system user either manually by using adduser or using the ansible.builtin.user module.
In this documentation we will assume:
- the service user creates is named
semaphore - it has the shell
/bin/bashset - its home directory is
/home/semaphore
Troubleshooting
If the Ansible execution of Semaphore is failing - you will need to troubleshoot it in the context of the service user.
You have multiple options to do so:
-
Change your whole shell session to be in the user's context:
sudo su --login semaphore -
Run a single command in the user's context:
sudo --login -u semaphore <command>
Python3
Ansible is build using the Python3 programming language.
So its clean setup is essential for Ansible to work correctly.
First - make sure the packages python3 and python3-pip are installed on your system!
You have multiple options to install required Python modules:
- Installing them in the service user's context
- Installing them in a service-specific Virtual Environment
Requirements
Either way - it is recommended to use a requirements.txt file to specify the modules that need to be installed.
We will assume the file /home/semaphore/requirements.txt is used.
Here is an example of its content:
ansible
# for common jinja-filters
netaddr
jmespath
# for common modules
pywinrm
passlib
requests
docker
NOTE: You should also update those requirements from time to time!
An option for doing this automatically is also shown in the service example below.
Modules in user context
Manually:
sudo --login -u semaphore python3 -m pip install --user --upgrade -r /home/semaphore/requirements.txt
Using Ansible:
- name: Install requirements
  ansible.builtin.pip:
    requirements: '/home/semaphore/requirements.txt'
    extra_args: '--user --upgrade'
  become_user: 'semaphore'
Modules in a virtualenv
We will assume the virtualenv is created at /home/semaphore/venv
Make sure the virtual environment is activated inside the Service! This is also shown in the service example below.
Manually:
sudo su --login semaphore
python3 -m pip install --user virtualenv
python3 -m venv /home/semaphore/venv
# activate the context of the virtual environment
source /home/semaphore/venv/bin/activate
# verify we are using python3 from inside the venv
which python3
> /home/semaphore/venv/bin/python3
python3 -m pip install --upgrade -r /home/semaphore/requirements.txt
# disable the context to the virtual environment
deactivate
Using Ansible:
- name: Create virtual environment and install requirements into it
  ansible.builtin.pip:
    requirements: '/home/semaphore/requirements.txt'
    virtualenv: '/home/semaphore/venv'
    state: present  # or 'latest' to upgrade the requirements
Troubleshooting
If you encounter Python3 issues when using a virtual environment, you will need to change into its context to troubleshoot them:
sudo su --login semaphore
source /home/semaphore/venv/bin/activate
# verify we are using python3 from inside the venv
which python3
> /home/semaphore/venv/bin/python3

# troubleshooting

deactivate
Sometimes a virtual environment also breaks on system upgrades. If this happens you might just remove the existing one and re-create it.
Ansible Collections & Roles
You might want to pre-install Ansible modules and roles, so they don't need to be installed every time a task runs!
Requirements
It is recommended to use a requirements.yml file to specify the modules that need to be installed.
We will assume the file /home/semaphore/requirements.yml is used.
Here is an example of its content:
---

collections:
  - 'namespace.collection'
  # for common collections:
  - 'community.general'
  - 'ansible.posix'
  - 'community.mysql'
  - 'community.crypto'

roles:
  - src: 'namespace.role'
See also: Installing Collections, Installing Roles
NOTE: You should also update those requirements from time to time!
An option for doing this automatically is also shown in the service example below.
Install in user-context
Manually:
sudo su --login semaphore
ansible-galaxy collection install --upgrade -r /home/semaphore/requirements.yml
ansible-galaxy role install --force -r /home/semaphore/requirements.yml
Install when using a virtualenv
Manually:
sudo su --login semaphore
source /home/semaphore/venv/bin/activate
# verify we are using python3 from inside the venv
which python3
> /home/semaphore/venv/bin/python3

ansible-galaxy collection install --upgrade -r /home/semaphore/requirements.yml
ansible-galaxy role install --force -r /home/semaphore/requirements.yml

deactivate
Reverse Proxy
See: Security - Encrypted connection
Extended Systemd Service
Here is the basic template of the systemd service.
Add additional settings under their [PART]
Base
[Unit]
Description=Semaphore UI
Documentation=https://docs.semaphoreui.com/
Wants=network-online.target
After=network-online.target
ConditionPathExists=/usr/bin/semaphore
ConditionPathExists=/etc/semaphore/config.json

[Service]
ExecStart=/usr/bin/semaphore server --config /etc/semaphore/config.json
ExecReload=/bin/kill -HUP $MAINPID
Restart=always
RestartSec=10s

[Install]
WantedBy=multi-user.target
Service user
[Service]
User=semaphore
Group=semaphore
Python Modules
In user-context
[Service]
# to auto-upgrade python modules at service startup
ExecStartPre=/bin/bash -c 'python3 -m pip install --upgrade --user -r /home/semaphore/requirements.txt'

# so the executables are found
Environment="PATH=/usr/local/sbin:/usr/local/bin:/usr/sbin:/usr/bin:/sbin:/bin:/home/semaphore/.local/bin"
# set the correct python path. You can get the correct path with: python3 -c "import site; print(site.USER_SITE)"
Environment="PYTHONPATH=/home/semaphore/.local/lib/python3.10/site-packages"
In virtualenv
[Service]
# to auto-upgrade python modules at service startup
ExecStartPre=/bin/bash -c 'source /home/semaphore/venv/bin/activate \
                           && python3 -m pip install --upgrade -r /home/semaphore/requirements.txt'

# REPLACE THE EXISTING 'ExecStart'
ExecStart=/bin/bash -c 'source /home/semaphore/venv/bin/activate \
                        && /usr/bin/semaphore server --config /etc/semaphore/config.json'
Ansible Collections & Roles
If using Python3 in user-context
[Service]
# to auto-upgrade ansible collections and roles at service startup
ExecStartPre=/bin/bash -c 'ansible-galaxy collection install --upgrade -r /home/semaphore/requirements.yml'
ExecStartPre=/bin/bash -c 'ansible-galaxy role install --force -r /home/semaphore/requirements.yml'
If using Python3 in virtualenv
# to auto-upgrade ansible collections and roles at service startup
ExecStartPre=/bin/bash -c 'source /home/semaphore/venv/bin/activate \
                           && ansible-galaxy collection install --upgrade -r /home/semaphore/requirements.yml \
                           && ansible-galaxy role install --force -r /home/semaphore/requirements.yml'
Other use-cases
Using local MariaDB
[Unit]
Requires=mariadb.service
Using local Nginx
[Unit]
Wants=nginx.service
Sending logs to syslog
[Service]
StandardOutput=journal
StandardError=journal
SyslogIdentifier=semaphore
Full Examples
Python Modules in user-context
[Unit]
Description=Semaphore UI
Documentation=https://docs.semaphoreui.com/
Wants=network-online.target
After=network-online.target
ConditionPathExists=/usr/bin/semaphore
ConditionPathExists=/etc/semaphore/config.json

[Service]
User=semaphore
Group=semaphore
Restart=always
RestartSec=10s
Environment="PATH=/usr/local/sbin:/usr/local/bin:/usr/sbin:/usr/bin:/sbin:/bin:~/.local/bin"

ExecStartPre=/bin/bash -c 'ansible-galaxy collection install --upgrade -r /home/semaphore/requirements.yml'
ExecStartPre=/bin/bash -c 'ansible-galaxy role install --force -r /home/semaphore/requirements.yml'
ExecStartPre=/bin/bash -c 'python3 -m pip install --upgrade --user -r /home/semaphore/requirements.txt'

ExecStart=/usr/bin/semaphore server --config /etc/semaphore/config.json
ExecReload=/bin/kill -HUP $MAINPID

[Install]
WantedBy=multi-user.target
Python Modules in virtualenv
[Unit]
Description=Semaphore UI
Documentation=https://docs.semaphoreui.com/
Wants=network-online.target
After=network-online.target
ConditionPathExists=/usr/bin/semaphore
ConditionPathExists=/etc/semaphore/config.json

[Service]
User=semaphore
Group=semaphore
Restart=always
RestartSec=10s

ExecStartPre=/bin/bash -c 'source /home/semaphore/venv/bin/activate \
                           && python3 -m pip install --upgrade -r /home/semaphore/requirements.txt'
ExecStartPre=/bin/bash -c 'source /home/semaphore/venv/bin/activate \
                           && ansible-galaxy collection install --upgrade -r /home/semaphore/requirements.yml \
                           && ansible-galaxy role install --force -r /home/semaphore/requirements.yml'

ExecStart=/bin/bash -c 'source /home/semaphore/venv/bin/activate \
                        && /usr/bin/semaphore server --config /etc/semaphore/config.json'
ExecReload=/bin/kill -HUP $MAINPID

[Install]
WantedBy=multi-user.target
Fixes
If you have a custom system language set - you might run into problems that can be resoled by updating the associated environmental variables:
[Service]
Environment=LANG="en_US.UTF-8"
Environment=LC_ALL="en_US.UTF-8"
Troubleshooting
If there is a problem while executing a task it might be an environmental issue with your setup - not an issue with Semaphore itself!
Please go through these steps to verify if the issue occurs outside Semaphore:
-
Change into the context of the user:
sudo su --login semaphore -
Change into the context of the virtualenv if you use one:
source /home/semaphore/venv/bin/activate # verify we are using python3 from inside the venv which python3 > /home/semaphore/venv/bin/python3 # troubleshooting deactivate -
Run the Ansible Playbook manually
- If it fails => there is an issue with your environment
- If it works:
- Re-check your configuration inside Semaphore
- It might be an issue with Semaphore
Configuration
Semaphore can be configured using several methods:
- Interactive setup — guided configuration when running Semaphore for the first time. It creates
config.json. - Configuration file — the primary and most flexible way to configure Semaphore.
- Environment variables — useful for containerized or cloud-native deployments.
- Snap configuration (deprecated) — legacy method used when installing via Snap packages.
Configuration options
Full list of available configuration options:
| Config file option / Environment variable | Description |
|---|---|
| Common | |
git_client SEMAPHORE_GIT_CLIENT | Type of Git client. Can be cmd_git or go_git. |
ssh_config_path SEMAPHORE_SSH_PATH | Path to SSH configuration file. |
port SEMAPHORE_PORT | TCP port on which the web interface will be available. Default: 3000 |
interface SEMAPHORE_INTERFACE | Useful if your server has multiple network interfaces |
tmp_path SEMAPHORE_TMP_PATH | Path to directory where cloned repositories and generated files are stored. Default: /tmp/semaphore |
max_parallel_tasks SEMAPHORE_MAX_PARALLEL_TASKS | Max number of parallel tasks that can be run on the server. |
max_task_duration_sec SEMAPHORE_MAX_TASK_DURATION_SEC | Max duration of a task in seconds. |
max_tasks_per_templateSEMAPHORE_MAX_TASKS_PER_TEMPLATE | Maximum number of recent tasks stored in the database for each template. |
schedule.timezone SEMAPHORE_SCHEDULE_TIMEZONE | Timezone used for scheduling tasks and cron jobs. |
oidc_providers | OpenID provider settings. You can provide multiple OpenID providers. More about OpenID configuration read in OpenID. |
password_login_disable SEMAPHORE_PASSWORD_LOGIN_DISABLED | Deny password login. |
non_admin_can_create_project SEMAPHORE_NON_ADMIN_CAN_CREATE_PROJECT | Allow non-admin users to create projects. |
env_vars SEMAPHORE_ENV_VARS | JSON map which contains environment variables. |
forwarded_env_vars SEMAPHORE_FORWARDED_ENV_VARS | JSON array of environment variables which will be forwarded from system. |
apps SEMAPHORE_APPS | JSON map which contains apps configuration. |
use_remote_runner SEMAPHORE_USE_REMOTE_RUNNER | |
runner_registration_token SEMAPHORE_RUNNER_REGISTRATION_TOKEN | |
| Database | |
sqlite.host SEMAPHORE_DB_HOST | Path to the SQLite database file. |
bolt.host SEMAPHORE_DB_HOST | Path to the BoltDB database file. |
mysql.host SEMAPHORE_DB_HOST | MySQL database host. |
mysql.name SEMAPHORE_DB_NAME | MySQL database (schema) name. |
mysql.user SEMAPHORE_DB_USER | MySQL user name. |
mysql.pass SEMAPHORE_DB_PASS | MySQL user's password. |
postgres.host SEMAPHORE_DB_HOST | Postgres database host. |
postgres.name SEMAPHORE_DB_NAME | Postgres database (schema) name. |
postgres.user SEMAPHORE_DB_USER | Postgres user name. |
postgres.pass SEMAPHORE_DB_PASS | Postgres user's password. |
dialect SEMAPHORE_DB_DIALECT | Can be sqlite (default), postgres, mysql or bolt (deprecated). |
*.options SEMAPHORE_DB_OPTIONS | JSON map which contains database connection options. |
| Security | |
access_key_encryption SEMAPHORE_ACCESS_KEY_ENCRYPTION | Secret key used for encrypting access keys in database. Read more in Database encryption reference. |
cookie_hash SEMAPHORE_COOKIE_HASH | Secret key used to sign cookies. |
cookie_encryption SEMAPHORE_COOKIE_ENCRYPTION | Secret key used to encrypt cookies. |
web_host SEMAPHORE_WEB_ROOT | Can be useful if you want to use Semaphore by the subpath, for example: http://yourdomain.com/semaphore. Do not add a trailing /. |
tls.enabled SEMAPHORE_TLS_ENABLED | Enable or disable TLS (HTTPS) for secure communication with the Semaphore server. |
tls.cert_file SEMAPHORE_TLS_CERT_FILE | Path to TLS certificate file. |
tls.key_file SEMAPHORE_TLS_KEY_FILE | Path to TLS key file. |
tls.http_redirect_port SEMAPHORE_TLS_HTTP_REDIRECT_PORT | Port to redirect HTTP traffic to HTTPS. |
auth.totp.enabled SEMAPHORE_TOTP_ENABLED | Enable Two-factor authentication with using TOTP. |
auth.totp.issuer SEMAPHORE_TOTP_ISSUER | Semaphore title in TOTP authorization app. |
auth.totp.allow_recovery SEMAPHORE_TOTP_ALLOW_RECOVERY | Allow users to reset TOTP using a recovery code. |
| Process | |
process.user SEMAPHORE_PROCESS_USER | User under which wrapped processes (such as Ansible, Terraform, or OpenTofu) will run. |
process.uid SEMAPHORE_PROCESS_UID | ID of user under which wrapped processes (such as Ansible, Terraform, or OpenTofu) will run. |
process.gid SEMAPHORE_PROCESS_GID | ID for group under which wrapped processes (such as Ansible, Terraform, or OpenTofu) will run. |
process.chroot SEMAPHORE_PROCESS_CHROOT | Chroot directory for wrapped processes. |
email_sender SEMAPHORE_EMAIL_SENDER | Email address of the sender. |
email_host SEMAPHORE_EMAIL_HOST | SMTP server hostname. |
email_port SEMAPHORE_EMAIL_PORT | SMTP server port. |
email_secure SEMAPHORE_EMAIL_SECURE | Enable StartTLS to upgrade an unencrypted SMTP connection to a secure, encrypted one. |
email_tls SEMAPHORE_EMAIL_TLS | Use SSL or TLS connection for communication with the SMTP server. |
email_tls_min_version SEMAPHORE_EMAIL_TLS_MIN_VERSION | Minimum TLS version to use for the connection. |
email_username SEMAPHORE_EMAIL_USERNAME | Username for SMTP server authentication. |
email_password SEMAPHORE_EMAIL_PASSWORD | Password for SMTP server authentication. |
email_alert SEMAPHORE_EMAIL_ALERT | Flag which enables email alerts. |
| Messengers | |
telegram_alert SEMAPHORE_TELEGRAM_ALERT | Set to True to enable pushing alerts to Telegram. It should be used in combination with telegram_chat and telegram_token. |
telegram_chat SEMAPHORE_TELEGRAM_CHAT | Set to the Chat ID for the chat to send alerts to. Read more in Telegram Notifications Setup |
telegram_token SEMAPHORE_TELEGRAM_TOKEN | Set to the Authorization Token for the bot that will receive the alert payload. Read more in Telegram Notifications Setup |
slack_alert SEMAPHORE_SLACK_ALERT | Set to True to enable pushing alerts to slack. It should be used in combination with slack_url |
slack_url SEMAPHORE_SLACK_URL | The slack webhook url. Semaphore will used it to POST Slack formatted json alerts to the provided url. |
microsoft_teams_alert SEMAPHORE_MICROSOFT_TEAMS_ALERT | Flag which enables Microsoft Teams alerts. |
microsoft_teams_url SEMAPHORE_MICROSOFT_TEAMS_URL | Microsoft Teams webhook URL. |
rocketchat_alert SEMAPHORE_ROCKETCHAT_ALERT | Set to True to enable pushing alerts to Rocket.Chat. It should be used in combination with rocketchat_url. Available since v2.9.56. |
rocketchat_url SEMAPHORE_ROCKETCHAT_URL | The rocketchat webhook url. Semaphore will used it to POST Rocket.Chat formatted json alerts to the provided url. Available since v2.9.56. |
dingtalk_alert SEMAPHORE_DINGTALK_ALERT | Enable Dingtalk alerts. |
dingtalk_url SEMAPHORE_DINGTALK_URL | Dingtalk messenger webhook URL. |
gotify_alert SEMAPHORE_GOTIFY_ALERT | Enable Gotify alerts. |
gotify_url SEMAPHORE_GOTIFY_URL | Gotify server URL. |
gotify_token SEMAPHORE_GOTIFY_TOKEN | Gotify server token. |
| LDAP | |
ldap_enable SEMAPHORE_LDAP_ENABLE | Flag which enables LDAP authentication. |
ldap_needtls SEMAPHORE_LDAP_NEEDTLS | Flag to enable or disable TLS for LDAP connections. |
ldap_binddn SEMAPHORE_LDAP_BIND_DN | The distinguished name (DN) used to bind to the LDAP server for authentication. |
ldap_bindpassword SEMAPHORE_LDAP_BIND_PASSWORD | The password used to bind to the LDAP server for authentication. |
ldap_server SEMAPHORE_LDAP_SERVER | The hostname and port of the LDAP server (e.g., ldap-server.com:1389). |
ldap_searchdn SEMAPHORE_LDAP_SEARCH_DN | The base distinguished name (DN) used for searching users in the LDAP directory (e.g., dc=example,dc=org). |
ldap_searchfilter SEMAPHORE_LDAP_SEARCH_FILTER | The filter used to search for users in the LDAP directory (e.g., (&(objectClass=inetOrgPerson)(uid=%s))). |
ldap_mappings.dn SEMAPHORE_LDAP_MAPPING_DN | LDAP attribute to use as the distinguished name (DN) mapping for user authentication. |
ldap_mappings.mail SEMAPHORE_LDAP_MAPPING_MAIL | LDAP attribute to use as the email address mapping for user authentication. |
ldap_mappings.uid SEMAPHORE_LDAP_MAPPING_UID | LDAP attribute to use as the user ID (UID) mapping for user authentication. |
ldap_mappings.cn SEMAPHORE_LDAP_MAPPING_CN | LDAP attribute to use as the common name (CN) mapping for user authentication. |
| Logging | |
log.events.format SEMAPHORE_EVENT_LOG_FORMAT | Event log format. Can be json or empty for text. |
log.events.enabled SEMAPHORE_EVENT_LOG_ENABLED | Enable or disable event logging. |
log.events.logger SEMAPHORE_EVENT_LOGGER | JSON map which contains event logger configuration. |
log.tasks.format SEMAPHORE_TASK_LOG_FORMAT | Task log format. Can be json or empty for text. |
log.tasks.enabled SEMAPHORE_TASK_LOG_ENABLED | Enable or disable task logging. |
log.tasks.logger SEMAPHORE_TASK_LOGGER | JSON map which contains task logger configuration. |
log.tasks.result_logger SEMAPHORE_TASK_RESULT_LOGGER | JSON map which contains task result logger configuration. |
Frequently asked questions
1. How to configure a public URL for Semaphore UI
If you use nginx or other web server before Semaphore, you should provide configuration option web_host.
For example you configured NGINX on the server which proxies queries to Semaphore.
Server address https://example.com and you proxies all queries https://example.com/semaphore to Semaphore.
Your web_host will be https://example.com/semaphore.
Configuration file
Creating configuration file
Semaphore uses a config.json file for its core configuration. You can generate this file interactively using built-in tools or through a web-based configurator.
Generate via CLI
Use the following commands to generate the configuration file interactively:
-
For the Semaphore server:
semaphore setup -
For the Semaphore runner:
semaphore runner setupFor more details about runner configuration, see the Runners section.
Generate via Web
Alternatively, you can use the web-based interactive configurator:
Configuration file example
Semaphore uses a config.json configuration file with following content:
{
	"mysql_test": {
		"host": "127.0.0.1:3306",
		"user": "root",
		"pass": "***",
		"name": "semaphore"
	},

	"dialect": "mysql",

	"git_client": "go_git",

	"auth": {
		"totp": {
			"enabled": false,
			"allow_recovery": true
		}
	},

	"use_remote_runner": true,
	"runner_registration_token": "73fs***",

 	"tmp_path": "/tmp/semaphore",
 	"cookie_hash": "96Nt***",
 	"cookie_encryption": "x0bs***",
 	"access_key_encryption": "j1ia***",

	"max_tasks_per_template": 3,

	"schedule": {
		"timezone": "UTC"
	},

	"log": {
		"events": {
			"enabled": true,
			"path": "../events.log"
		}
	},

	"process": {
		"chroot": "/opt/semaphore/sandbox"
	}
 }
Configuration file usage
- For Semaphore server:
semaphore server --config ./config.json
- For Semaphore runner:
semaphore runner start --config ./config.json
Environment variables
With using environment variables you can override any available configuration option.
You can use interactive evnvironment variables generator (for Docker):
Application environment for apps (Ansible, Terraform, etc.)
Semaphore can pass environment variables to application processes (Ansible, Terraform/OpenTofu, Python, PowerShell, etc.). There are two related options:
env_vars/SEMAPHORE_ENV_VARS: static key-value pairs that will be set for app processes.forwarded_env_vars/SEMAPHORE_FORWARDED_ENV_VARS: a list of variable names the server will forward from its own process environment.
Example configuration file:
{
  "env_vars": {
    "HTTP_PROXY": "http://proxy.internal:3128",
    "ANSIBLE_STDOUT_CALLBACK": "yaml"
  },
  "forwarded_env_vars": [
    "AWS_ACCESS_KEY_ID",
    "AWS_SECRET_ACCESS_KEY",
    "GOOGLE_APPLICATION_CREDENTIALS"
  ]
}
Equivalent with environment variables:
export SEMAPHORE_ENV_VARS='{"HTTP_PROXY":"http://proxy.internal:3128","ANSIBLE_STDOUT_CALLBACK":"yaml"}'
export SEMAPHORE_FORWARDED_ENV_VARS='["AWS_ACCESS_KEY_ID","AWS_SECRET_ACCESS_KEY","GOOGLE_APPLICATION_CREDENTIALS"]'
Notes:
- Forwarding is explicit: only variables listed in
forwarded_env_varsare inherited by app processes. - Secrets should be provided securely (for example via Docker/Kubernetes secrets) and then forwarded using
forwarded_env_vars.
Secret environment variables in Variable Groups
In addition to global environment variables, you can define per-project secrets in Variable Groups. Secret keys are masked in the UI and logs. See User Guide → Variable Groups for usage and Terraform integration with TF_VAR_* variables.
Interactive setup
Use this option for first time configuration (not working for Semaphore installed via Snap).
semaphore setup
Snap configuration
Snap configurations should be used for when Semaphore was installed via Snap.
To see a list of available options, use the following command:
sudo snap get semaphore
You can change each of these configurations. For example if you want to change Semaphore port, use following command:
sudo snap set semaphore port=4444
Don't forget to restart Semaphore after changing a configuration:
sudo snap restart semaphore
Upgrading
There are 4 ways for upgrading Semaphore:
- Snap
- Package manager
- Docker
- Binary
Snap
Use the following command for upgrading Semaphore to the latest stable version:
sudo snap refresh semaphore
Package manager
Download a package file from Releases page.
*.deb for Debian and Ubuntu, *.rpm for CentOS and RedHat.
Install it using the package manager.
wget https://github.com/semaphoreui/semaphore/releases/\

download/v2.15.0/semaphore_2.15.0_linux_amd64.deb

sudo dpkg -i semaphore_2.15.0_linux_amd64.deb
Docker
Binary
Migrating from Snap to package/binary
Snap installation is deprecated. If you are migrating from Snap to a package or binary installation on the same host and were using BoltDB, ensure you move the BoltDB file and repositories directory and update the corresponding paths in config.json for database.boltdb and tmp_path. Also adjust file ownership for the service user (e.g., semaphore).
Download a *.tar.gz for your platform from Releases page. Unpack the binary to the directory where your old Semaphore binary is located.
wget https://github.com/semaphoreui/semaphore/releases/\

download/v2.15.0/semaphore_2.15.0_linux_amd64.tar.gz

tar xf semaphore_2.15.0_linux_amd64.tar.gz
🔐 Security
Introduction
Security is a top priority in Semaphore UI. Whether you're automating critical infrastructure tasks or managing team access to sensitive systems, Semaphore UI is designed to provide robust, secure operations out of the box. This section outlines how Semaphore handles security and what you should consider when deploying it in production.
Authentication & authorization
Semaphore supports secure authentication and flexible authorization mechanisms:
-
Login methods:
-
Username/password
Default method using credentials stored in the Semaphore database. Passwords are hashed using a strong algorithm (bcrypt). -
LDAP
Allows integration with enterprise directory services. Supports user/group filtering and secure connections via LDAPS. -
OpenID Connect (OIDC)
Enables single sign-on with identity providers like Google, Azure AD, or Keycloak. Supports custom claims and group mappings.
-
-
Two-Factor authentication (2FA)
TOTP-based 2FA is available and recommended for all users. It can be enabled per user and supports optional recovery codes. See configuration optionsauth.totp.enabledandauth.totp.allow_recovery. -
Role-based access control
You can assign different roles to users such as Admin, Maintainer, or Viewer, limiting access based on responsibility. -
Session management
Sessions are protected with secure HTTP cookies. Session expiration and logout mechanisms ensure minimal exposure.
Secrets & credentials
Managing secrets securely is a core feature:
-
Encrypted key store
Credentials and secret variables are encrypted at rest using AES encryption. -
Environment isolation
Secrets are only passed to jobs at runtime and are not exposed to the container environment directly. -
SSH keys and tokens
Users are responsible for uploading valid SSH keys and tokens. These are encrypted and only used when running tasks. -
HashiCorp Vault integration (Pro)
Secrets can be stored in an external Vault instance. Choose storage per-secret when creating or editing a secret.
Running untrusted code / playbooks
Semaphore runs user-defined playbooks and commands, which can be risky:
-
Container isolation
Tasks are executed in isolated Docker containers. These containers have no access to the host system. -
Least privilege
Containers run with minimal permissions and can be restricted further using Docker flags. -
Chroot execution
Semaphore can execute tasks inside a chroot jail to further isolate the execution environment from the host system. -
Task process user
Tasks can be executed under a dedicated non-root system user (e.g.,semaphore) to reduce the impact of potential exploits. This is optional and can be configured based on system policies.
Secure Deployment
To ensure Semaphore is securely deployed:
-
Use HTTPS
Semaphore supports HTTPS both via its built-in TLS support and through a reverse proxy like Nginx. It is strongly recommended to enable HTTPS in production.To enable built-in HTTPS support add following block to config.json:
{ ... "tls": { "enabled": true, "cert_file": "/path/to/cert/example.com.cert", "key_file": "/path/to/key/example.com.key" } ... } -
Run behind a firewall
Limit access to the Semaphore UI and database to only trusted IPs. -
Database security
Use strong passwords and restrict database access to Semaphore only.
Updates & patch management
Security updates are published regularly:
-
Stay updated
Always use the latest stable release. -
Changelog
Review changes on GitHub before updating. -
Automatic updates
If using Docker, consider automation pipelines for regular updates.
Reporting Vulnerabilities
Found a vulnerability? Help us keep Semaphore secure:
- Responsible disclosure
Please email us at[email protected].
Vulnerability resolution targets
We aim to resolve reported vulnerabilities within the following target windows:
- Critical: within 30 days
- High: within 60 days
- Medium: within 90 days
- Low: best effort, typically within 180 days
Out-of-cycle patches may be released for actively exploited issues affecting latest stable releases.
Code security tooling
We use CodeQL, Codacy, Snyk and Renovate to analyze the codebase and dependencies, and to automate dependency updates.
-
No public exploits
Do not share vulnerabilities publicly until patched. -
Acknowledgments
Security researchers may be acknowledged in release notes if desired.
Database security
Data encryption
Sensitive data is stored in the database, in an encrypted form. You should set the configuration option access_key_encryption in configuration file to enable Access Keys encryption. It must be generated by command:
head -c32 /dev/urandom | base64Network security
For security reasons, Semaphore should not be used over unencrypted HTTP!
Why use encrypted connections? See: Article from Cloudflare.
Options you have:
VPN
You can use a Client-to-Site VPN, that terminates on the Semaphore server, to encrypt & secure the connection.
SSL
Semaphore supports SSL/TLS starting from v2.12.
config.json:
{
    ...
    "tls": {
        "enabled": true,
        "cert_file": "/path/to/cert/example.com.cert",
        "key_file": "/path/to/key/example.com.key"
    }
    ...
}
Or environment variables (useful for Docker):
export SEMAPHORE_TLS_ENABLED=True
export SEMAPHORE_TLS_CERT_FILE=/path/to/cert/example.com.cert
export SEMAPHORE_TLS_KEY_FILE=/path/to/key/example.com.key
Alternatively, you can use a reverse proxy in front of Semaphore to handle secure connections. For example:
Self-signed SSL certificate
You can generate your own SSL certificate with using openssl CLI tool:
openssl req -x509 -newkey rsa:4096 \
    -keyout key.pem -out cert.pem \
    -sha256 -days 3650 -nodes \
    -subj "/C=US/ST=California/L=San Francisco/O=CompanyName/OU=DevOps/CN=example.com"
Let's Encrypt SSL certificate
You can use Certbot to generate and automatically renew a Let's Encrypt SSL certificate.
Example for Apache:
sudo snap install certbot
sudo certbot --apache -n --agree-tos -d example.com -m [email protected]
Others
If you want to use any other reverse proxy - make sure to also forward websocket connections on the /api/ws route!
Nginx config
Configuration example:
server {
  listen 443 ssl;
  server_name  example.com;

  # add Strict-Transport-Security to prevent man in the middle attacks
  add_header Strict-Transport-Security "max-age=31536000" always;

  # SSL
  ssl_certificate /etc/nginx/cert/cert.pem;
  ssl_certificate_key /etc/nginx/cert/privkey.pem;

  # Recommendations from
  # https://raymii.org/s/tutorials/Strong_SSL_Security_On_nginx/
  ssl_protocols TLSv1.1 TLSv1.2;
  ssl_ciphers 'EECDH+AESGCM:EDH+AESGCM:AES256+EECDH:AES256+EDH';
  ssl_prefer_server_ciphers on;
  ssl_session_cache shared:SSL:10m;

  # required to avoid HTTP 411: see Issue #1486
  # (https://github.com/docker/docker/issues/1486)
  chunked_transfer_encoding on;

  location / {
    proxy_pass http://127.0.0.1:3000/;
    proxy_set_header Host $http_host;
    proxy_set_header X-Real-IP $remote_addr;
    proxy_set_header X-Forwarded-For $proxy_add_x_forwarded_for;

    proxy_set_header X-Forwarded-Proto $scheme;

    proxy_buffering off;
    proxy_request_buffering off;
  }

  location /api/ws {
    proxy_pass http://127.0.0.1:3000/api/ws;
    proxy_http_version 1.1;
    proxy_set_header Upgrade $http_upgrade;
    proxy_set_header Connection "upgrade";
    proxy_set_header Origin "";
  }
}
Apache config
Make sure you have enabled following Apache modules:
sudo a2enmod proxy
sudo a2enmod proxy_http
sudo a2enmod proxy_wstunnel
Add following virtual host to your Apache configuration:
<VirtualHost *:443>

    ServerName example.com

    ServerAdmin webmaster@localhost

    SSLEngine on
    SSLCertificateFile /path/to/example.com.crt
    SSLCertificateKeyFile /path/to/example.com.key

    ProxyPreserveHost On

    <Location />
        ProxyPass http://127.0.0.1:3000/
        ProxyPassReverse http://127.0.0.1:3000/
    </Location>

    <Location /api/ws>
        RewriteCond %{HTTP:Connection} Upgrade [NC]
        RewriteCond %{HTTP:Upgrade} websocket [NC]

        ProxyPass ws://127.0.0.1:3000/api/ws/
        ProxyPassReverse ws://127.0.0.1:3000/api/ws/

    </Location>
</VirtualHost>
CLI
Common config options
| Option | Description |
|---|---|
--config config.json | Path to the configuration file. |
--no-config | Do not use any configuration file. Only environment variable will be used. |
--log-level ERROR | DEBUG, INFO, WARN, ERROR, FATAL, PANIC |
Version
Print current version.
semaphore version
Help
Print list of supported commands.
semaphore help
Database migration
Update database schema to latest version.
semaphore migrate
Interactive setup
Use this option for first time configuration.
semaphore setup
Server mode
Start the server.
semaphore server
Runner mode
Start the runner.
semaphore runner
Users
Using CLI you can add, remove or change user.
semaphore user --help
How to add admin user
semaphore user add \
    --admin \
    --login newAdmin \
    --email [email protected] \
    --name "New Admin" \
    --password "New$Password"
How to change user password
semaphore user change-by-login \
    --login myAdmin \
    --password "New$Password"
TOTP management
Manage time-based one-time password (2FA) via CLI:
semaphore user totp --help
Examples:
# Enable TOTP for a user
semaphore user totp enable --login john

# Generate recovery codes (if allowed by config)
semaphore user totp recovery --login john
Vaults
You can reencrypt your secrets in database with using following command:
semaphore vault rekey --old-key <encryption-key-which-used-before>
Your data will be decryped using <encryption-key-which-used-before> and will be encrypted using option access_key_encryption from configuration key.
Multiple vault passwords (Ansible)
You can define multiple Ansible Vault passwords in the Key Store and attach them to an Ansible template. During execution, Semaphore will provide all configured passwords to Ansible so it can decrypt any referenced vaults.
Runners
Database Migrations
Database migrations allow you to update or roll back your Semaphore database schema to match the requirements of different Semaphore versions. This is essential for upgrades, downgrades, and maintaining compatibility.
Getting Help
To see all available migration commands and options, run:
semaphore migrations --help
Applying Migrations
Apply All Pending Migrations
To apply all available migrations and bring your database up to date:
semaphore migrate
Apply Migrations Up to a Specific Version
To migrate your database schema up to a specific version, use:
semaphore migrate --apply-to <version>
<version>: The target migration version (e.g.,2.15or2.14.4).
Example:
semaphore migrate --apply-to 2.15.1
Rolling Back Migrations
To undo migrations and roll back your database schema to a previous version:
semaphore migrate --undo-to <version>
<version>: The migration version you want to roll back to (e.g.,2.13or2.14.4).
Example:
semaphore migrate --undo-to 2.13
Troubleshooting
- Always back up your database before applying or rolling back migrations.
- If you encounter errors, check the logs for details and ensure your CLI version matches your Semaphore server version.
LDAP configuration
Configuration file contains the following LDAP parameters:
{
  "ldap_binddn": "cn=admin,dc=example,dc=org",
  "ldap_bindpassword": "admin_password",
  "ldap_server": "localhost:389",
  "ldap_searchdn": "ou=users,dc=example,dc=org",
  "ldap_searchfilter": "(&(objectClass=inetOrgPerson)(uid=%s))",
  "ldap_mappings": {
    "dn": "",
    "mail": "uid",
    "uid": "uid",
    "cn": "cn"
  },
  "ldap_enable": true,
  "ldap_needtls": false,
}
All SSO provider options:
| Parameter | Environment Variables | Description |
|---|---|---|
ldap_binddn | SEMAPHORE_LDAP_BIND_DN | Name of LDAP user object to bind. |
ldap_bindpassword | SEMAPHORE_LDAP_BIND_PASSWORD | Password of LDAP user defined in Bind DN. |
ldap_server | SEMAPHORE_LDAP_SERVER | LDAP server host including port. For example: localhost:389. |
ldap_searchdn | SEMAPHORE_LDAP_SEARCH_DN | Scope where users will be searched. For example: ou=users,dc=example,dc=org. |
ldap_searchfilter | SEMAPHORE_LDAP_SEARCH_FILTER | Users search expression. Default: (&(objectClass=inetOrgPerson)(uid=%s)), where %s will replaced to entered login. |
ldap_mappings.dn | SEMAPHORE_LDAP_MAPPING_DN | |
ldap_mappings.mail | SEMAPHORE_LDAP_MAPPING_MAIL | User email claim expression*. |
ldap_mappings.uid | SEMAPHORE_LDAP_MAPPING_UID | User login claim expression*. |
ldap_mappings.cn | SEMAPHORE_LDAP_MAPPING_CN | User name claim expression*. |
ldap_enable | SEMAPHORE_LDAP_ENABLE | LDAP enabled. |
ldap_needtls | SEMAPHORE_LDAP_NEEDTLS | Connect to LDAP server by SSL. |
*Claim expression
Example of claim expression:
email | {{ .username }}@your-domain.com
Semaphore is attempting to claim the email field first. If it is empty, the expression following it is executed.
"username_claim": "|" generates a random username for each user who logs in through the provider.
Troubleshooting
Use ldapwhoami tool to check if your BindDN works:
This tool is provided by the openldap-clients package.
ldapwhoami\
  -H ldap://ldap.com:389\
  -D "CN=your_ldap_binddn_value_in_config"\
  -x\
  -W
It will ask interactively for the password, and should return code 0 and echo out the DN as specified.
Example: Using OpenLDAP Server
Run the following command to start your own LDAP server with an admin account and an additional user:
docker run -d --name openldap \
  -p 1389:1389 \
  -p 1636:1636 \
  -e LDAP_ADMIN_USERNAME=admin \
  -e LDAP_ADMIN_PASSWORD=pwd \
  -e LDAP_USERS=user1 \
  -e LDAP_PASSWORDS=pwd \
  -e LDAP_ROOT=dc=example,dc=org \
  -e LDAP_ADMIN_DN=cn=admin,dc=example,dc=org \
  bitnami/openldap:latest
Your LDAP configuration for Semaphore UI should be as follows:
{
	"ldap_binddn": "cn=admin,dc=example,dc=org",
	"ldap_bindpassword": "pwd",
	"ldap_server": "ldap-server.com:1389",
	"ldap_searchdn": "dc=example,dc=org",
	"ldap_searchfilter": "(&(objectClass=inetOrgPerson)(uid=%s))",
	"ldap_mappings": {
		"mail": "{{ .cn }}@ldap.your-domain.com",
		"uid": "|",
		"cn": "cn"
	},
	"ldap_enable": true,
	"ldap_needtls": false
}
To run Semaphore in Docker, use the following LDAP configuration:
docker run -d -p 3000:3000 --name semaphore \
  -e SEMAPHORE_DB_DIALECT=bolt \
  -e SEMAPHORE_ADMIN=admin \
  -e SEMAPHORE_ADMIN_PASSWORD=changeme \
  -e SEMAPHORE_ADMIN_NAME=Admin \
  -e SEMAPHORE_ADMIN_EMAIL=admin@localhost \
  -e SEMAPHORE_LDAP_ENABLE=yes \
  -e SEMAPHORE_LDAP_SERVER=ldap-server.com:1389 \
  -e SEMAPHORE_LDAP_BIND_DN=cn=admin,dc=example,dc=org \
  -e SEMAPHORE_LDAP_BIND_PASSWORD=pwd \
  -e SEMAPHORE_LDAP_SEARCH_DN=dc=example,dc=org \
  -e 'SEMAPHORE_LDAP_SEARCH_FILTER=(&(objectClass=inetOrgPerson)(uid=%s))' \
  -e 'SEMAPHORE_LDAP_MAPPING_MAIL={{ .cn }}@ldap.your-domain.com' \
  -e 'SEMAPHORE_LDAP_MAPPING_UID=|' \
  -e 'SEMAPHORE_LDAP_MAPPING_CN=cn' \
  semaphoreui/semaphore:latest
OpenID
Semaphore supports authentication via OpenID Connect (OIDC).
Links:
- GitHub config
- Google config
- GitLab config
- Authelia config
- Authentik config
- Keycloak config
- Okta config
- Azure config
- Zitadel config
Example of SSO provider configuration:
{
  "oidc_providers": {
    "mysso": {
      "display_name": "Sign in with MySSO",
      "color": "orange",
      "icon": "login",
      "provider_url": "https://mysso-provider.com",
      "client_id": "***",
      "client_secret": "***",
      "redirect_url": "https://your-domain.com/api/auth/oidc/mysso/redirect"
    }
  }
}
Configure via environment variable
When running in containers it may be convenient to configure providers using a single environment variable:
SEMAPHORE_OIDC_PROVIDERS='{
  "github": {
    "client_id": "***",
    "client_secret": "***"
  }
}'
This value must be a valid JSON string matching the oidc_providers structure above.
All SSO provider options:
| Parameter | Description |
|---|---|
display_name | Provider name which displayed on Login screen. |
icon | MDI-icon which displayed before of provider name on Login screen. |
color | Provider name which displayed on Login screen. |
client_id | Provider client ID. |
client_id_file | The path to the file where the provider's client ID is stored. Has less priorty then client_id. |
client_secret | Provider client Secret. |
client_secret_file | The path to the file where the provider's client secret is stored. Has less priorty then client_secret. |
redirect_url | |
provider_url | |
scopes | |
username_claim | Username claim expression*. |
email_claim | Email claim expression*. |
name_claim | Profile Name claim expression*. |
order | Position of the provider button on the Sign in screen. |
endpoint.issuer | |
endpoint.auth | |
endpoint.token | |
endpoint.userinfo | |
endpoint.jwks | |
endpoint.algorithms |
*Claim expression
Example of claim expression:
email | {{ .username }}@your-domain.com
Semaphore is attempting to claim the email field first. If it is empty, the expression following it is executed.
"username_claim": "|" generates a random username for each user who logs in through the provider.
Sign in screen
For each of the configured providers, an additional login button is added to the login page:

GitHub config
config.json:
{
  "oidc_providers": {
		"github": {
			"icon": "github",
			"display_name": "Sign in with GitHub",
			"client_id": "***",
			"client_secret": "***",
			"redirect_url": "https://your-domain.com/api/auth/oidc/github/redirect",
			"endpoint": {
				"auth": "https://github.com/login/oauth/authorize",
				"token": "https://github.com/login/oauth/access_token",
				"userinfo": "https://api.github.com/user"
			},
			"scopes": ["read:user", "user:email"],
			"username_claim": "|",
			"email_claim": "email | {{ .id }}@github.your-domain.com",
			"name_claim": "name",
			"order": 1
		}
  }
}
Google config
config.json:
{
  "oidc_providers": {
		"google": {
			"color": "blue",
			"icon": "google",
			"display_name": "Sign in with Google",
			"provider_url": "https://accounts.google.com",
			"client_id": "***.apps.googleusercontent.com",
			"client_secret": "GOCSPX-***",
			"redirect_url": "https://your-domain.com/api/auth/oidc/google/redirect",
			"username_claim": "|",
			"name_claim": "name",
			"order": 2
		}
  }
}
GitLab config
config.json:
{
  "oidc_providers": {
		"gitlab": {
			"display_name": "Sign in with GitLab",
			"color": "orange",
			"icon": "gitlab",
			"provider_url": "https://gitlab.com",
			"client_id": "***",
			"client_secret": "gloas-***",
			"redirect_url": "https://your-domain.com/api/auth/oidc/gitlab/redirect",
			"username_claim": "|",
			"order": 3
		}
  }
}
Tutorial in Semaphore UI blog: GitLab authentication in Semaphore UI.
Gitea config
config.json:
"oidc_providers": {
        "github": {
            "icon": "github",
            "display_name": "Sign in with gitea instance",
            "client_id": "123-456-789",
            "client_secret": "**********",
            "redirect_url": "https://your-semaphore.tld/api/auth/oidc/github/redirect",
            "endpoint": {
                "auth": "https://your-gitea.tld/login/oauth/authorize",
                "token": "https://your-gitea.tld/login/oauth/access_token",
                "userinfo": "https://your-gitea.tld/api/v1/user"
            },
            "scopes": ["read:user", "user:email"],
            "username_claim": "login",
            "email_claim": "email",
            "name_claim": "full_name",
            "order": 1
        }
}
In your gitea instance, go to https://your-gitea.tld/user/settings/applications and create a new oauth2 application.
As redirect URI use https://your-semaphore.tld/api/auth/oidc/github/redirect.
Authentication works fine. But "Name" and "Username" does not recieved correctly. The username will be a unique ID in semaphore and the name will be set to "Anonymous", which is changeable by the user itself. The emails is mapped correctly.
Authelia config
Authelia config.yaml:
identity_providers:
  oidc:
    claims_policies:
      semaphore_claims_policy:
        id_token:
          - groups
          - email
          - email_verified
          - alt_emails
          - preferred_username
          - name
    clients:
      - client_id: semaphore
        client_name: Semaphore
        client_secret: 'your_secret'
        claims_policy: semaphore_claims_policy
        public: false
        authorization_policy: two_factor
        redirect_uris:
          - https://your-semaphore-domain.com/api/auth/oidc/authelia/redirect
        scopes:
          - openid
          - profile
          - email
        userinfo_signed_response_alg: none
Semaphore config.json:
"oidc_providers":  {
    "authelia": {
        "display_name": "Authelia",
        "provider_url": "https://your-authelia-domain.com",
        "client_id": "semaphore",
        "client_secret": "your_secret",
        "redirect_url": "https://your-semaphore-domain.com/api/auth/oidc/authelia/redirect"
    }
},
Authentik config
config.json:
{
  "oidc_providers": {
    "authentik": {
      "display_name": "Sign in with Authentik",
      "provider_url": "https://authentik.example.com/application/o/<slug>/",
      "client_id": "<client-id>",
      "client_secret": "<client-secret>",
      "redirect_url": "https://semaphore.example.com/api/auth/oidc/authentik/redirect/",
      "scopes": ["openid", "profile", "email"],
      "username_claim": "preferred_username",
      "name_claim": "preferred_username"
    }
  }
}
Discussion on GitHub: #1663.
See also description in authentik docs.
Keycloak config
config.json:
{
  "oidc_providers": {
    "keycloak": {
      "display_name": "Sign in with keycloak",
      "provider_url": "https://keycloak.example.com/realms/master",
      "client_id": "***",
      "client_secret": "***",
      "redirect_url": "https://semaphore.example.com/api/auth/oidc/keycloak/redirect"
    }
  }
}
Related GitHub Issues
- #2308 — How to disable certificate validation for Keycloak server
- #2314 — Option to disable TLS verification
- #1496 — Log out from Keycloak session when logging out from Semaphore
Explore all Keycloak-related issues →
Related GitHub Discussions
Explore all Keycloak-related discussions →
Okta config
config.json:
{
  "oidc_providers": {
    "okta": {
      "display_name":"Sign in with Okta",
      "provider_url":"https://trial-776xxxx.okta.com/oauth2/default",
      "client_id":"***",
      "client_secret":"***",
      "redirect_url":"https://semaphore.example.com/api/auth/oidc/okta/redirect/"
    }
  }
}
Related GitHub Issues
- #1434 — Help with OIDC Azure AD configuration/debugging
- #1864 — v2.9.56 breaks oidc auth with keycloak
- #1329 — testing oidc_providers
Explore all Okta-related issues →
Related GitHub Discussions
- #2822 — When setting up GitHub OpenID, parsing is not possible except for Email
- #1030 — SAML support?
Explore all Okta-related discussions →
Azure config
config.json:
{
  "oidc_providers": {
        "azure": {
            "color": "blue",
            "display_name": "Sign in with Azure (Entra ID)",
            "provider_url": "https://login.microsoftonline.com/<Tennant ID>/v2.0",
            "client_id": "<ID>",
            "client_secret": "<secret>",
            "redirect_url": "https://semaphore.test.com/api/auth/oidc/azure/redirect"
        }
  }
}
Zitadel config
config.json:
{
  "oidc_providers": {
    "zitadel":
    {
        "provider_url": "https://your-domain.zitadel.cloud",
        "display_name": "ZITADEL",
        "client_id": "***",
        "client_secret": "***",
        "redirect_url": "https://your-domain.com:3000/api/auth/oidc/zitadel/redirect",
        "email_claim": "email"
    },
  }
}
Tutorial on Zitadel: OpenID Connect Endpoints in ZITADEL.
Known issues:
- to avoid error
claim 'email' missing or has bad formatadd user Info inside ID Token in the Zitadel console.
API
API reference
Semaphore UI provides two formats of API documentation, so you can choose the one that fits your workflow best:
-
Swagger/OpenAPI — ideal if you prefer an interactive, browser-based experience.
-
Official Postman Collection — explore and test all endpoints in Postman.
-
Built-in Swagger API documentation — interactive API documentation powered by Swagger UI. You can access it on your instance.
All options include complete documentation of available endpoints, parameters, and example responses.
Getting Started with the API
To start using the Semaphore API, you need to generate an API token. This token must be included in the request header as:
Authorization: Bearer YOUR_API_TOKEN
Creating an API Token
There are two ways to create an API token:
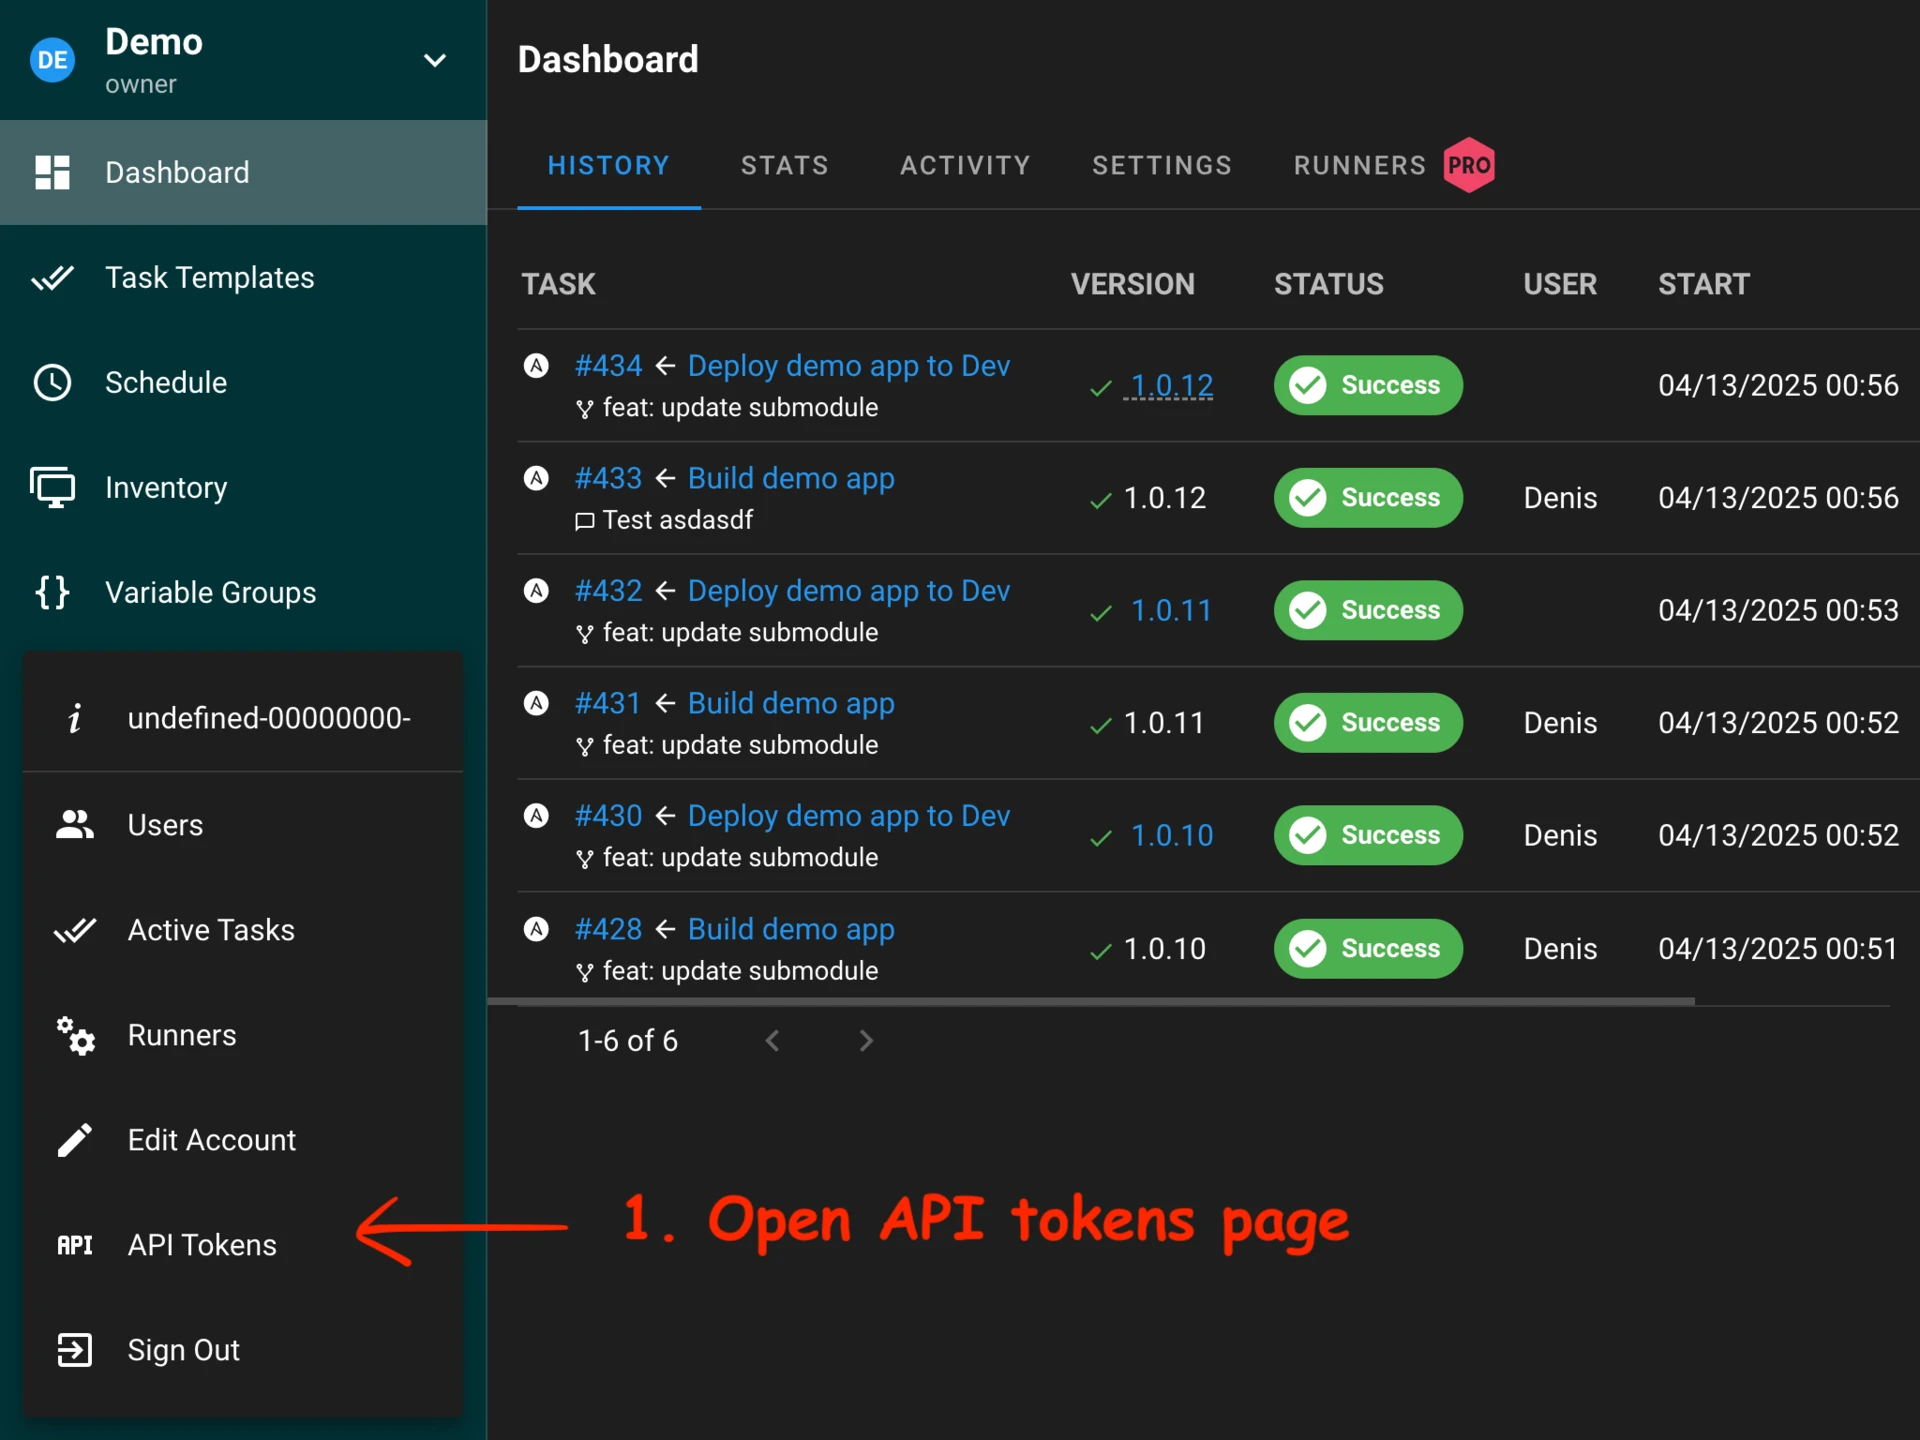
- Through the web interface
- Using HTTP request
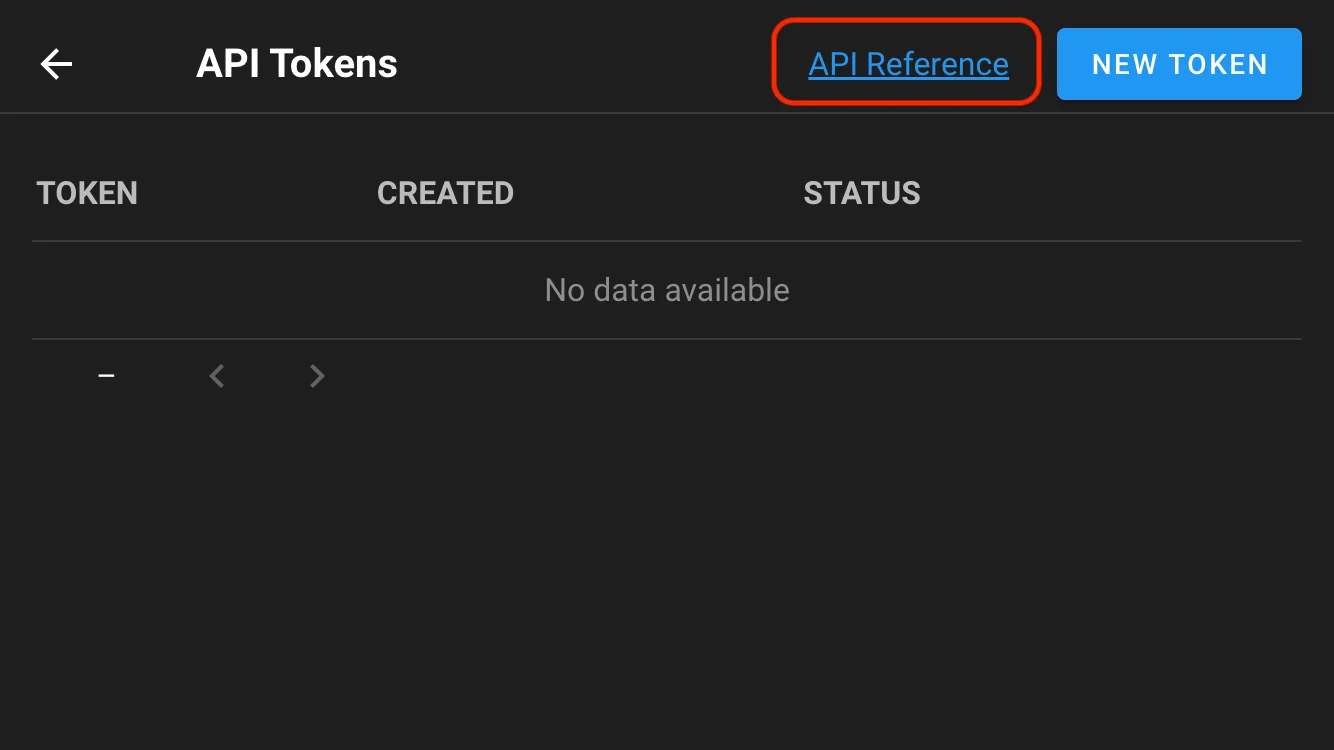
Through the web interface (since 2.14)
You can create and manage your API tokens via the Semaphore web UI:
Using HTTP request
You can also authenticate and generate a session token using a direct HTTP request.
Login to Semaphore (password should be escaped, slashy\\pass instead of slashy\pass e.g.):
curl -v -c /tmp/semaphore-cookie -XPOST \
-H 'Content-Type: application/json' \
-H 'Accept: application/json' \
-d '{"auth": "YOUR_LOGIN", "password": "YOUR_PASSWORD"}' \
http://localhost:3000/api/auth/login
Generate a new token, and get the new token:
curl -v -b /tmp/semaphore-cookie -XPOST \
-H 'Content-Type: application/json' \
-H 'Accept: application/json' \
http://localhost:3000/api/user/tokens
The command should return something similar to:
{
    "id": "YOUR_ACCESS_TOKEN",
    "created": "2025-05-21T02:35:12Z",
    "expired": false,
    "user_id": 3
}
Using token to make API requests
Once you have your API token, include it in the Authorization header to authenticate your requests.
Launch a task
Use this token for launching a task or anything else:
curl -v -XPOST \
-H 'Content-Type: application/json' \
-H 'Accept: application/json' \
-H 'Authorization: Bearer YOUR_ACCESS_TOKEN' \
-d '{"template_id": 1}' \
http://localhost:3000/api/project/1/tasks
Expiring an API token
If you no longer need the token, you should expire it to keep your account secure.
To manually revoke (expire) an API token, send a DELETE request to the token endpoint:
curl -v -XDELETE \
-H 'Content-Type: application/json' \
-H 'Accept: application/json' \
-H 'Authorization: Bearer YOUR_ACCESS_TOKEN' \
http://localhost:3000/api/user/tokens/YOUR_ACCESS_TOKEN
Pipelines
Semaphore supports simple pipelines with using build and deploy tasks.
Semaphore passes semaphore_vars variable to each Ansible playbook which it runs.
You can use it in your Ansible tasks to get what type of task was run, which version should be build or deployed, who ran the task, etc.
Example of semaphore_vars for build tasks:
semaphore_vars:
    task_details:
        type: build
        username: user123
        message: New version of some feature
        target_version: 1.5.33
Example of semaphore_vars for deploy tasks:
semaphore_vars:
    task_details:
        type: deploy
        username: user123
        message: Deploy new feature to servers
        incoming_version: 1.5.33
Build
This type of task is used to create artifacts. Each build task has autogenerated version. You should use variable semaphore_vars.task_details.target_version in your Ansible playbook to get what version of the artifact should be created. After the artifact is created, it can be used for deployment.
Example of build Ansible role:
- Get app source code from GitHub
- Compile source code
- Pack created binary to a tarball with name
app-{{semaphore_vars.task_details.target_version}}.tar.gz - Send
app-{{semaphore_vars.task_details.target_version}}.tar.gzto an S3 bucket
Deploy
This type of task is used to deploy artifacts to destination servers. Each deployment task is associated with the build task. You should use variable semaphore_vars.task_details.incoming_version in your Ansible playbook to get what version of the artifact should be deployed.
Example of deploy Ansible role:
- Download
app-{{semaphore_vars.task_details.incoming_version}}.tar.gzfrom an S3 bucket to destination servers - Unpack
app-{{semaphore_vars.task_details.incoming_version}}.tar.gzto destination directory - Create or update configuration files
- Restart app service
Runners
Runners enable running tasks on a separate server from Semaphore UI.
Semaphore runners operate on the same principle as GitLab or GitHub Actions runners:
- You launch a runner on a separate server, specifying the Semaphore server's address and an authentication token.
- The runner connects to Semaphore and signals its readiness to accept tasks.
- When a new task appears, Semaphore provides all the necessary information to the runner, which, in turn, clones the repository and runs Ansible, Terraform, PowerShell, etc.
- The runner sends the task execution results back to Semaphore.
For end users, working with Semaphore with or without runners appears the same.
Using runners offers the following advantages:
- Executing tasks more securely. For instance, a runner can be located within a closed subnet or isolated docker container.
- Distributing the workload across multiple servers. You can start multiple runners, and tasks will be randomly distributed among them.
Set up
Set up a server
To set up the server for working with running you should add following option to your Semaphore server configuration:
{
  "use_remote_runner": true,
  "runner_registration_token": "long string of random characters"
}
or with using environment variables:
SEMAPHORE_USE_REMOTE_RUNNER=True
SEMAPHORE_RUNNER_REGISTRATION_TOKEN=long_string_of_random_characters
Setup a runner
To set up the runner, use the following command:
semaphore runner setup --config /path/to/your/config/file.json
This command will create a configuration file at /path/to/your/config/file.json.
But before using this command, you need to understand how runners are registered on the server.
Registering the runner on the server
There are two ways to register a runner on the Semaphore server:
- Add it via the web interface or API.
- Use the command line with the
semaphore runner registercommand.
Adding the runner via the web UI
Registering via CLI
To register a runner this way, you need to add the runner_registration_token option to your Semaphore server's configuration file. This option should be set to an arbitrary string. Choose a sufficiently complex string to avoid security issues.
When the semaphore runner setup command asks if you have a Runner token, answer No. Then use the following command to register the runner:
semaphore runner register --config /path/to/your/config/file.json
or
echo REGISTRATION_TOKEN | semaphore runner register --stdin-registration-token --config /path/to/your/config/file.json
Configuration file
As a result of running the semaphore runner setup command, a configuration file like the following will be created:
{
  "tmp_path": "/tmp/semaphore",
  "web_host": "https://semaphore_server_host",

  // Here you can provide other settings, for example: git_client, ssh_config_path, etc.
  // ...

  // Runner specific options
  "runner": {
    "token": "your runner's token",
    // or
    "token_file": "path/to/the/file/where/runner/saves/token"

    // Here you can provide other runner-specific options,
    // which will be used for runner registration, for example:
    // max_parallel_tasks, webhook, one_off, etc.
    // ...
  }
}
You can manually edit this file without needing to call semaphore runner setup again.
To re-register the runner, you can use the semaphore runner register command. This will overwrite the token in the file specified in the configuration.
Running the runner
Now you can start the runner with the command:
semaphore runner start --config /path/to/your/config/file.json
Your runner is ready to execute tasks ;)
Runner tags (Pro)
You can assign one or more tags to a project runner. Templates can then require a tag so tasks run only on matching runners. Configure tags when adding a runner in the project UI, and set the required tag in the template settings.
Runner unregistaration
You can remove runner using the web interfance.
Or unregister runner via CLI:
semaphore runner unregister --config /path/to/your/config/file.json
Security
Data transfer security is ensured by using asymmetric encryption: the server encrypts data using a public key, the runner decrypts it using a private key.
Public and private keys are generated automatically when the runner registers on the server.
Logs
Semaphore writes server logs to stdout and stores Task and Activity logs in a database, centralizing key log information and eliminating the need to back up log files separately. The only data stored on the file system is caching data.
Server log
Semaphore does not log to files. Instead, all application logs are written to stdout.
If Semaphore is running as a systemd service, you can view the logs with the following command:
journalctl -u semaphore.service -f
If Semaphore is running in Docker container, you can view the logs with the following commamd:
docker logs -f my-semaphore-container
This provides a live (streaming) view of the logs.
Activity log
The Activity Log captures all user actions performed in Semaphore, including:
- Adding or removing resources (e.g., Templates, Inventories, Repositories).
- Adding or removing team members.
- Starting or stopping tasks.
Pro version 2.10 and later
Semaphore Pro 2.10+ supports writing the Activity Log and Task log to a file. To enable this, add the following configuration to your config.json:
{
  "log": {
    "events": {
      "enabled": true,
      "logger": {
        "filename": "../events.log"
        // other logger options
      }
    },
    "tasks": {
      "enabled": true,
      "logger": {
        "filename": "../tasks.log"
        // other logger options
      },
			"result_logger": {
				"filename": "../task_results.log"
        // other logger options
			}
    }
  }
}
Or you can do this using following environment variables:
export SEMAPHORE_EVENT_LOG_ENABLED=True
export SEMAPHORE_EVENT_LOG_LOGGER=./events.log

export SEMAPHORE_TASK_LOG_ENABLED=True
export SEMAPHORE_EVENT_LOG_LOGGER=./tasks.log
Activity (events) logging options
The Activity (events) logging options allow you to configure how Semaphore records user actions and system events to a file. These settings control the behavior of event logging, including whether it's enabled, the format of log entries, and specific logger configurations. When enabled, all user actions (like creating templates, managing teams, or running tasks) will be written to the specified log file according to these settings.
| Parameter | Environment Variables | Description |
|---|---|---|
enabled | SEMAPHORE_EVENT_LOG_ENABLED | Enable event logging to file. |
format | SEMAPHORE_EVENT_LOG_FORMAT | Log record format. Can be raw or json. |
logger | SEMAPHORE_EVENT_LOG_LOGGER | Logger options. |
Tasks logging options
The Tasks logging options allow you to configure how Semaphore records task execution details to a file. These settings control the logging of task-related events, including task starts, completions, and their execution status. When enabled, all task operations and their outcomes will be written to the specified log file according to these settings, providing a detailed audit trail of task execution history.
| Parameter | Environment Variables | Description |
|---|---|---|
enabled | SEMAPHORE_TASK_LOG_ENABLED | Enable task logging to file. |
format | SEMAPHORE_TASK_LOG_FORMAT | Log record format. Can be raw or json. |
logger | SEMAPHORE_TASK_LOG_LOGGER | Logger options. |
result_logger | SEMAPHORE_TASK_RESULT_LOGGER | Logger options. |
Logger options
| Parameter | Type | Description |
|---|---|---|
filename | String | Path and name of the file to write logs to. Backup log files will be retained in the same directory. It uses |
maxsize | Integer | The maximum size in megabytes of the log file before it gets rotated. It defaults to 100 megabytes. |
maxage | Integer | The maximum number of days to retain old log files based on the timestamp encoded in their filename. Note that a day is defined as 24 hours and may not exactly correspond to calendar days due to daylight savings, leap seconds, etc. The default is not to remove old log files based on age. |
maxbackups | Integer | The maximum number of old log files to retain. The default is to retain all old log files (though MaxAge may still cause them to get deleted.) |
localtime | Boolean | Determines if the time used for formatting the timestamps in backup files is the computer's local time. The default is to use UTC time. |
compress | Boolean | Determines if the rotated log files should be compressed using gzip. The default is not to perform compression. |
Each line in the file follows this format:
2024-01-03 12:00:34 user=234234 object=template action=delete
Task history
Semaphore stores information about task execution in the database. Task history provides a detailed view of all executed tasks, including their status and logs. You can monitor tasks in real time or review historical logs through the web interface.
Configuring task retention
By default, Semaphore stores all tasks in the database. If you run a large number of tasks, they can occupy a significant amount of disk space.
You can configure how many tasks are retained per template using one of the following approaches:
- Environment Variable
SEMAPHORE_MAX_TASKS_PER_TEMPLATE=30 config.jsonOption{ "max_tasks_per_template": 30 }
When the number of tasks exceeds this limit, the oldest Task Logs are automatically deleted.
Syslog protocol support
Semaphore can forward activity and task log entries to an external syslog collector for long‑term storage or centralized monitoring. Syslog forwarding is disabled by default.
Configure syslog support in config.json:
"syslog": {
"enabled": true,
"network": "udp",
"address": "logs.example.com:514",
"tag": "semaphore"
}
The same options are available through environment variables if you prefer not to edit the JSON file:
SEMAPHORE_SYSLOG_ENABLED=true
SEMAPHORE_SYSLOG_NETWORK=udp
SEMAPHORE_SYSLOG_ADDRESS=logs.example.com:514
SEMAPHORE_SYSLOG_TAG=semaphore
Syslog options
| Parameter | Environment Variables | Description |
|---|---|---|
enabled | SEMAPHORE_SYSLOG_ENABLED | Turn syslog forwarding on or off. |
network | SEMAPHORE_SYSLOG_NETWORK | Protocol used to reach the collector, such as udp or tcp. |
address | SEMAPHORE_SYSLOG_ADDRESS | Collector address in host:port format. |
tag | SEMAPHORE_SYSLOG_TAG | Optional identifier prepended to every message. |
Restart the Semaphore service after changing these values so that the new syslog destination is applied.
Summary
- Server log: Written to stdout; viewable via
journalctlif running under systemd. - Activity and tasks log: Tracks all user actions. Optionally, Pro 2.10+ can write these to a file.
- Task history: Stores real-time and historical task execution logs. Retention is configurable per template.
Following these guidelines ensures you have proper visibility into Semaphore UI operations while controlling storage usage and log retention.
Notifications
Semaphore can send notifications about task and project activity to popular channels. Configure a global notifier in config.json, and (where supported) override certain options per project.
Supported providers:
How it works
- Global configuration: Enable a provider and set its connection options in
config.jsonon the Semaphore server. See each provider page for the exact keys. - Events: Notifications are sent on key task lifecycle events (e.g., start, success, failure) and are posted to the configured channel/webhook.
- Per-project overrides: Some providers allow per-project overrides. For example, Telegram supports a project-specific chat ID.
Email notifications
Example config.json for configuring AWS SMTP email notifications:
{
"email_alert": true,
"email_sender": "[email protected]",
"email_host": "email-smtp.us-east-1.amazonaws.com",
"email_port": "587",
"email_secure": true,
"email_username": "<aws-key>",
"email_password": "<aws-secret>",
"email_tls": true,
"email_tls_min_version": "1.2"
}
Explanation of key setting:
email_secure— enables StartTLS to upgrade the connection to a secure, encrypted channel.email_tls— force TLS usage for SMTP connections.email_tls_min_version— minimal allowed TLS version (e.g.1.2).
Telegram notifications
Pre-requisites
In order to configure Semaphore UI to send alerts via Telegram, a few steps are required beforehand on the Telegram side. You'll need to create your own bot that will receive the webhook and you'll need to know the ID of the chat you want to send the message to.
Bot setup
The easiest way to set up your own bot is to use @BotFather.
- In your Telegram client, message @BotFather with
/start. - Follow the prompts to create a new bot and take note of the Authorization Token given in the last step. Note: this token is secret and should be treated as such.
- Message your new bot with
/startto start the bot so it can receive messages.
Chat ID
- In your Telegram client, message @RawDataBot with any message.
- Copy the value for the
idkey in thechatmap.
Testing
You can use cURL to validate your settings above as follows:
curl -X POST https://api.telegram.org/botYOUR_BOT_TOKEN/sendMessage \
-d chat_id=YOUR_CHAT_ID \
-d text="Test message from curl"
Configuration
Using the Chat ID and Token from the previous steps, you can now configure Semaphore UI to send Telegram Alerts as follows:
telegram_alert: True
telegram_chat: <chat id>
telegram_token: <token>
config.json example:
{
"telegram_alert": true,
"telegram_token": "64********:AAG****_rM6obyR********************",
"telegram_chat": "",
}
Per-project Chat IDs
Each project can use a unique Chat ID. This allows you to separate notifications by project rather than have them all go to the same chat. This overrides the global Chat ID from above.
Slack notifications
Slack notifications allow you to receive real-time updates about your Semaphore workflows directly in your Slack channels. This integration helps teams stay informed about build statuses, deployment results, and other important events without having to constantly check the Semaphore dashboard.
To set up Slack notifications, you need to create a webhook URL that connects Semaphore to your desired Slack channel. This webhook acts as a secure communication bridge between the two platforms.
Creating Slack webhook
Step 1. Open Slack API settings
- Go to https://api.slack.com/apps.
- Click Create New App → choose From Scratch.
- Give your app a name (e.g.,
Semaphore Bot) and select your Slack workspace.
Step 2. Enable incoming webhooks
- Inside the app settings, go to Features → Incoming Webhooks.
- Switch ctivate Incoming Webhooks → On.
Step 3. Create a webhook URL
-
Click dd New Webhook to Workspace.
-
Select the xxchannelxx where messages should be sent.
-
Click Allow.
-
You’ll see a Webhook URL like:
https://hooks.slack.com/services/xxxxxxxxxxx/xxxxxxxxxxx/xxxxxxxxxxxxxxxxxxxxxxxx
Step 4. Test your webhook
Use curl to test:
curl -X POST -H 'Content-type: application/json' \
--data '{"text":"Hello from Semaphore UI 🚀"}' \
https://hooks.slack.com/services/xxxxxxxxxxx/xxxxxxxxxxx/xxxxxxxxxxxxxxxxxxxxxxxx
If everything is set up, you’ll see the message in the selected Slack channel.
Semaphore configuration
Once you have your Slack webhook URL, you can configure Semaphore to send notifications in several ways:
You can enable Slack notifications using either configuration files or environment variables.
Method 1: Configuration file
Add the following settings to your Semaphore configuration file:
slack_alert: Set totrueto enable Slack notificationsslack_url: Your webhook URL from the previous step
config.json example:
{
"slack_alert": true,
"slack_url": "https://hooks.slack.com/services/xxxxxxxxxxx/xxxxxxxxxxx/xxxxxxxxxxxxxxxxxxxxxxxx",
}
Method 2: Environment variables
Alternatively, you can use environment variables to configure Slack notifications. This method is particularly useful for containerized deployments or when you want to keep sensitive information separate from configuration files.
SEMAPHORE_SLACK_ALERT=True
SEMAPHORE_SLACK_URL=https://hooks.slack.com/services/xxxxxxxxxxx/xxxxxxxxxxx/xxxxxxxxxxxxxxxxxxxxxxxx
Microsoft Teams notifications
config.json example:
{
"microsoft_teams_alert": true,
"microsoft_teams_url": "...",
}
RocketChat notifications
config.json example:
{
"rocketchat_alert": true,
"rocketchat_url": "...",
}
DingTalk notifications
config.json example:
{
"dingtalk_alert": true,
"dingtalk_url": "...",
}
Gotify notifications
config.json example:
{
"gotify_alert": true,
"gotify_url": "...",
"gotify_token": "***",
}
Troubleshooting
Renner prints error 404
How to fix
Getting 401 error code from Runner
Gathering Facts issue for localhost
The issue can occur on Semaphore UI installed via Snap or Docker.
4:10:16 PM
TASK [Gathering Facts] *********************************************************
4:10:17 PM
fatal: [localhost]: FAILED! => changed=false
Why this happens
For more information about localhost use in Ansible, read this article Implicit 'localhost'.
Ansible tries to gather facts locally, but Ansible is located in a limited isolated container which doesn't allow this.
How to fix this
There are two ways:
- Disable facts gathering:
- hosts: localhost
gather_facts: False
roles:
- ...
- Explicitly set the connection type to ssh:
[localhost]
127.0.0.1 ansible_connection=ssh ansible_ssh_user=your_localhost_user
panic: pq: SSL is not enabled on the server
This means that your Postgres doesn't work by SSL.
How to fix this
Add option sslmode=disable to the configuration file:
"postgres": {
"host": "localhost",
"user": "pastgres",
"pass": "pwd",
"name": "semaphore",
"options": {
"sslmode": "disable"
}
},
fatal: bad numeric config value '0' for 'GIT_TERMINAL_PROMPT': invalid unit
This means that you are trying to access a repository over HTTPS that requires authentication.
How to fix this
- Go to Key Store screen.
- Create a new key
Login with passwordtype. - Specify your login for GitHub/BitBucket/etc.
- Specify the password. You can't use your account password for GitHub/BitBucket, you should use a Personal Access Token (PAT) instead of it. Read more here.
- After creating the key, go to the Repositories screen, find your repository and specify the key.
unable to read LDAP response packet: unexpected EOF
Most likely, you are trying to connect to the LDAP server using an insecure method, although it expects a secure connection (via TLS).
How to fix this
Enable TLS in your config.json file:
...
"ldap_needtls": true
...
LDAP Result Code 49 "Invalid Credentials"
You have the wrong password or binddn.
How to fix this
Use ldapwhoami tool and check if your binddn works:
ldapwhoami\
-H ldap://ldap.com:389\
-D "CN=/your/ldap_binddn/value/in/config/file"\
-x\
-W
It will ask interactively for the password and should return code 0 and echo out the DN as specified.
You also can read the following articles:
LDAP Result Code 32 "No Such Object"
Coming soon.
User Guide
Learn how to use Semaphore day-to-day: create projects, run tasks, manage inventories, keys, variables, and more.
Start here
- Organize work with projects and teams
- Connect repositories and key store
- Define inventories and variable groups
- Create task templates and run tasks on schedule
Quick links
- Projects: Overview
- Tasks and schedules:
- Task Templates: Overview
- Variables and secrets:
- Inventory:
- Repositories:
- Integrations: Overview
- Team management: Overview
Projects
A project is a place to separate management activity.
All Semaphore activities occur within the context of a project.
Projects are independent from one another, so you can use them to organize unrelated systems within a single Semaphore installation.
This can be useful for managing different teams, infrastructures, environments or applications.
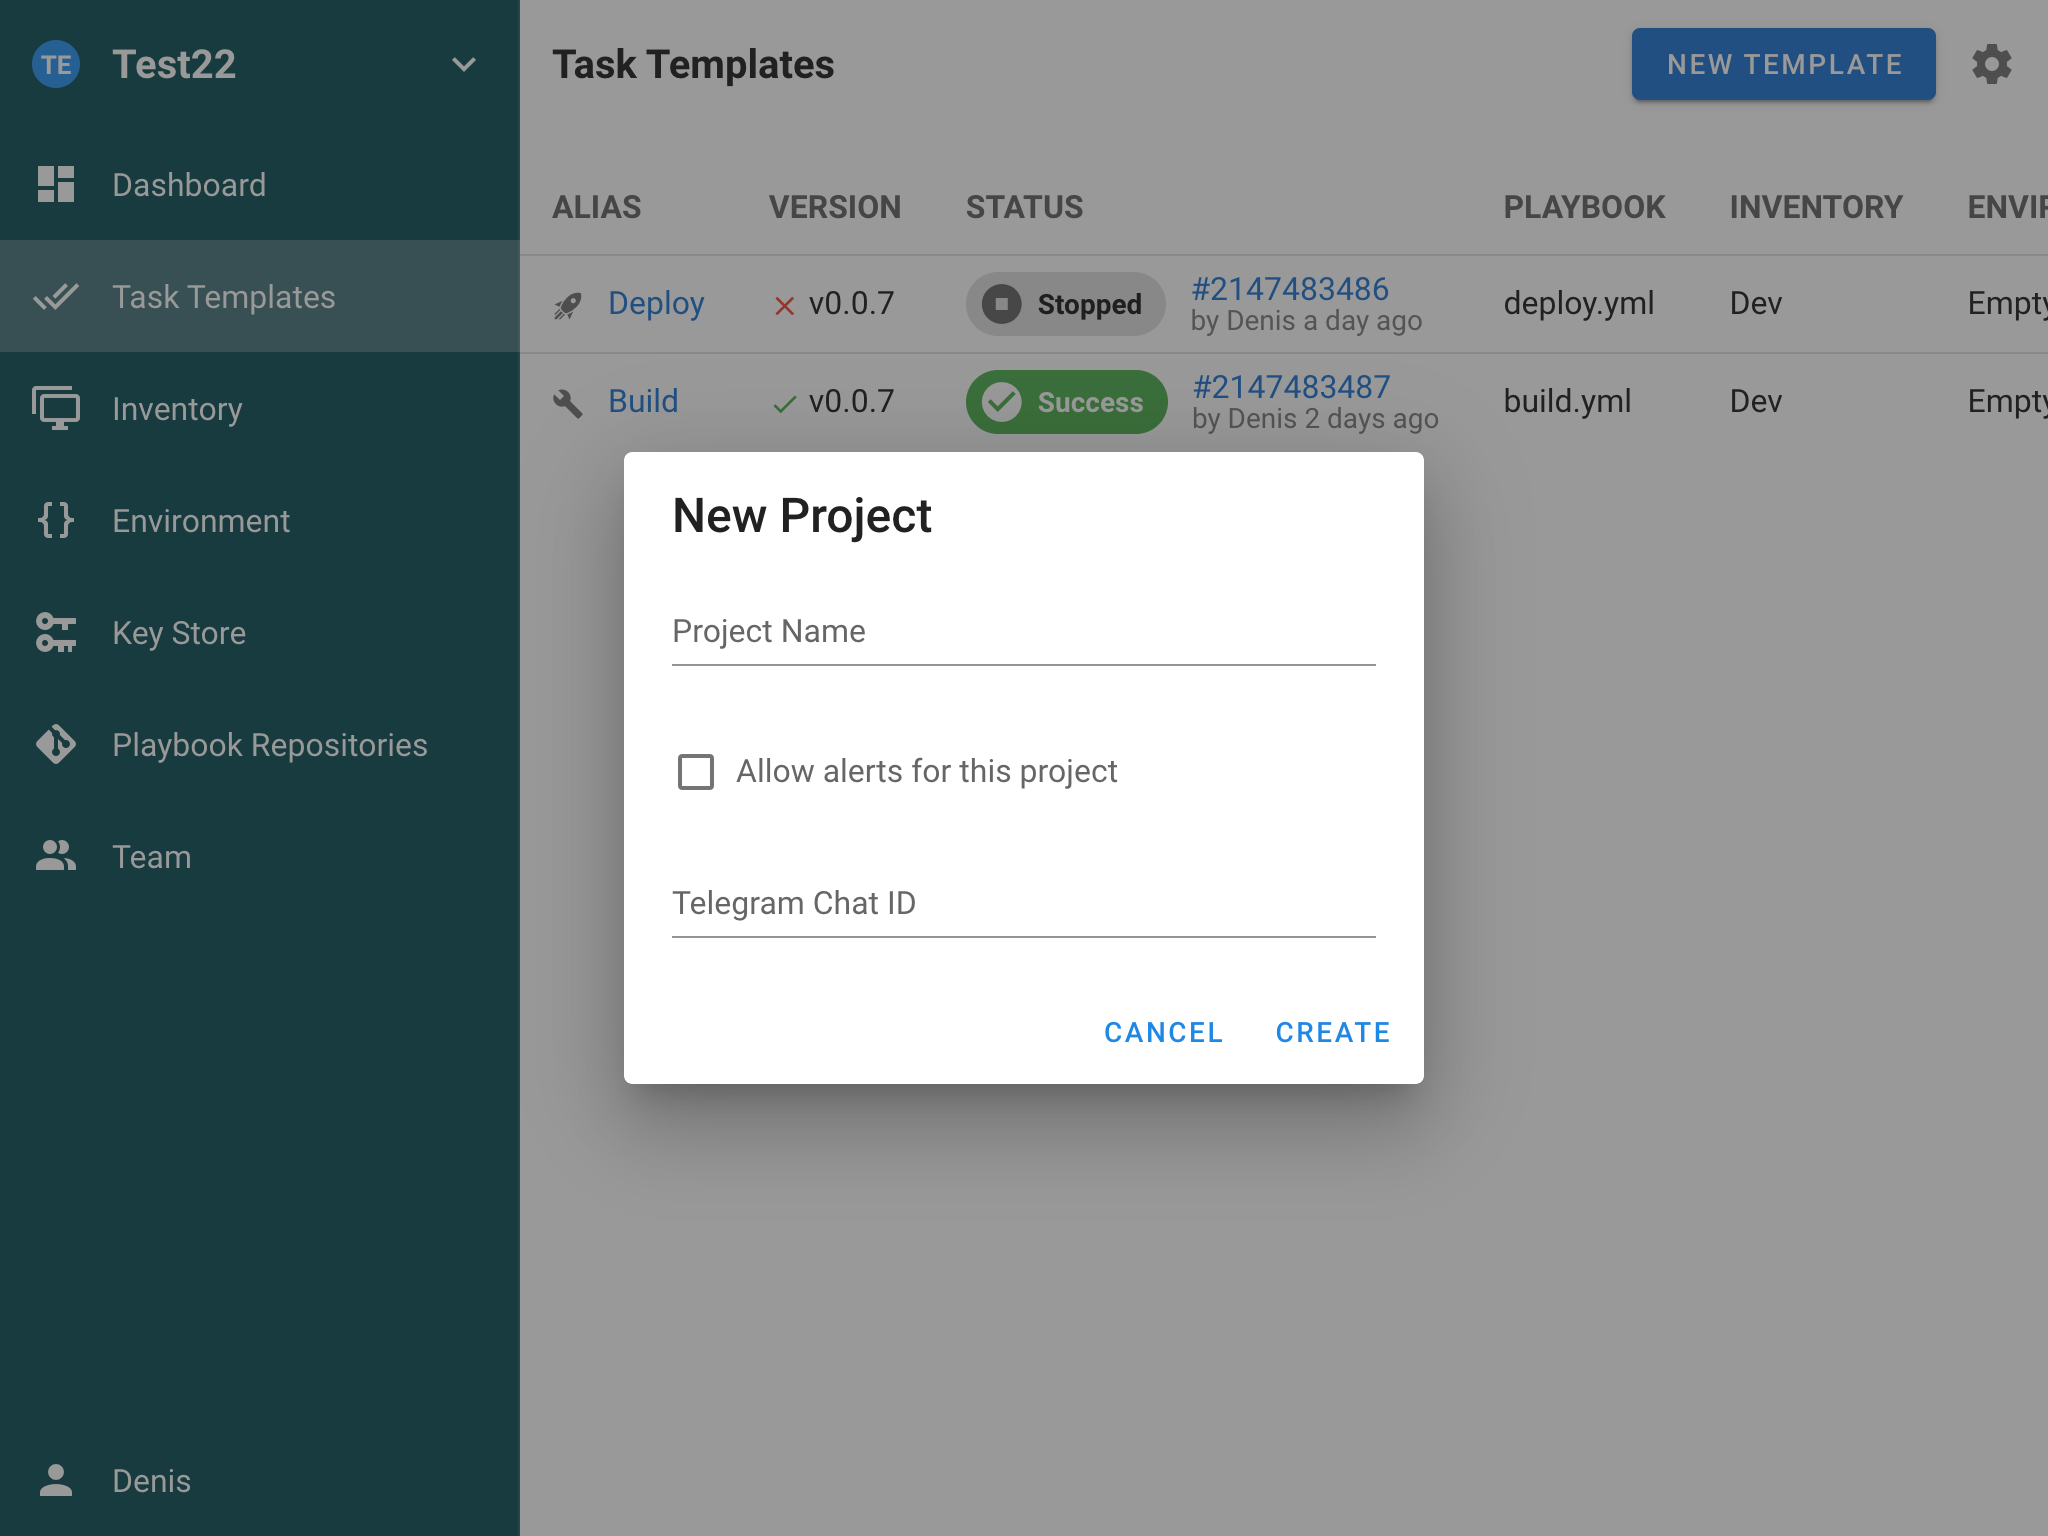
History
The History screen in Semaphore provides a comprehensive view of all task executions within your project. This feature allows you to track, analyze the execution history of your tasks, providing valuable insights into your automation workflows.
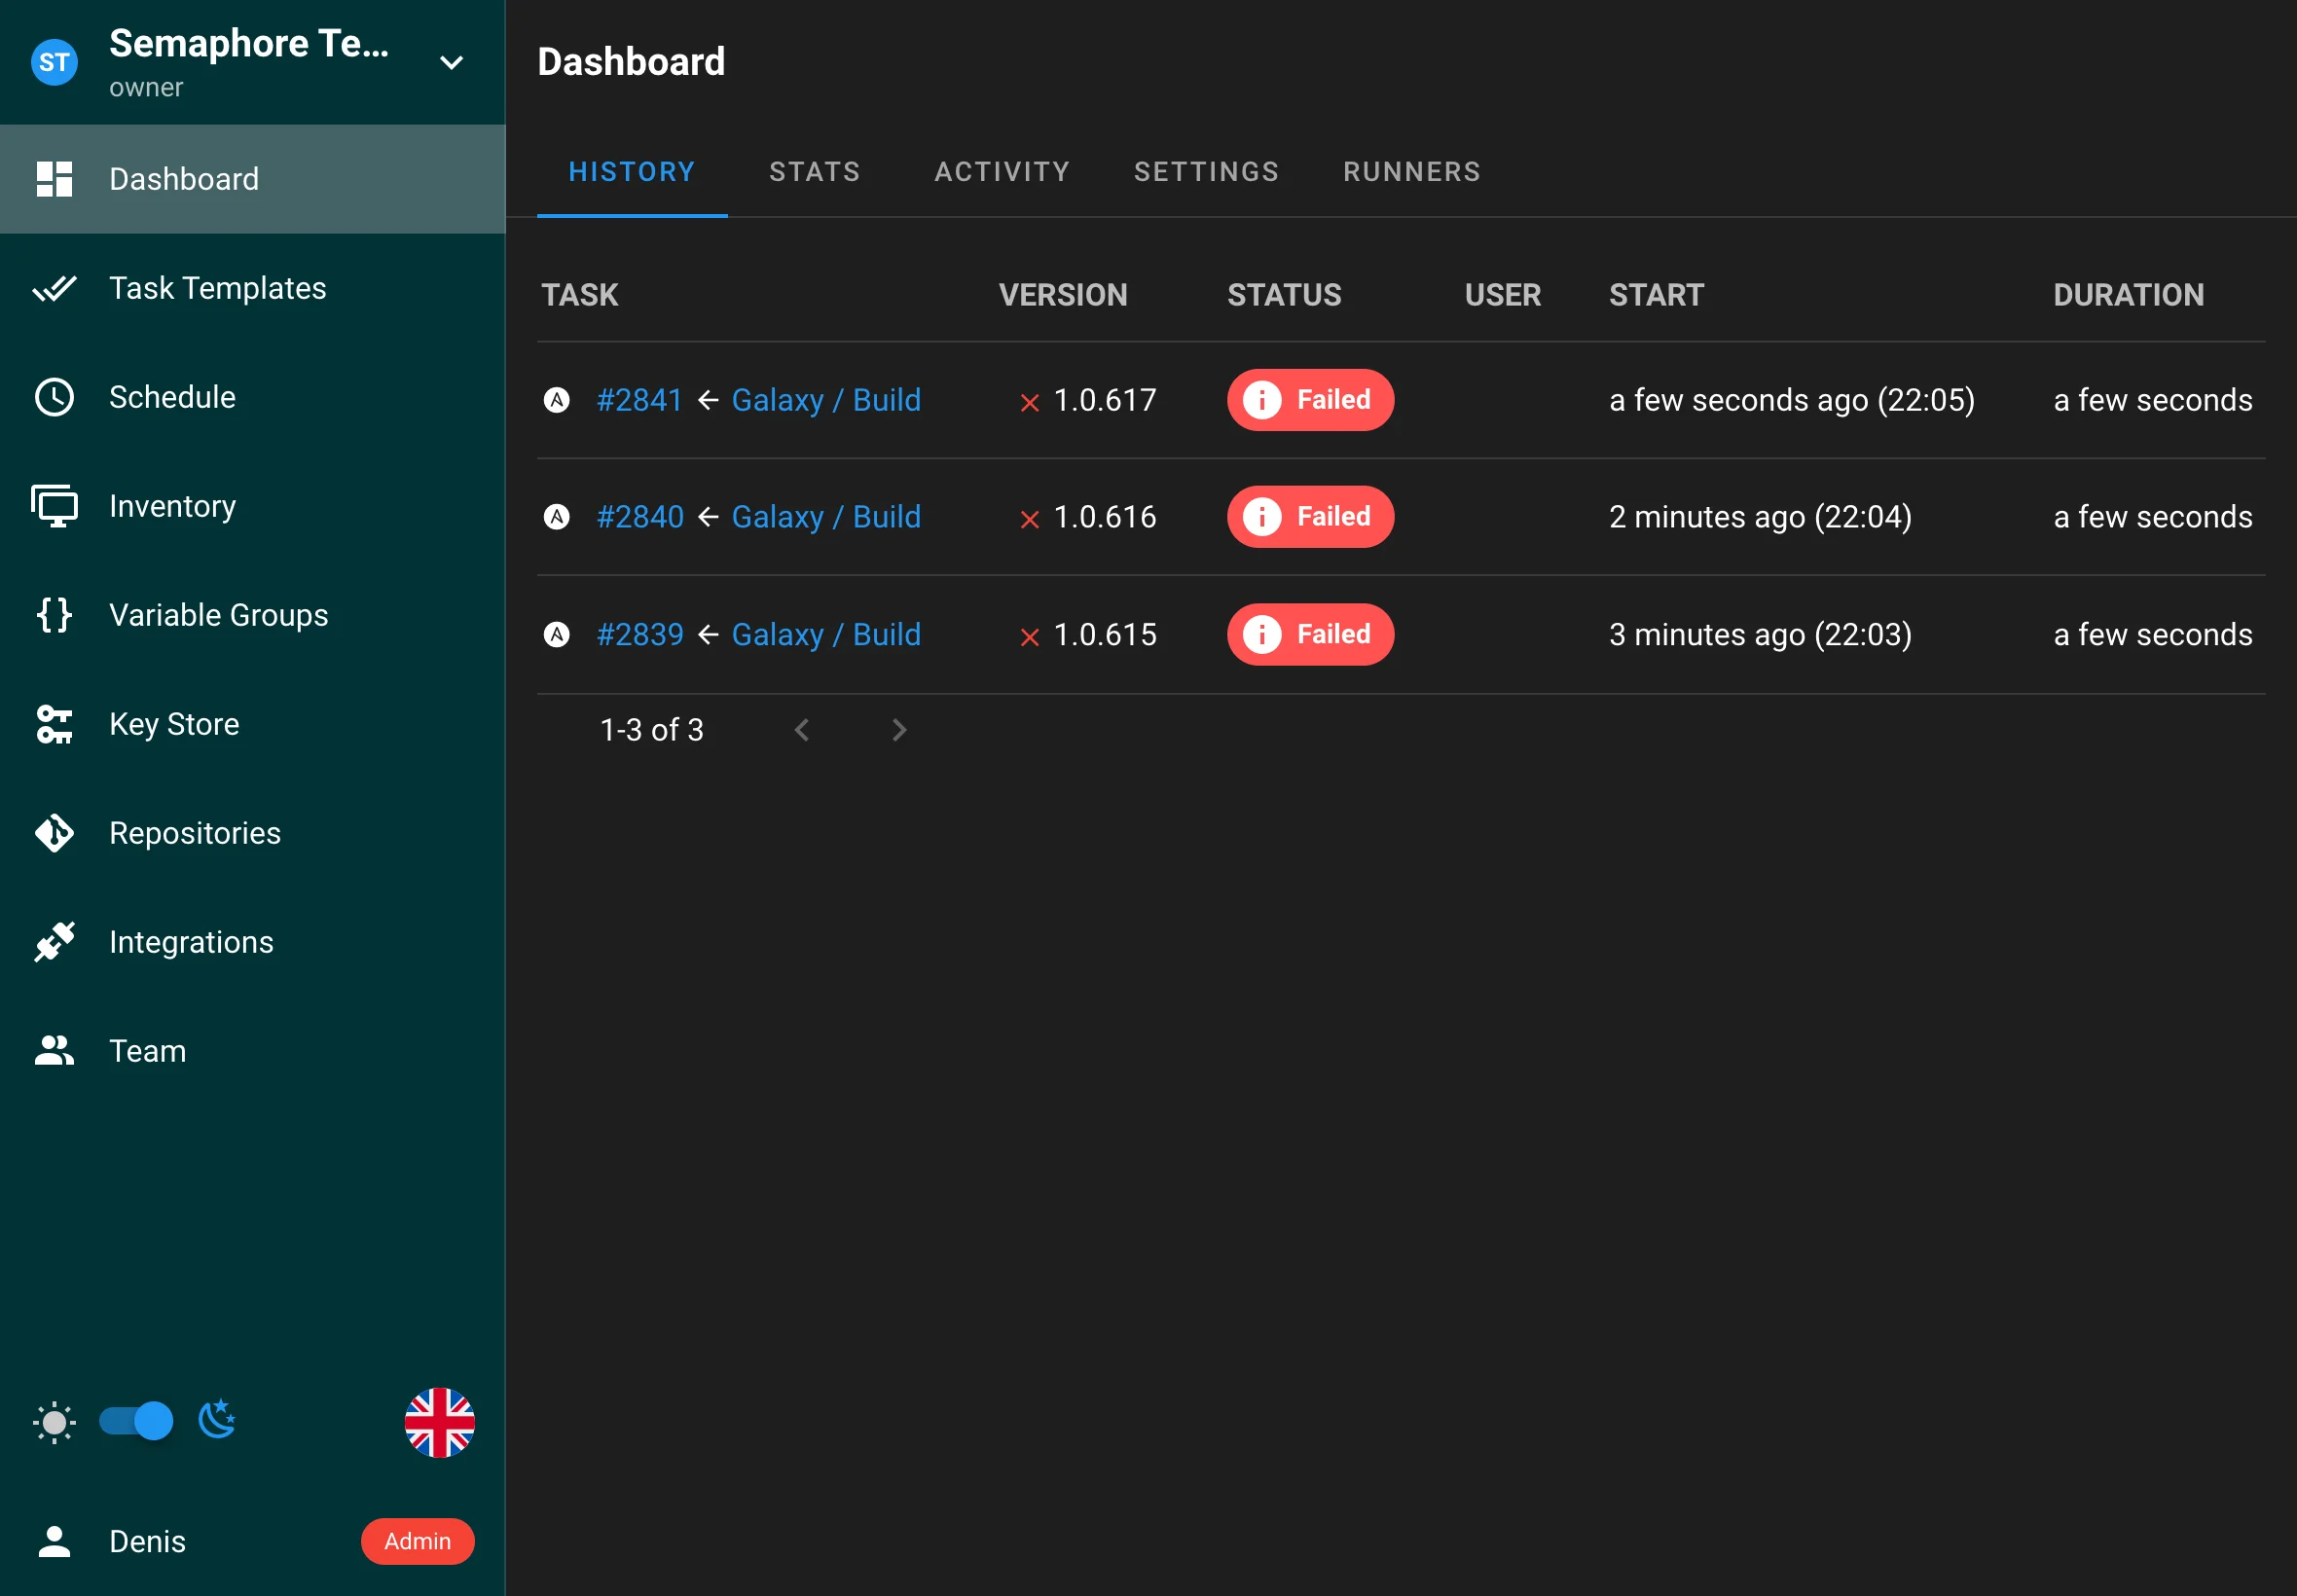
Overview
The History page displays a chronological list of all task executions, including:
- Task templates used
- Execution status (success, failure, in progress)
- Start and end times
- Duration
- User who initiated the task
- Task output and logs
Viewing Task History
Accessing History
- Navigate to your project in Semaphore
- Click on "History" tab
- View the list of all task executions
Task Details
Clicking on any task in the history list opens a detailed view showing:
-
Task Information
- Task ID
- Template used
- Start and end times
- Duration
- Status
- User who ran the task
-
Execution Details
- Complete task output
- Error messages (if any)
- Environment variables used
- Inventory information
- Repository details
-
Task Logs
- Real-time log viewing
- Log download option
- Log search functionality
- Error highlighting
Statistics
The project provides a statistics page summarizing task outcomes over a selected time range, with filtering by user.
Task Management
Actions Available
From the history view, you can:
- Access complete task logs
- Download task output
- Search within logs
Task Retention
Semaphore allows you to configure how long task history is retained:
-
Default Behavior
- All tasks are stored in the database
- No automatic deletion by default
-
Configuring Retention
- Set maximum tasks per template
- Configure via environment variable:
SEMAPHORE_MAX_TASKS_PER_TEMPLATE=30 - Or via config.json:
{
  "max_tasks_per_template": 30
}
-
Retention Rules
- When the limit is reached, oldest tasks are automatically deleted
- Deletion is per template
- Task logs are removed along with task records
Activity
The Activity page provides a comprehensive audit trail of all actions and events that occur within your project. This feature tracks user activities, system events giving you complete visibility into what's happening in your project.
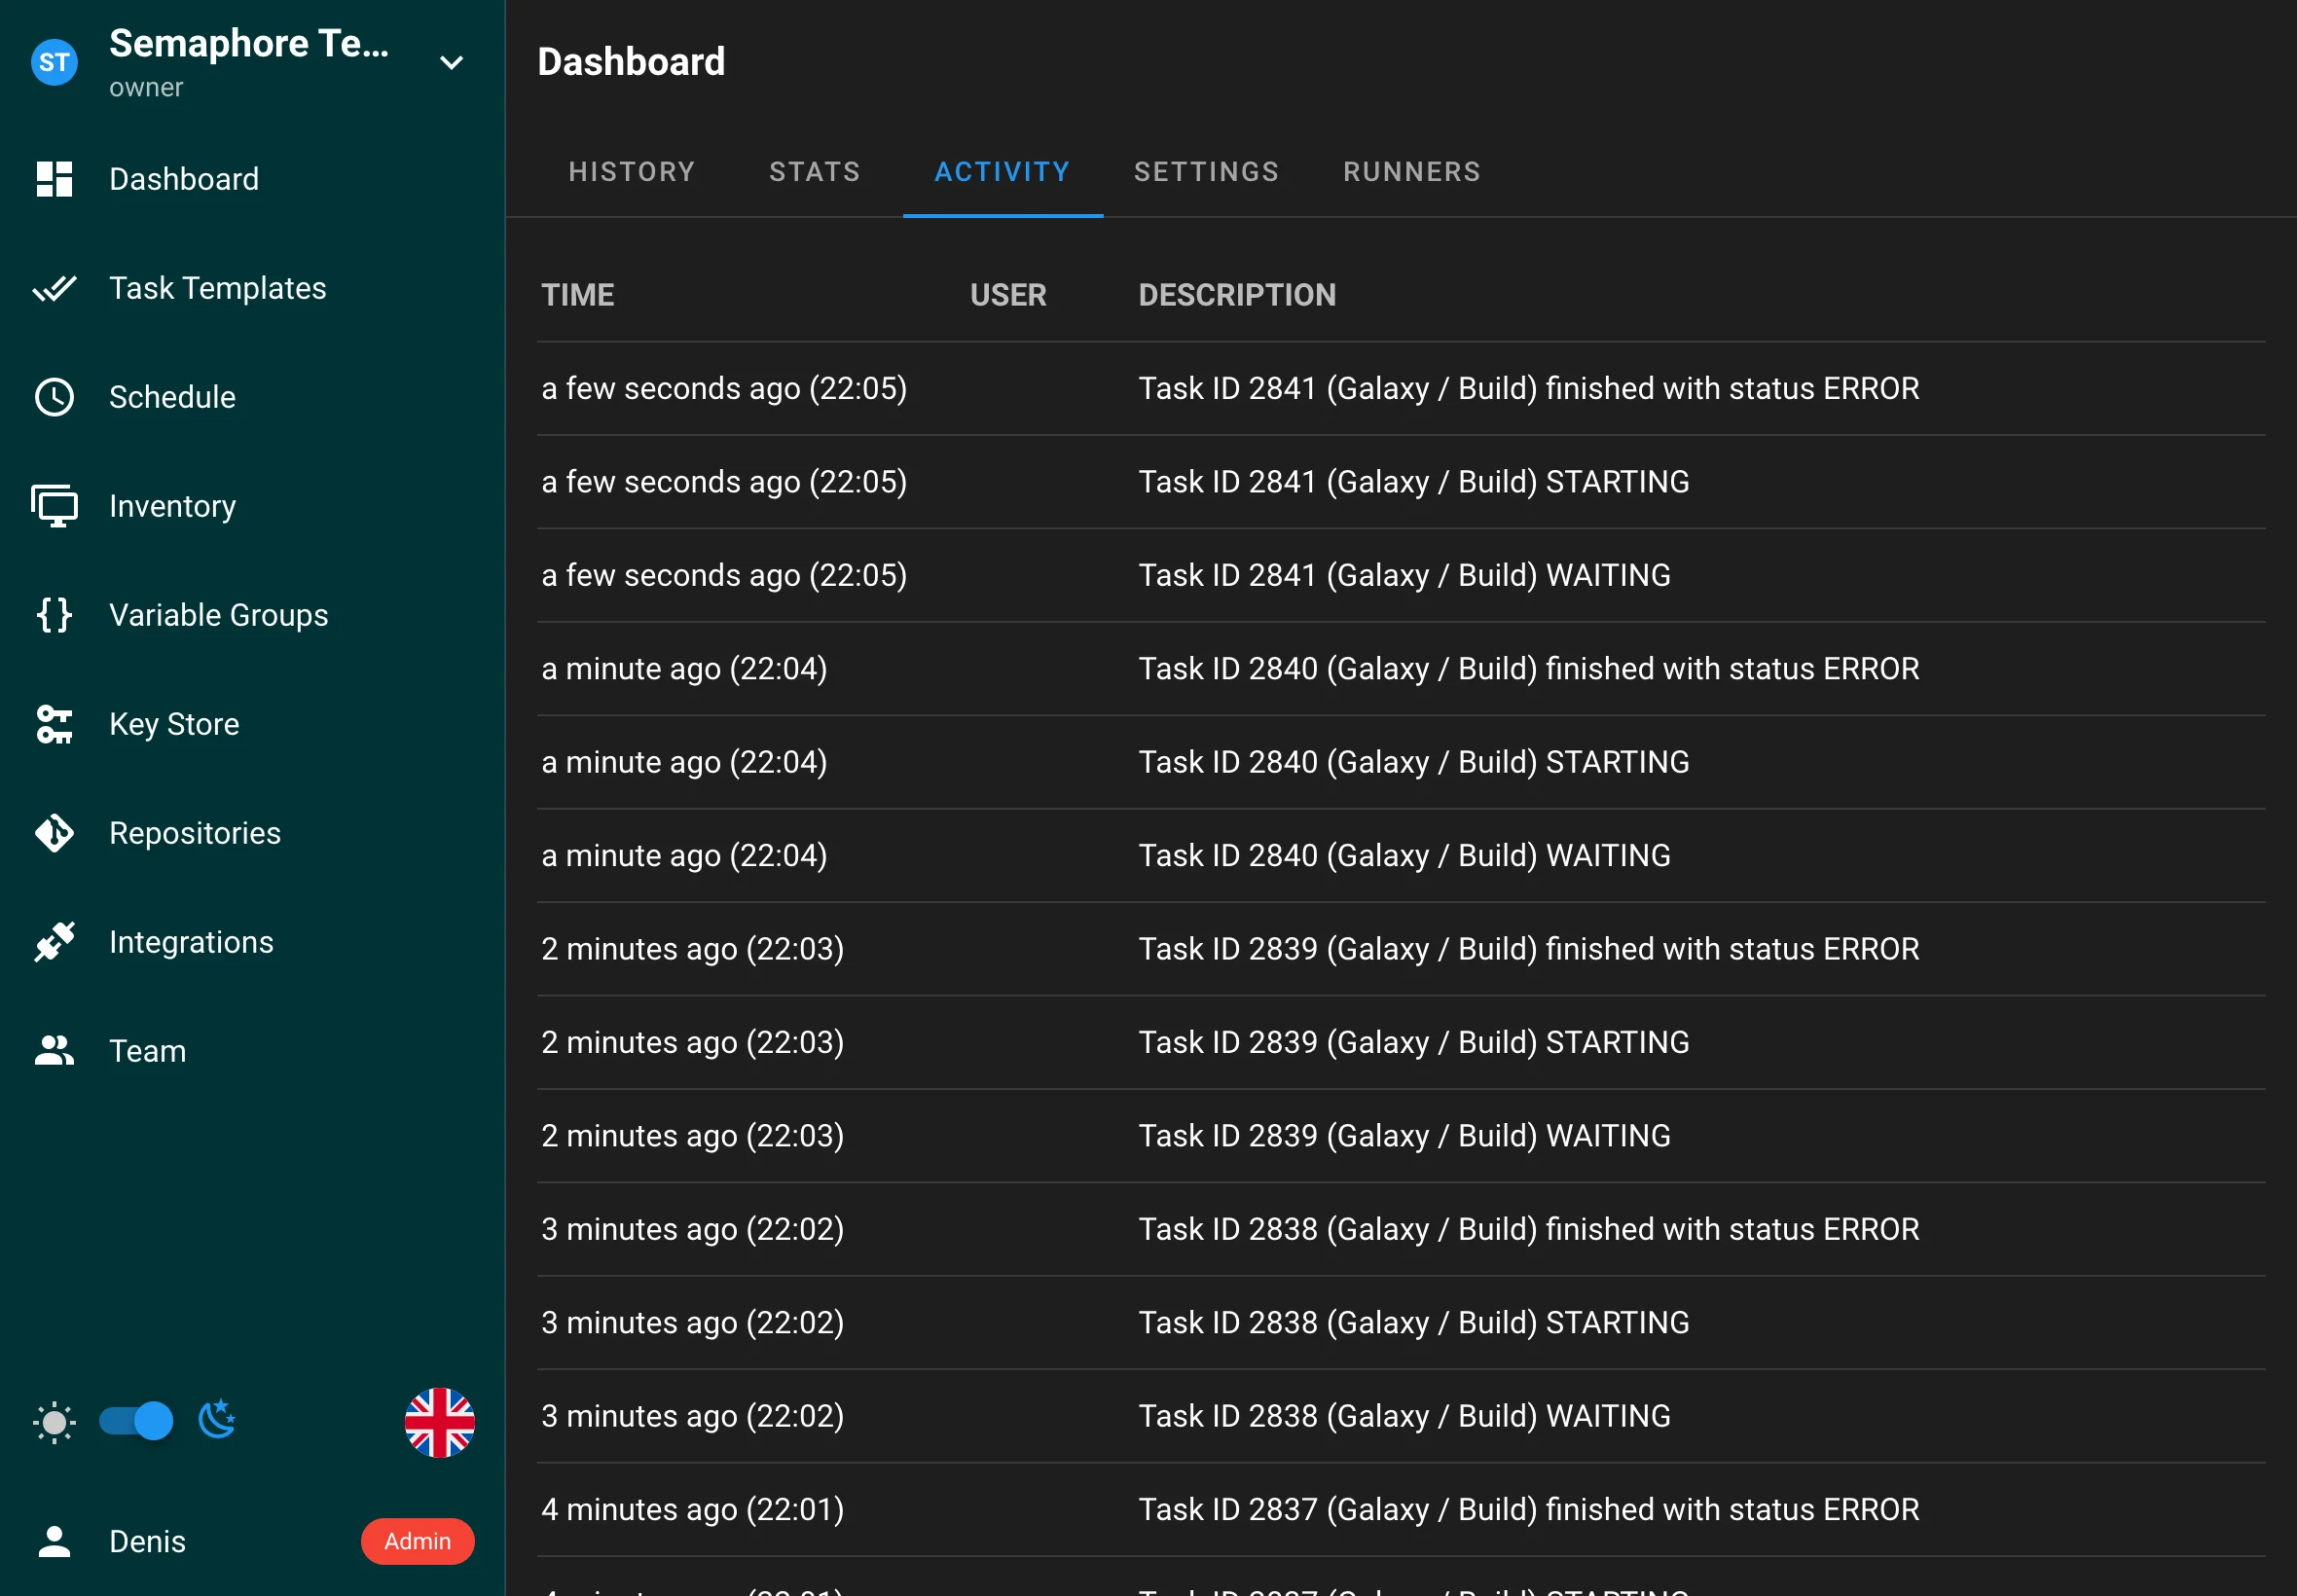
Overview
The Activity page displays a chronological feed of all project activities, including:
- User actions (creating, editing, deleting resources)
- System events and notifications
- Access and permission changes
Settings
The Settings page allows you to configure various aspects of your project, including notifications, and project-specific settings. This page is accessible to project administrators and provides centralized management of project configuration.
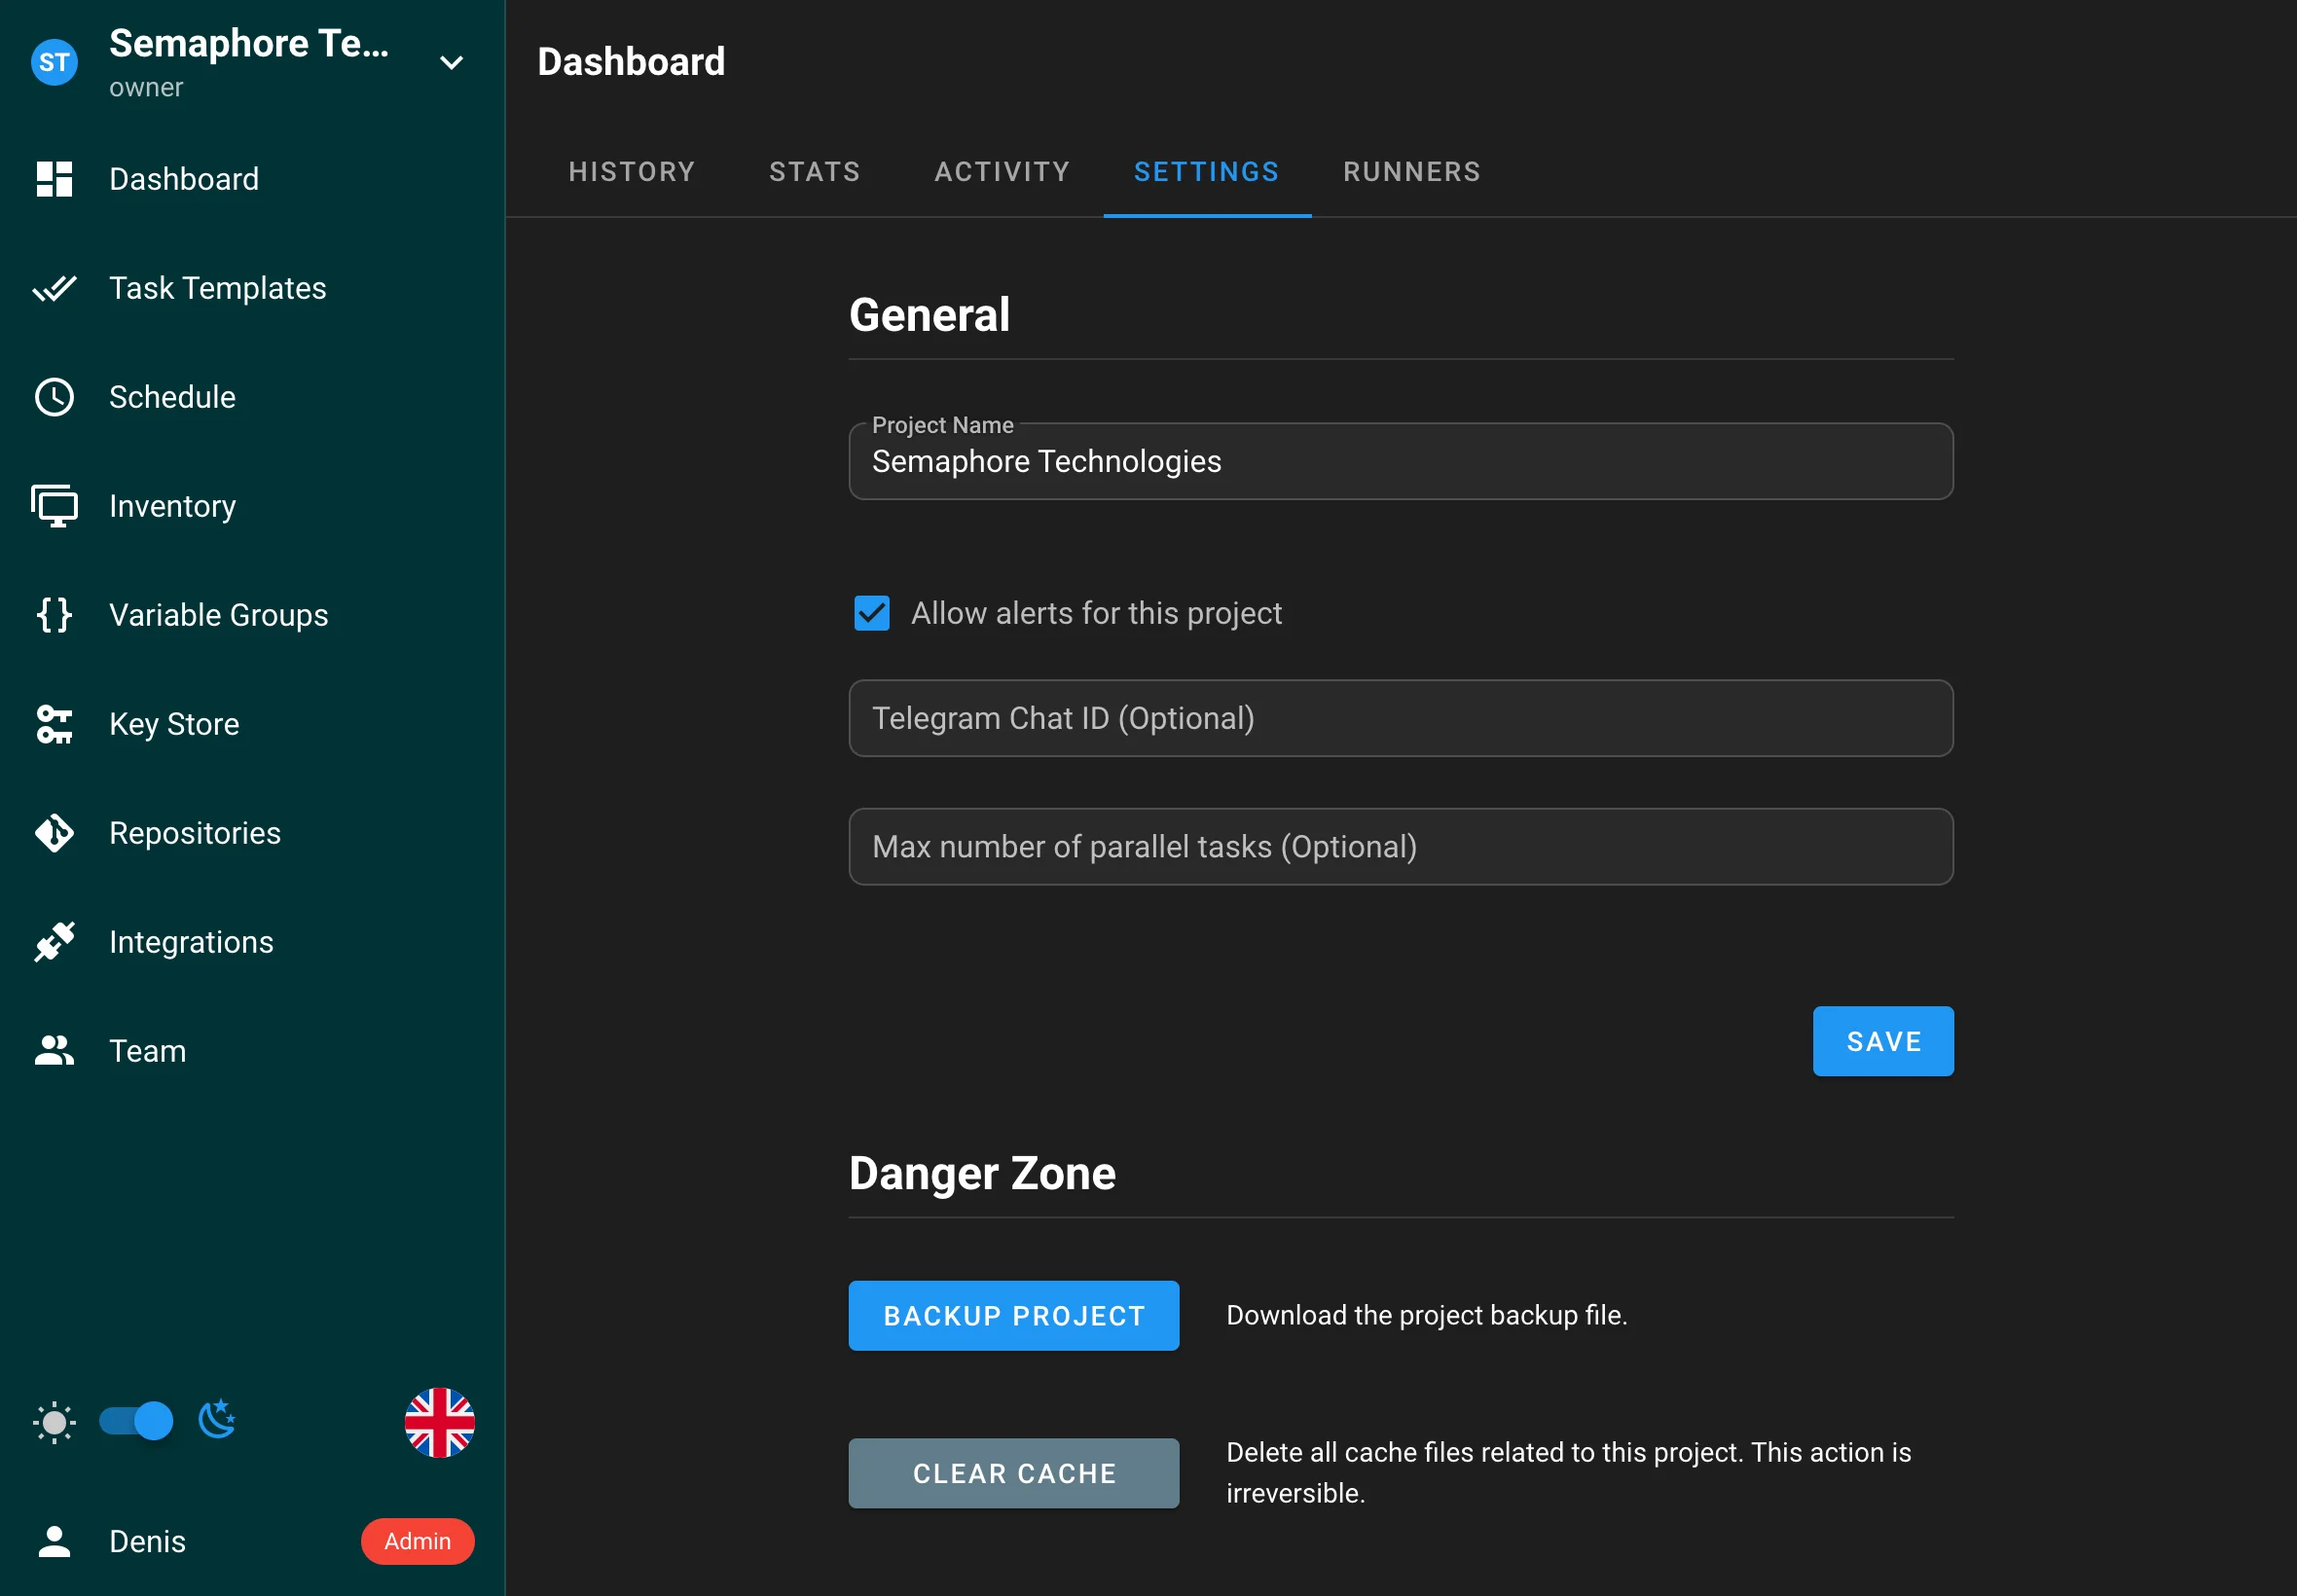
Runners (Pro)
Project runners can be attached to a project. You can also require a specific runner by tag in a template:
- In
Project → Runners, add a runner and specify a tag. - In
Project → Templates → <your template>, set the required runner tag.
This ensures the task is executed on a runner matching the tag.
Project runners (Pro)
Project Runners are a powerful feature in Semaphore Pro that enables distributed task execution across multiple servers. This feature allows you to run tasks on separate servers from your Semaphore UI instance, providing enhanced security, scalability, and resource management.
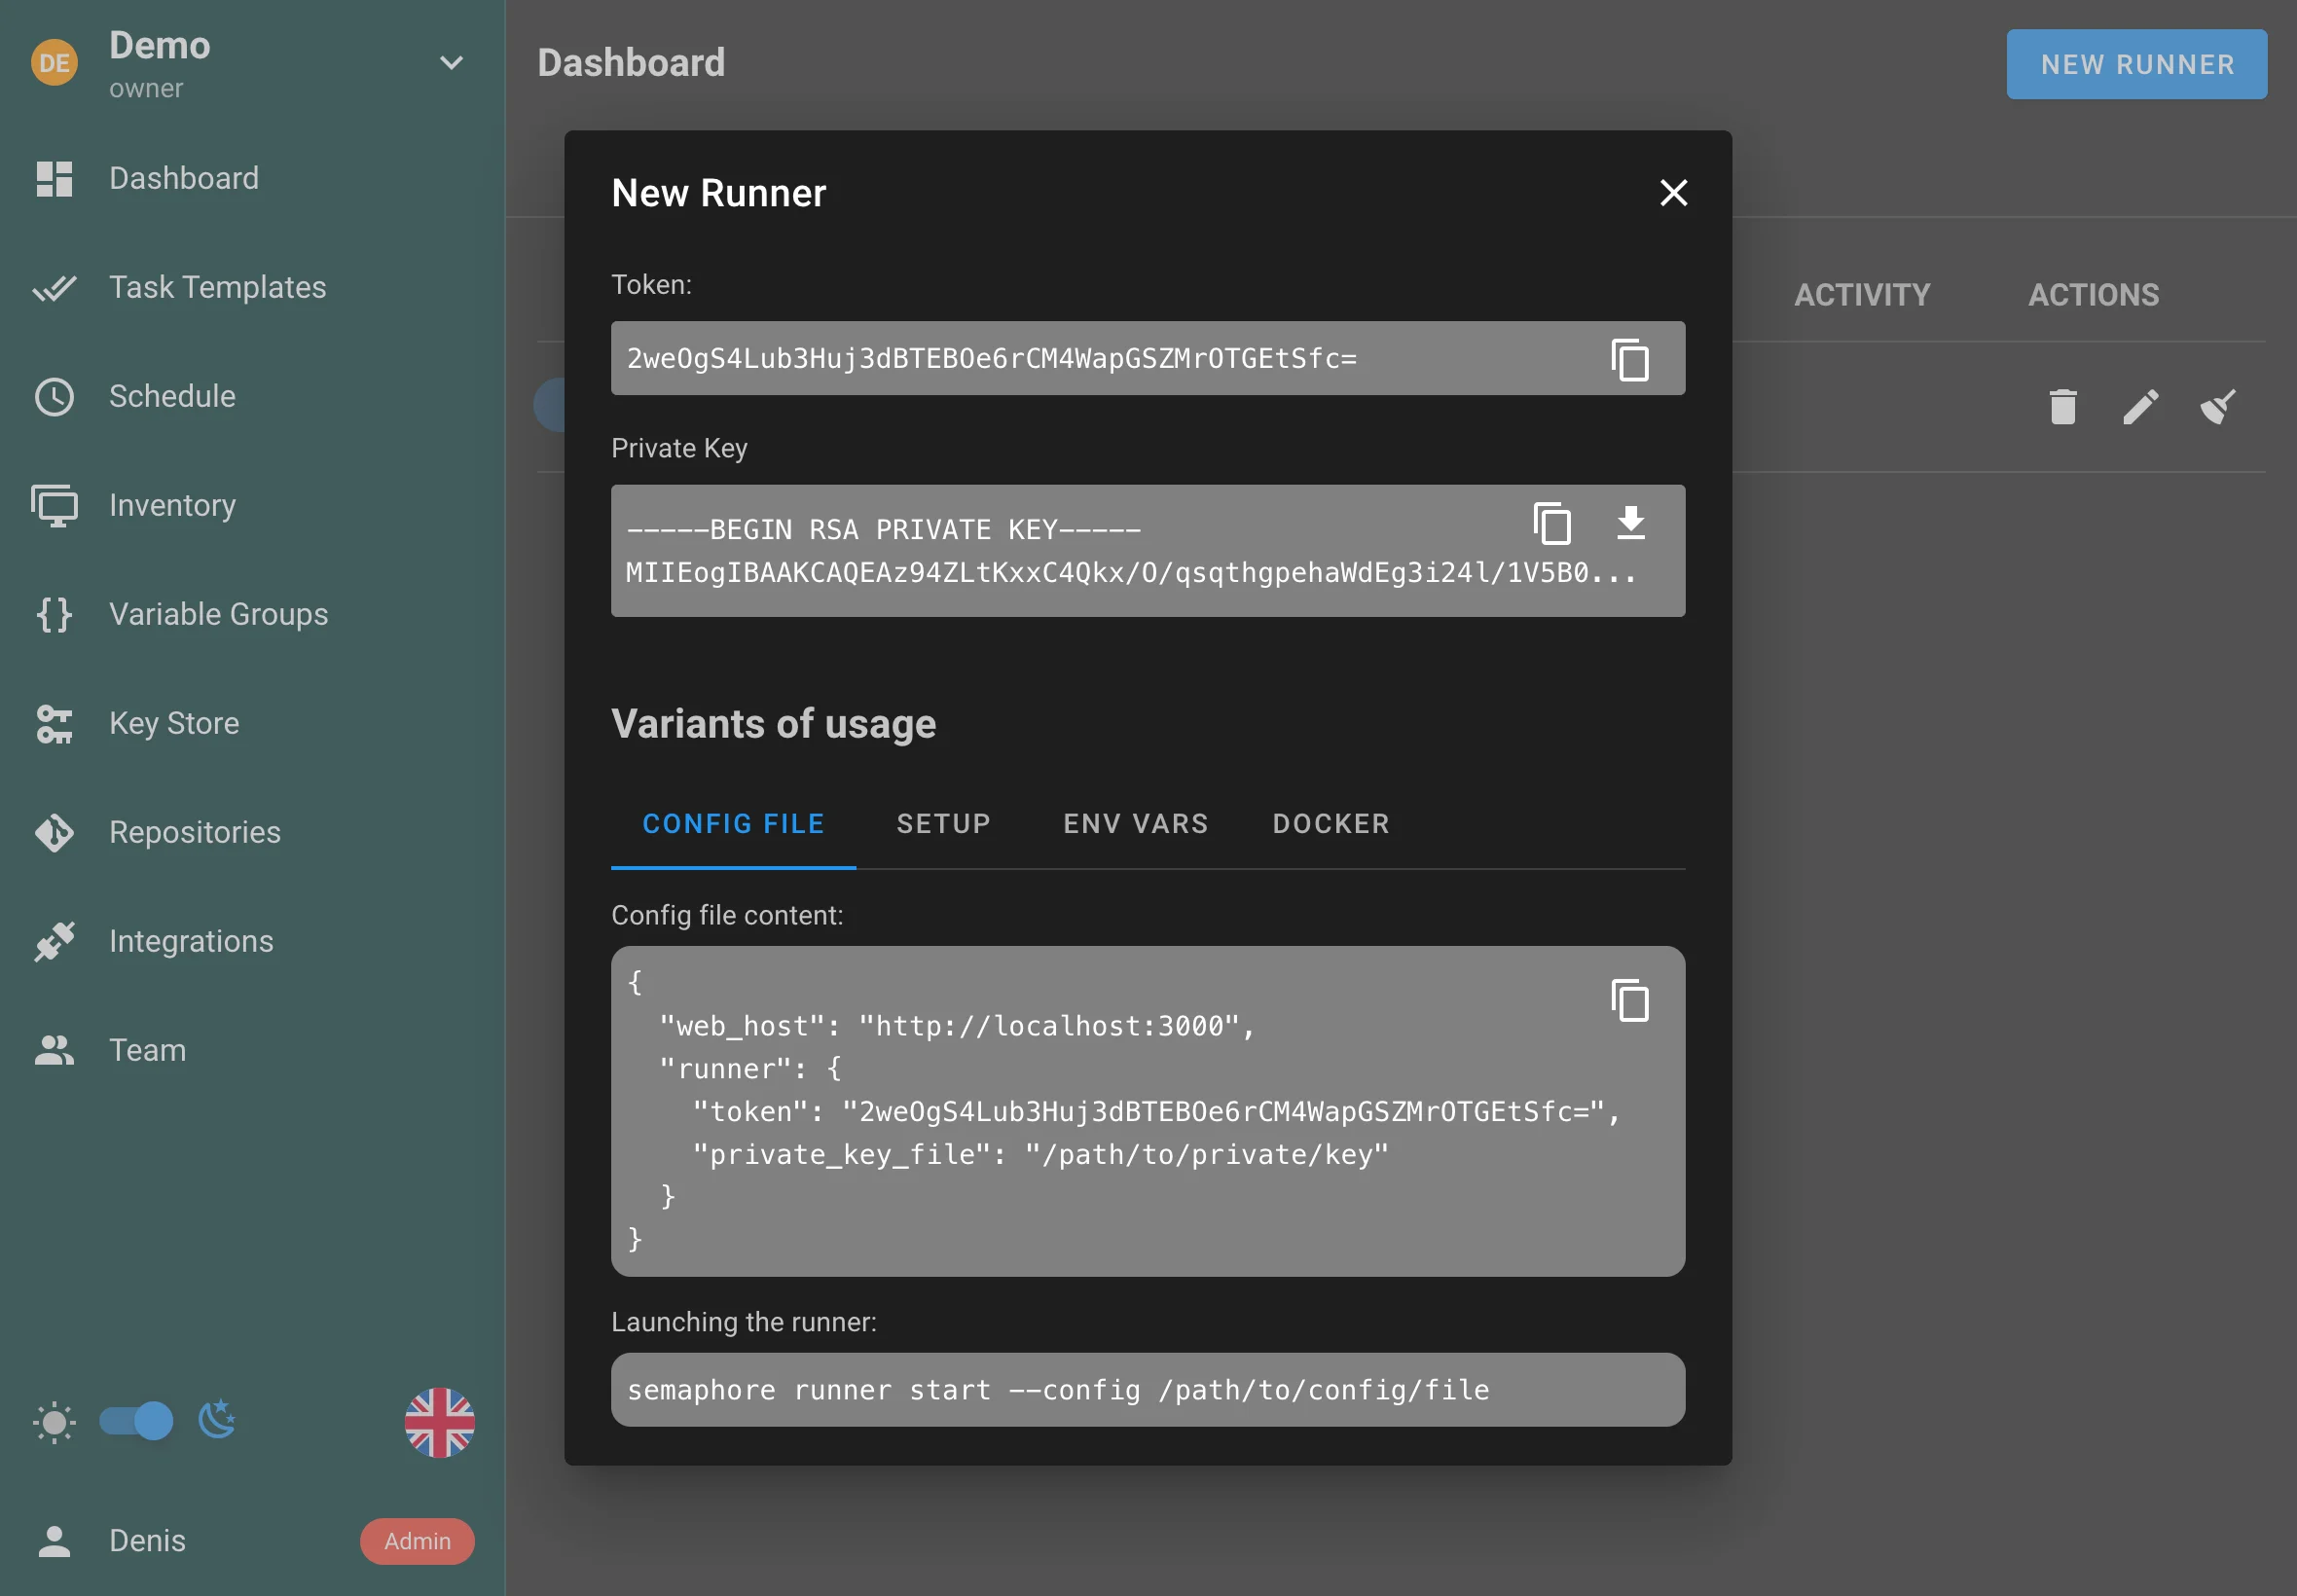
Overview
Project runners operate on a similar principle to GitLab or GitHub Actions runners:
- A runner is deployed on a separate server from your Semaphore UI
- The runner connects to your Semaphore instance using a secure token
- When tasks are created, Semaphore delegates them to available runners
- Runners execute the tasks and report results back to Semaphore
Benefits
Using runners provides several key advantages:
-
Enhanced Security
- Runners can be deployed in isolated environments or restricted networks
- Sensitive operations can be executed in controlled environments
- Better separation of concerns between UI and execution environments
-
Improved Scalability
- Distribute workload across multiple servers
- Add or remove runners based on demand
- Better resource utilization across your infrastructure
-
Flexible Deployment
- Deploy runners close to your target infrastructure
- Run tasks in different network zones
- Support for various deployment models (on-premises, cloud, hybrid)
Using Project Runners
Prerequisites
To use runners, you need:
- A Semaphore Pro license
- A separate server for running the runner
- Network connectivity between the runner and Semaphore UI
- Proper configuration on both the Semaphore UI and runner servers
Managing Runners
You can manage runners through the Semaphore UI:
- Navigate to the Runners section in your project
- View all registered runners and their status
- Add or remove runners as needed
- Monitor runner health and performance
Security Considerations
- Always use HTTPS for communication between runners and Semaphore UI
- Implement proper network security between runners and Semaphore UI
- Consider using isolated environments for sensitive operations
Best Practices
-
Resource Planning
- Size your runners appropriately for your workload
- Monitor runner resource usage
- Scale runners based on demand
-
Network Configuration
- Ensure proper network connectivity
- Configure firewalls appropriately
- Use secure communication channels
-
Maintenance
- Regularly update runner software
- Monitor runner health
- Implement proper logging and monitoring
- Have a backup strategy for runner failures
-
Security
- Follow the principle of least privilege
- Implement proper access controls
- Regular security audits
- Keep software up to date
Task Templates
Templates define how to run Semaphore tasks. Currently the following task types are supported:
Parallel tasks
By default, tasks from the same template execute sequentially. To allow concurrent runs of the same template, enable the "Allow parallel tasks" option in the template settings.
Ansible
Using Semaphore UI you can run Ansible playbooks. To do this, you need to create an Ansible Playbook Template.
- Go go Task Templates section, click on New Template and then Ansible Playbook.
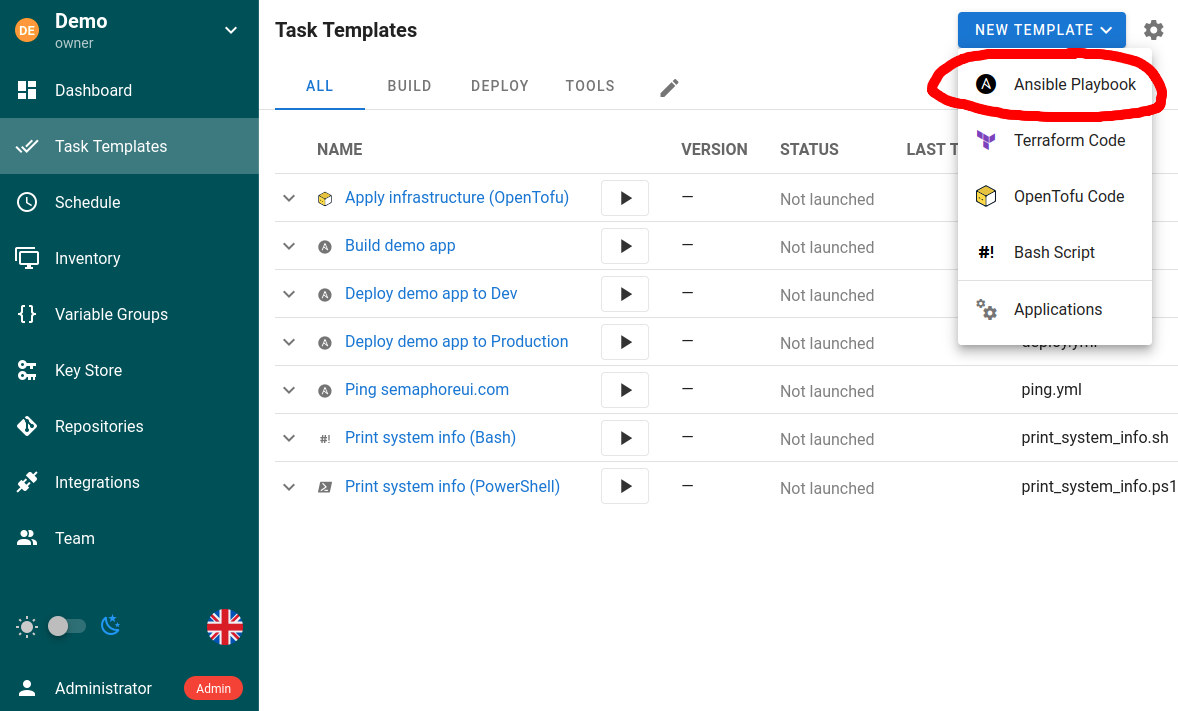
- Set up the template.
The template allows you to specify the following parameters:
- Repository
- Path to playbook file
- Inventory
- Variable Groups
- Vaults
- and much more
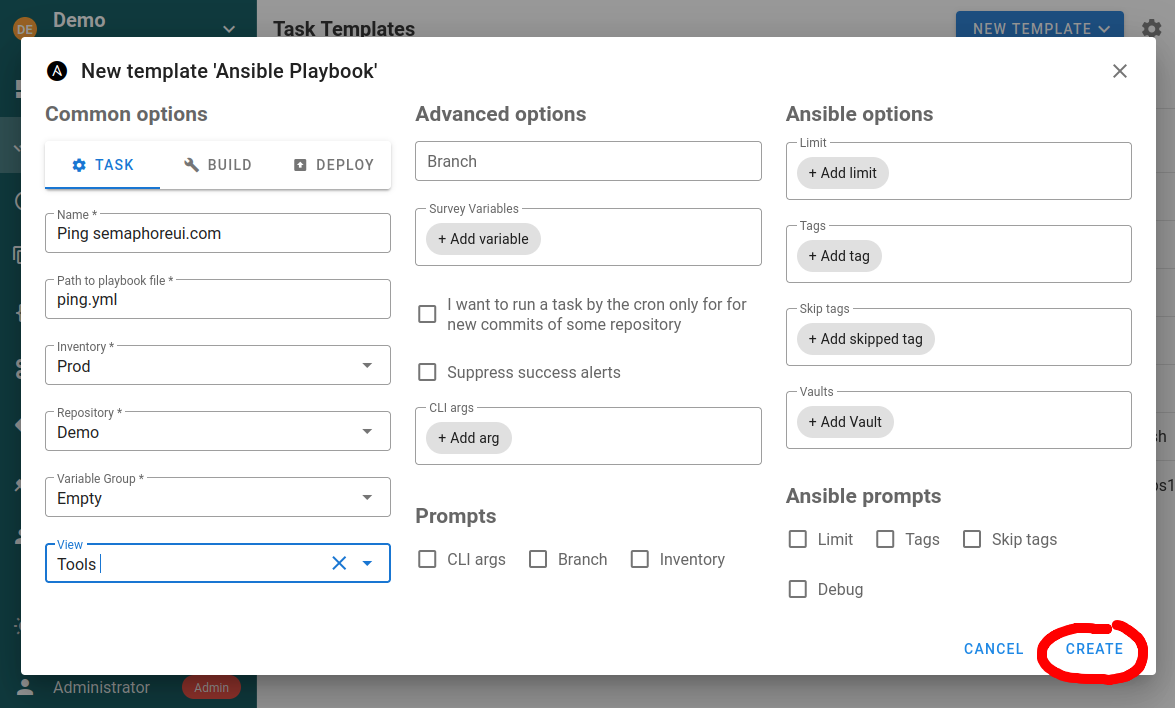
An ansible-playbook template can be one of the following types:
Task
Just runs specified playbooks with specified parameters.
If you intend to launch the template with an API call with the limit feature, make sure to activate the option Ansible prompts: Limit. Otherwise the limit set in the API call will be ignored. For the API triggered task, this will not cause any interactive prompt, the task will run unattended.
Build
This type of template should be used to create artifacts. The start version of the artifact can be specified in a template parameter. Each run increments the artifact version.
.png)
Semaphore doesn't support artifacts out-of-box, it only provides task versioning. You should implement the artifact creation yourself. Read the article CI/CD to know how to do this.
Deploy
This type of template should be used to deploy artifacts to the destination servers. Each deploy template is associated with a build template.
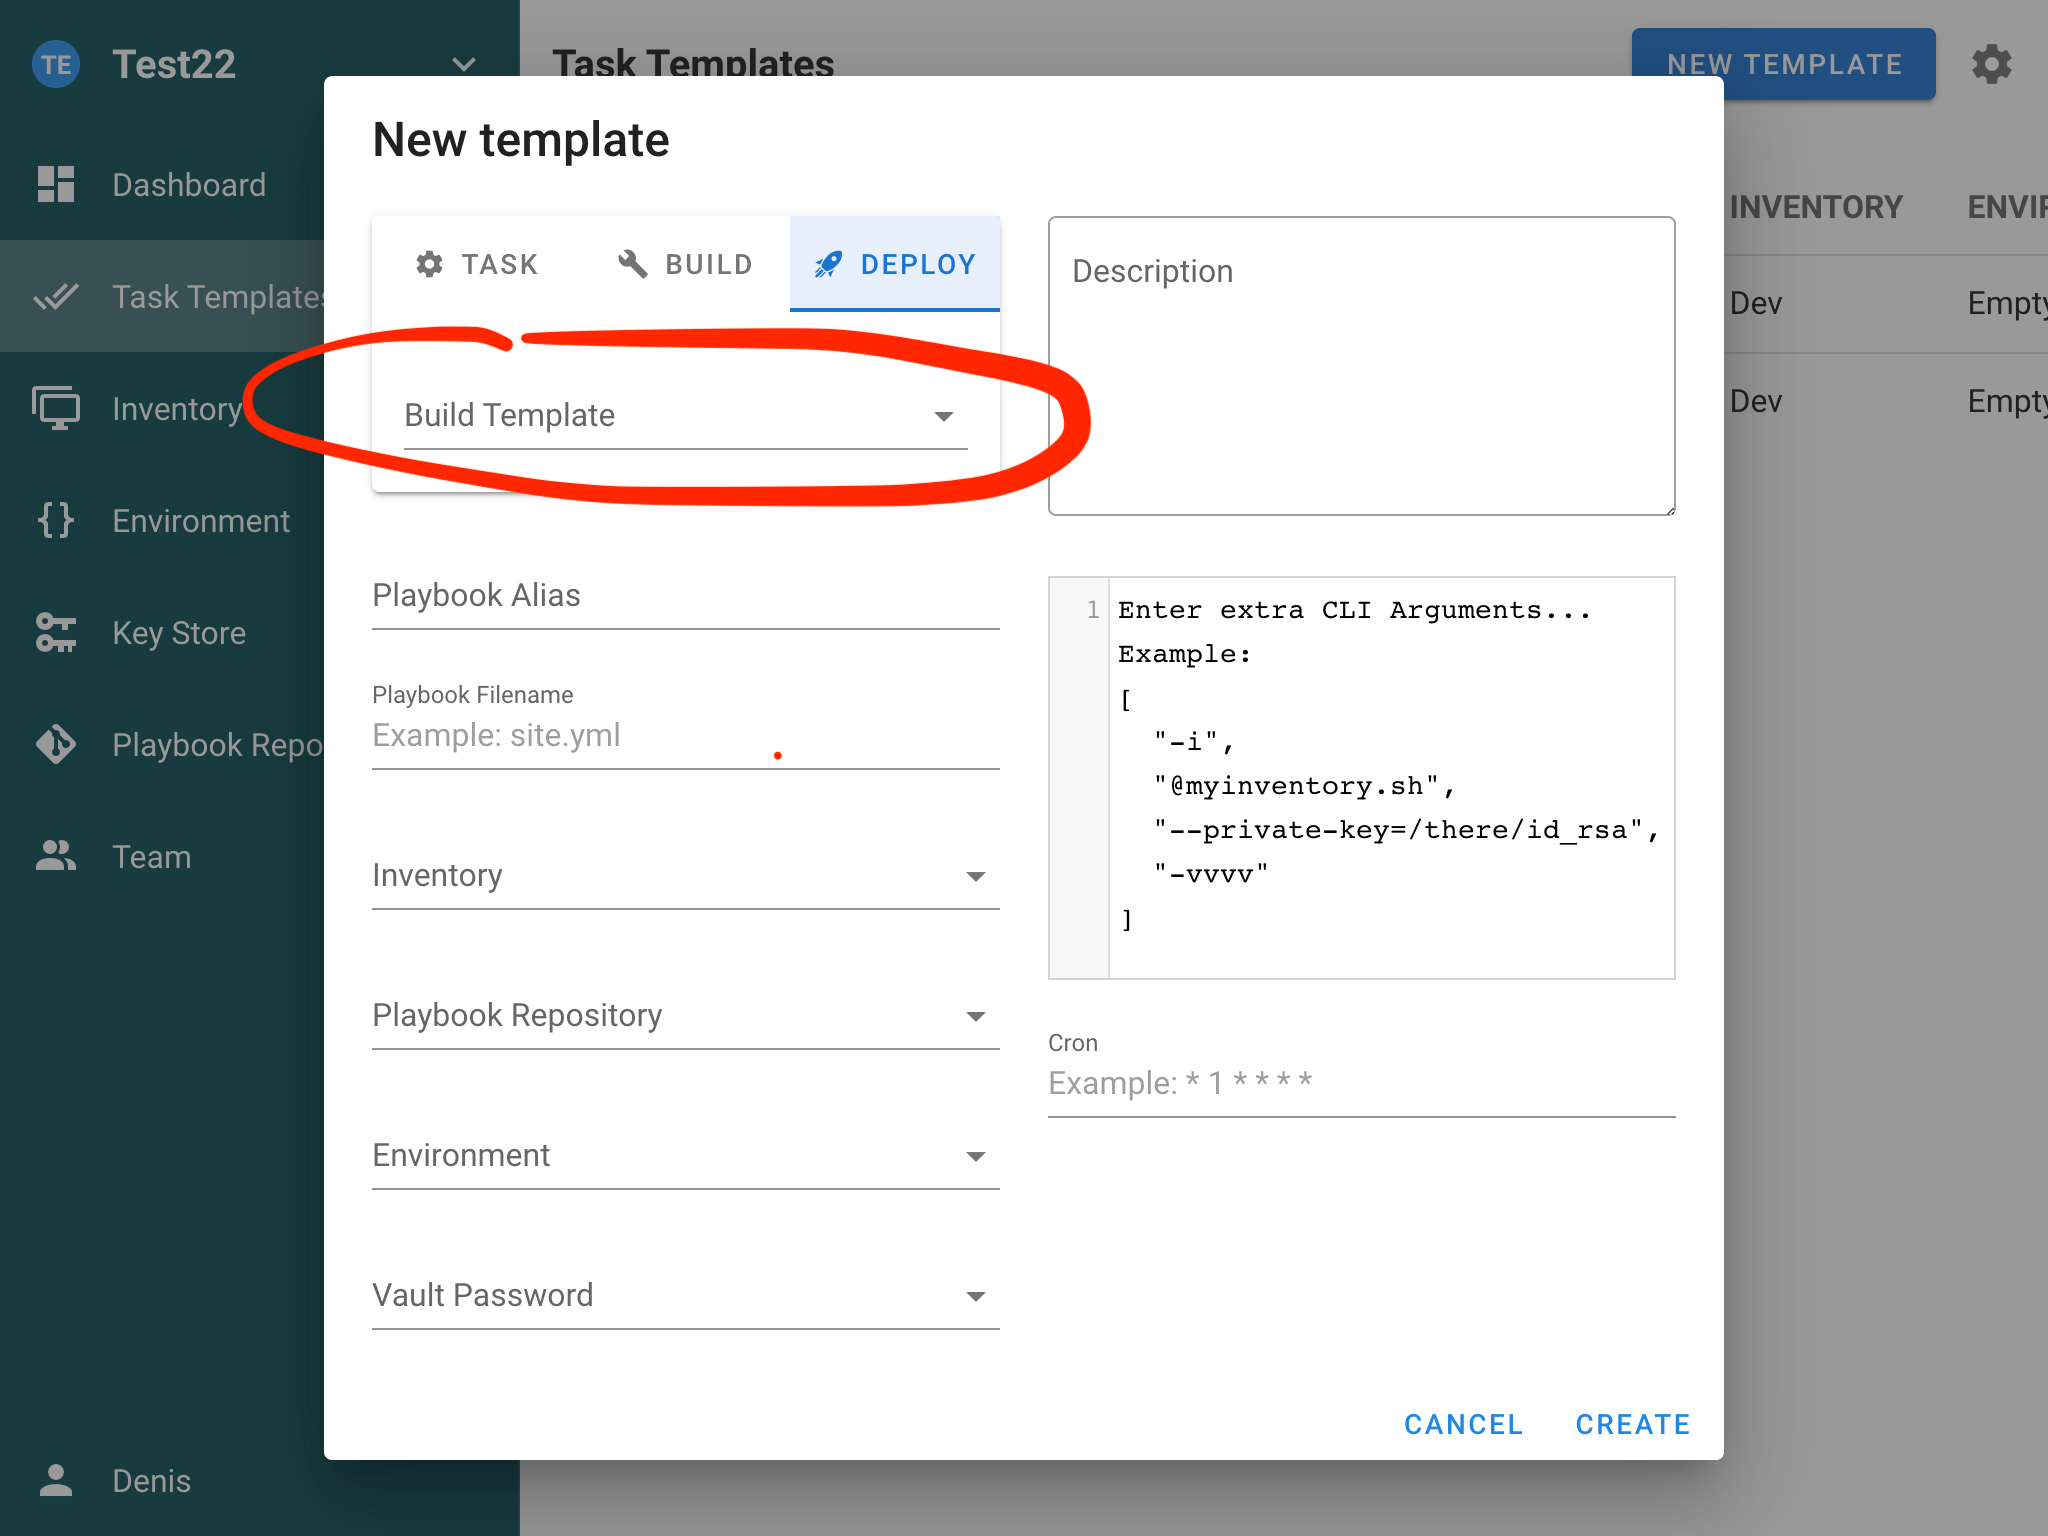
This allows you to deploy a specific version of the artifact to the servers.
Schedule
You can set up task scheduling by specifying a cron schedule in the template settings. Cron expression format you can find in documentation.
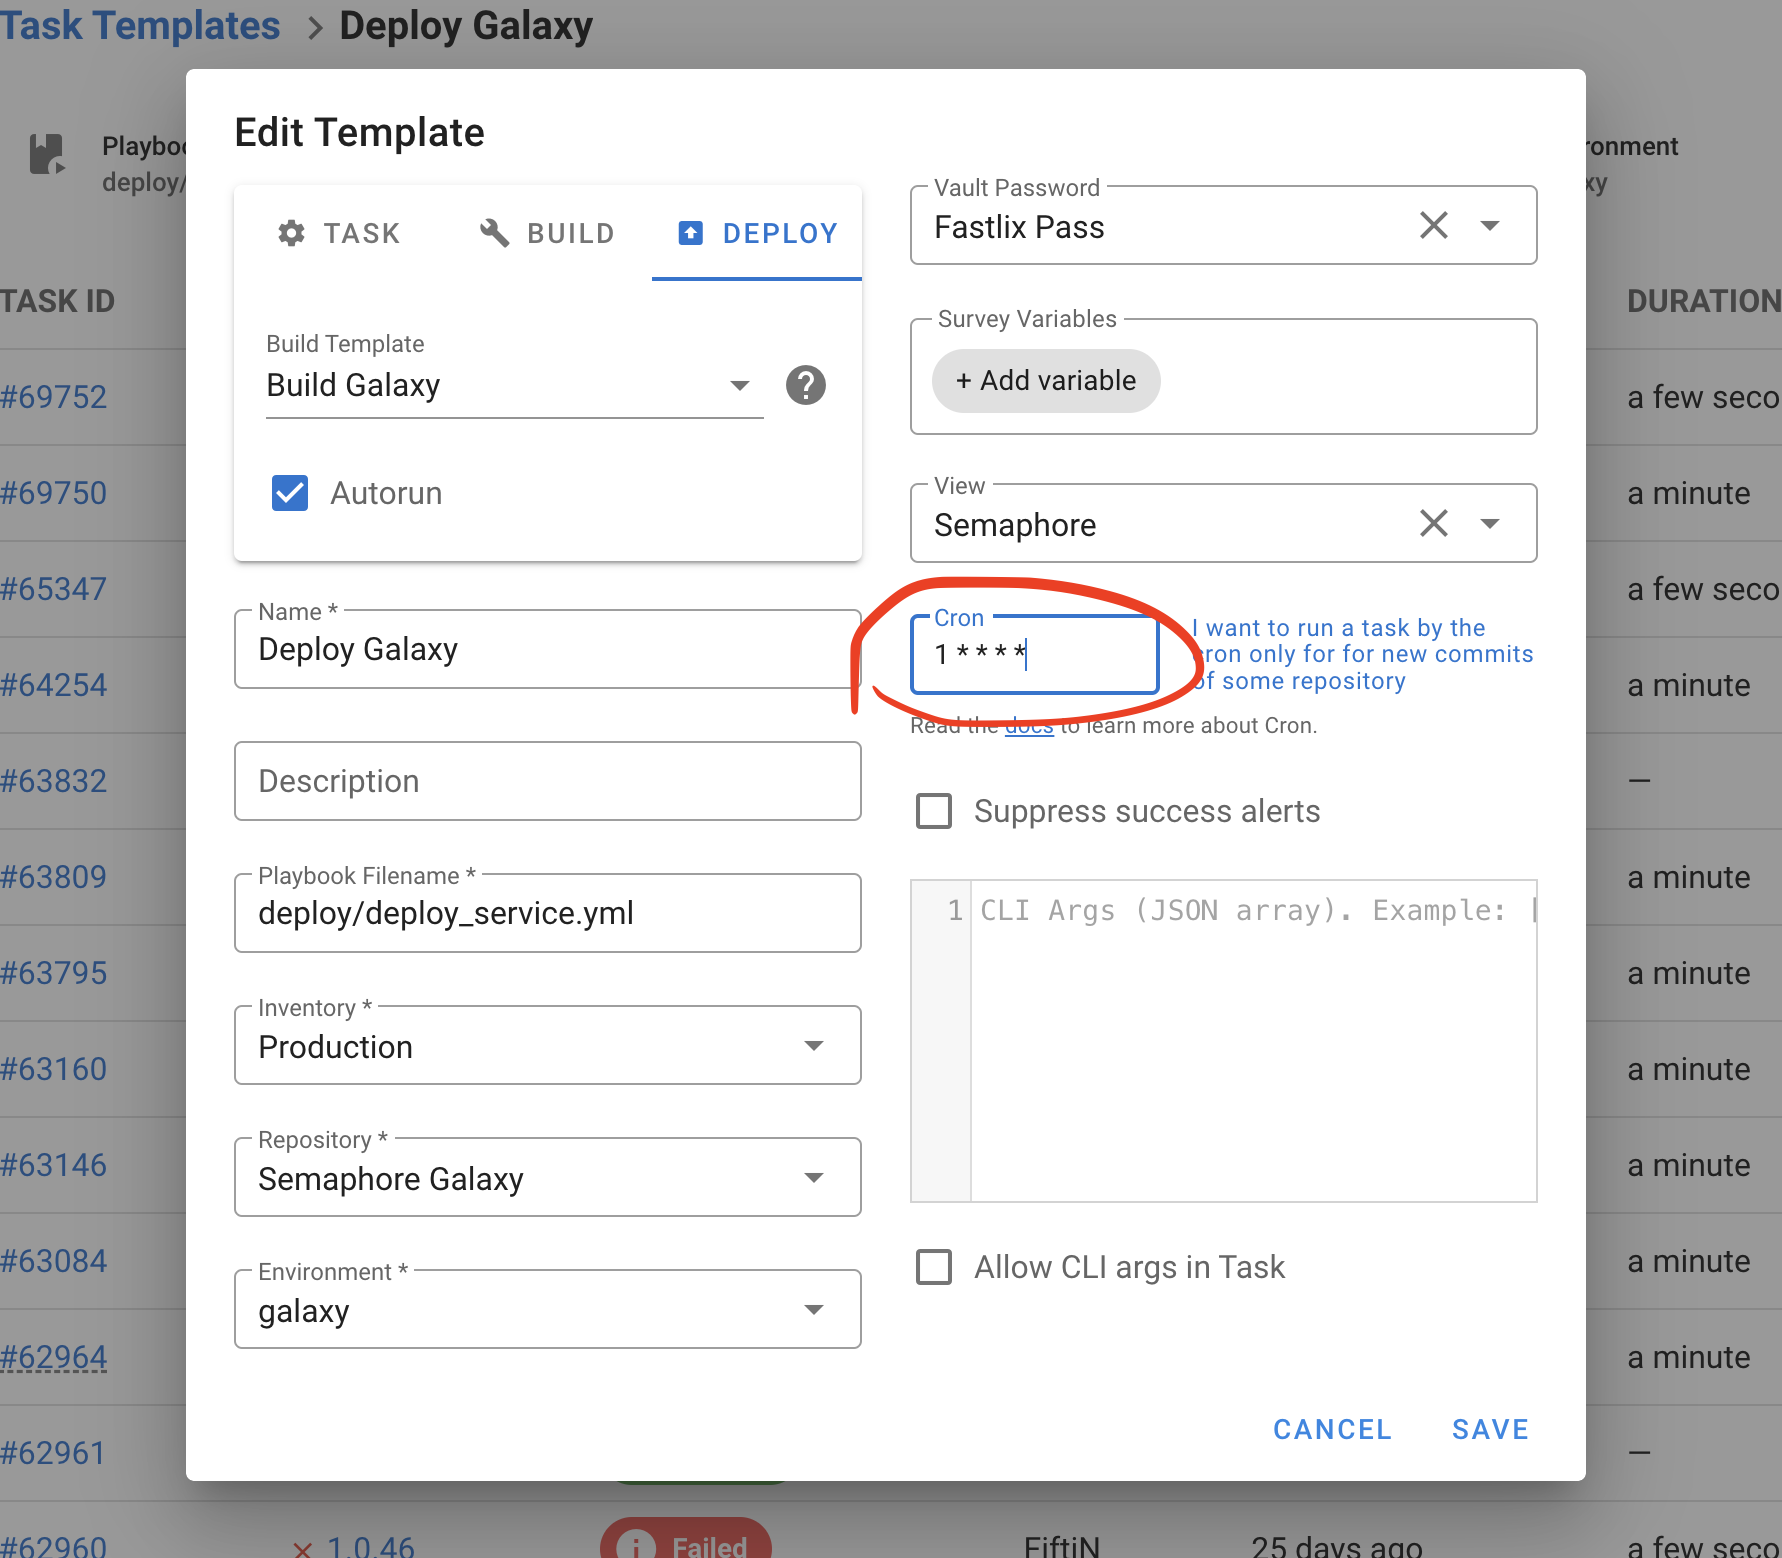
Run a task when a new commit is added to the repository
You can use cron to periodically check for new commits in the repository and trigger a task upon their arrival.
For example you have source code of the app in the git repository. You can add it to Repositories and trigger the Build task for new commits.
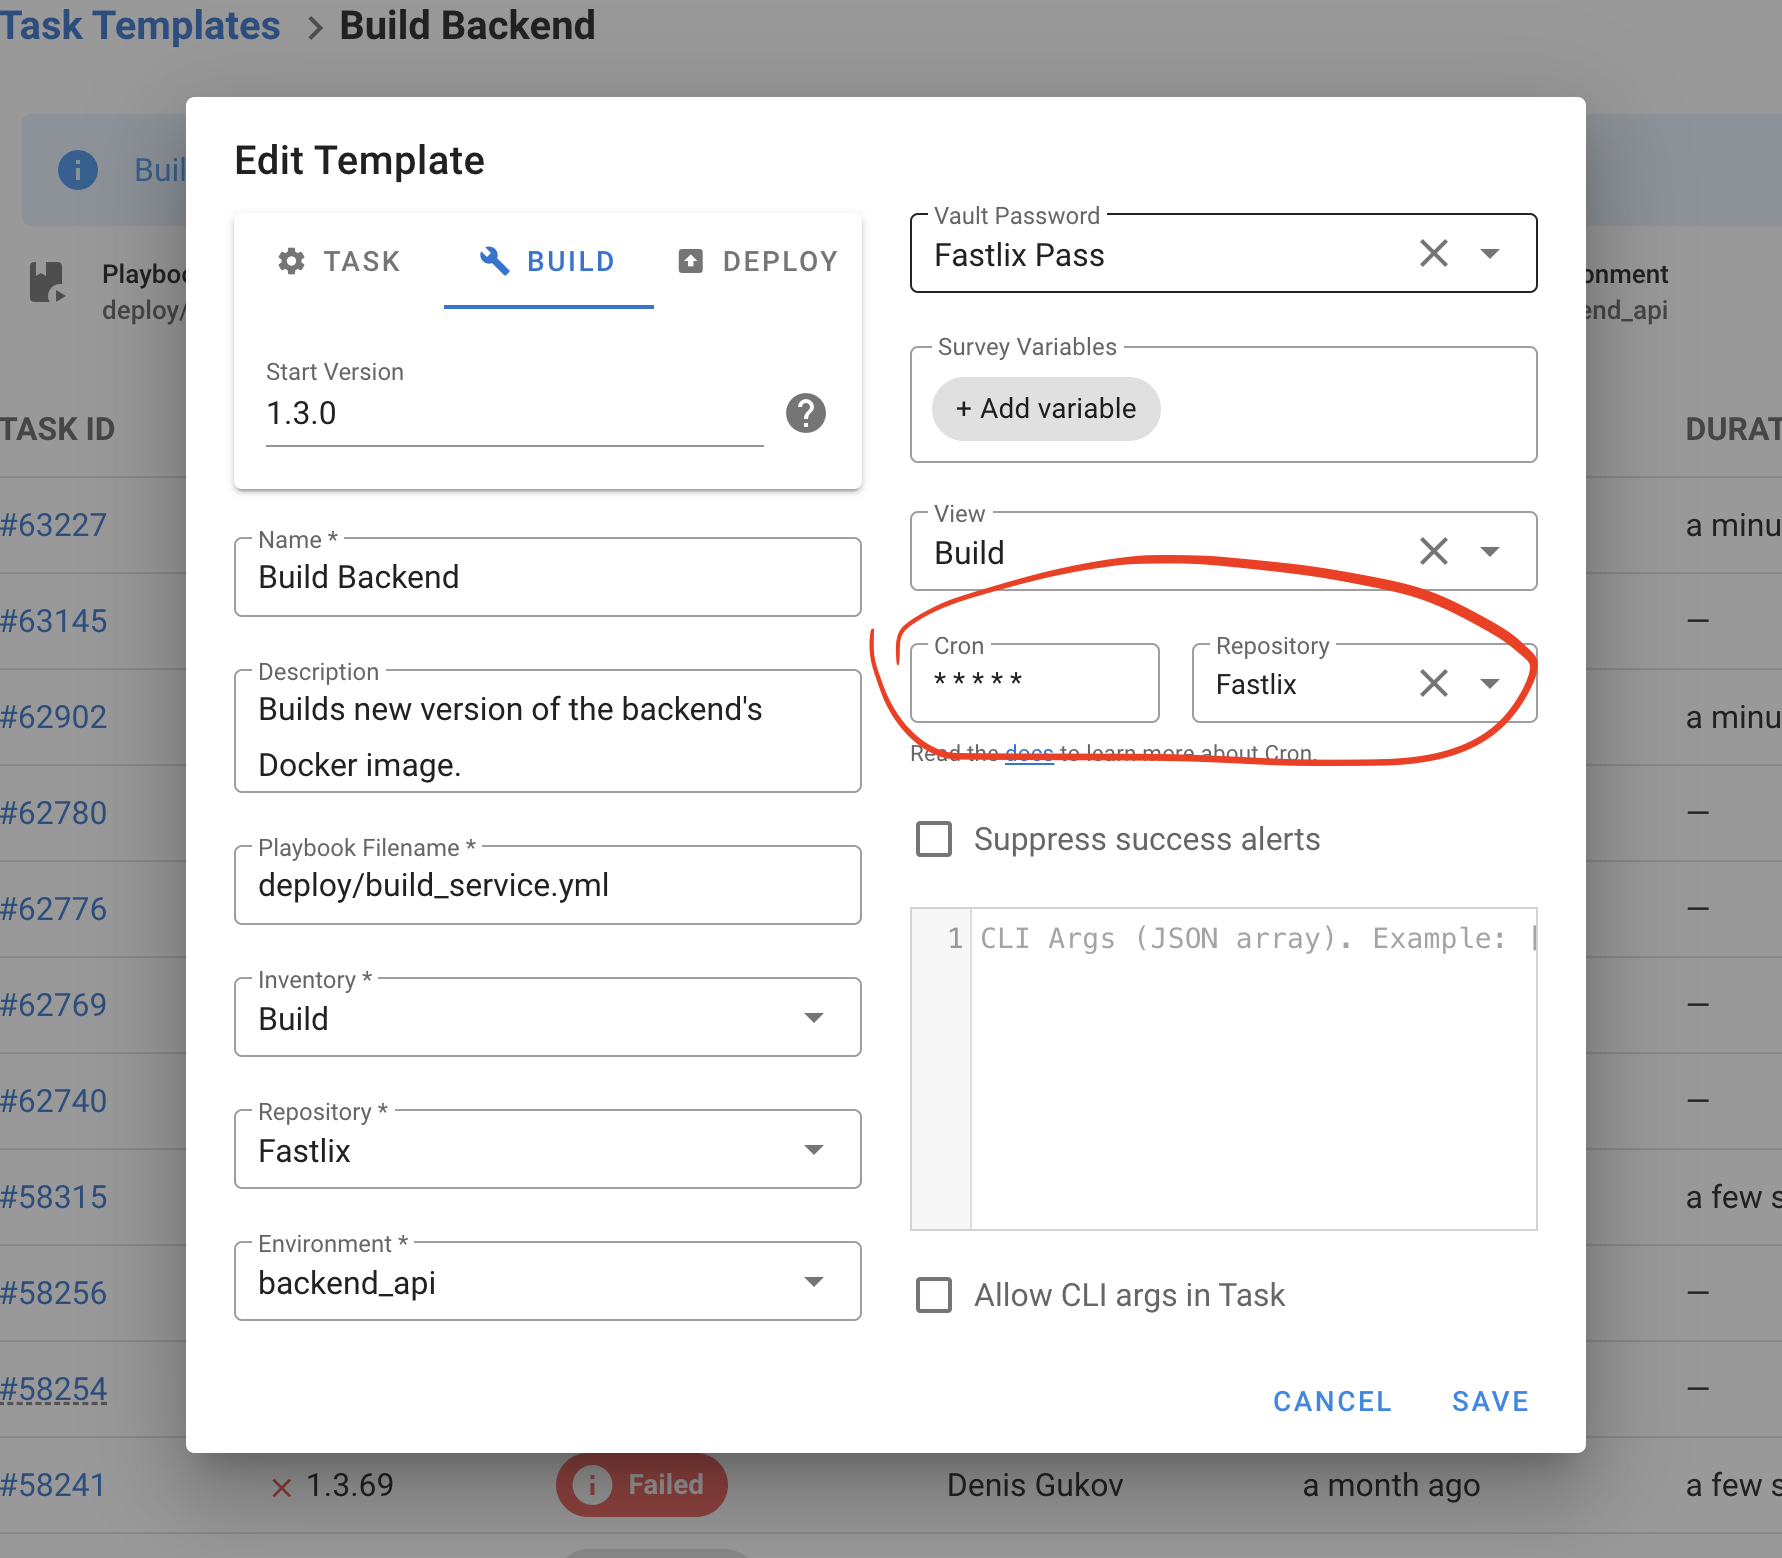
Tags, skip-tags and limit
Templates support Ansible CLI options:
--tags--skip-tags--limit
These can be set in the template and overridden when creating a task. Ensure corresponding prompts are enabled if you plan to pass these values via API.
Multiple vault passwords
You can attach multiple Vault passwords from the Key Store to a template. During execution, Ansible will attempt to decrypt using the provided passwords.
Verbosity level
You can adjust Ansible verbosity for a task (for example -v, -vvv) from the template/task form to aid troubleshooting.
Terraform/OpenTofu
Using Semaphore UI you can run Terraform code. To do this, you need to create a Terraform Code Template.
- Go go Task Templates section and click the New Template button.
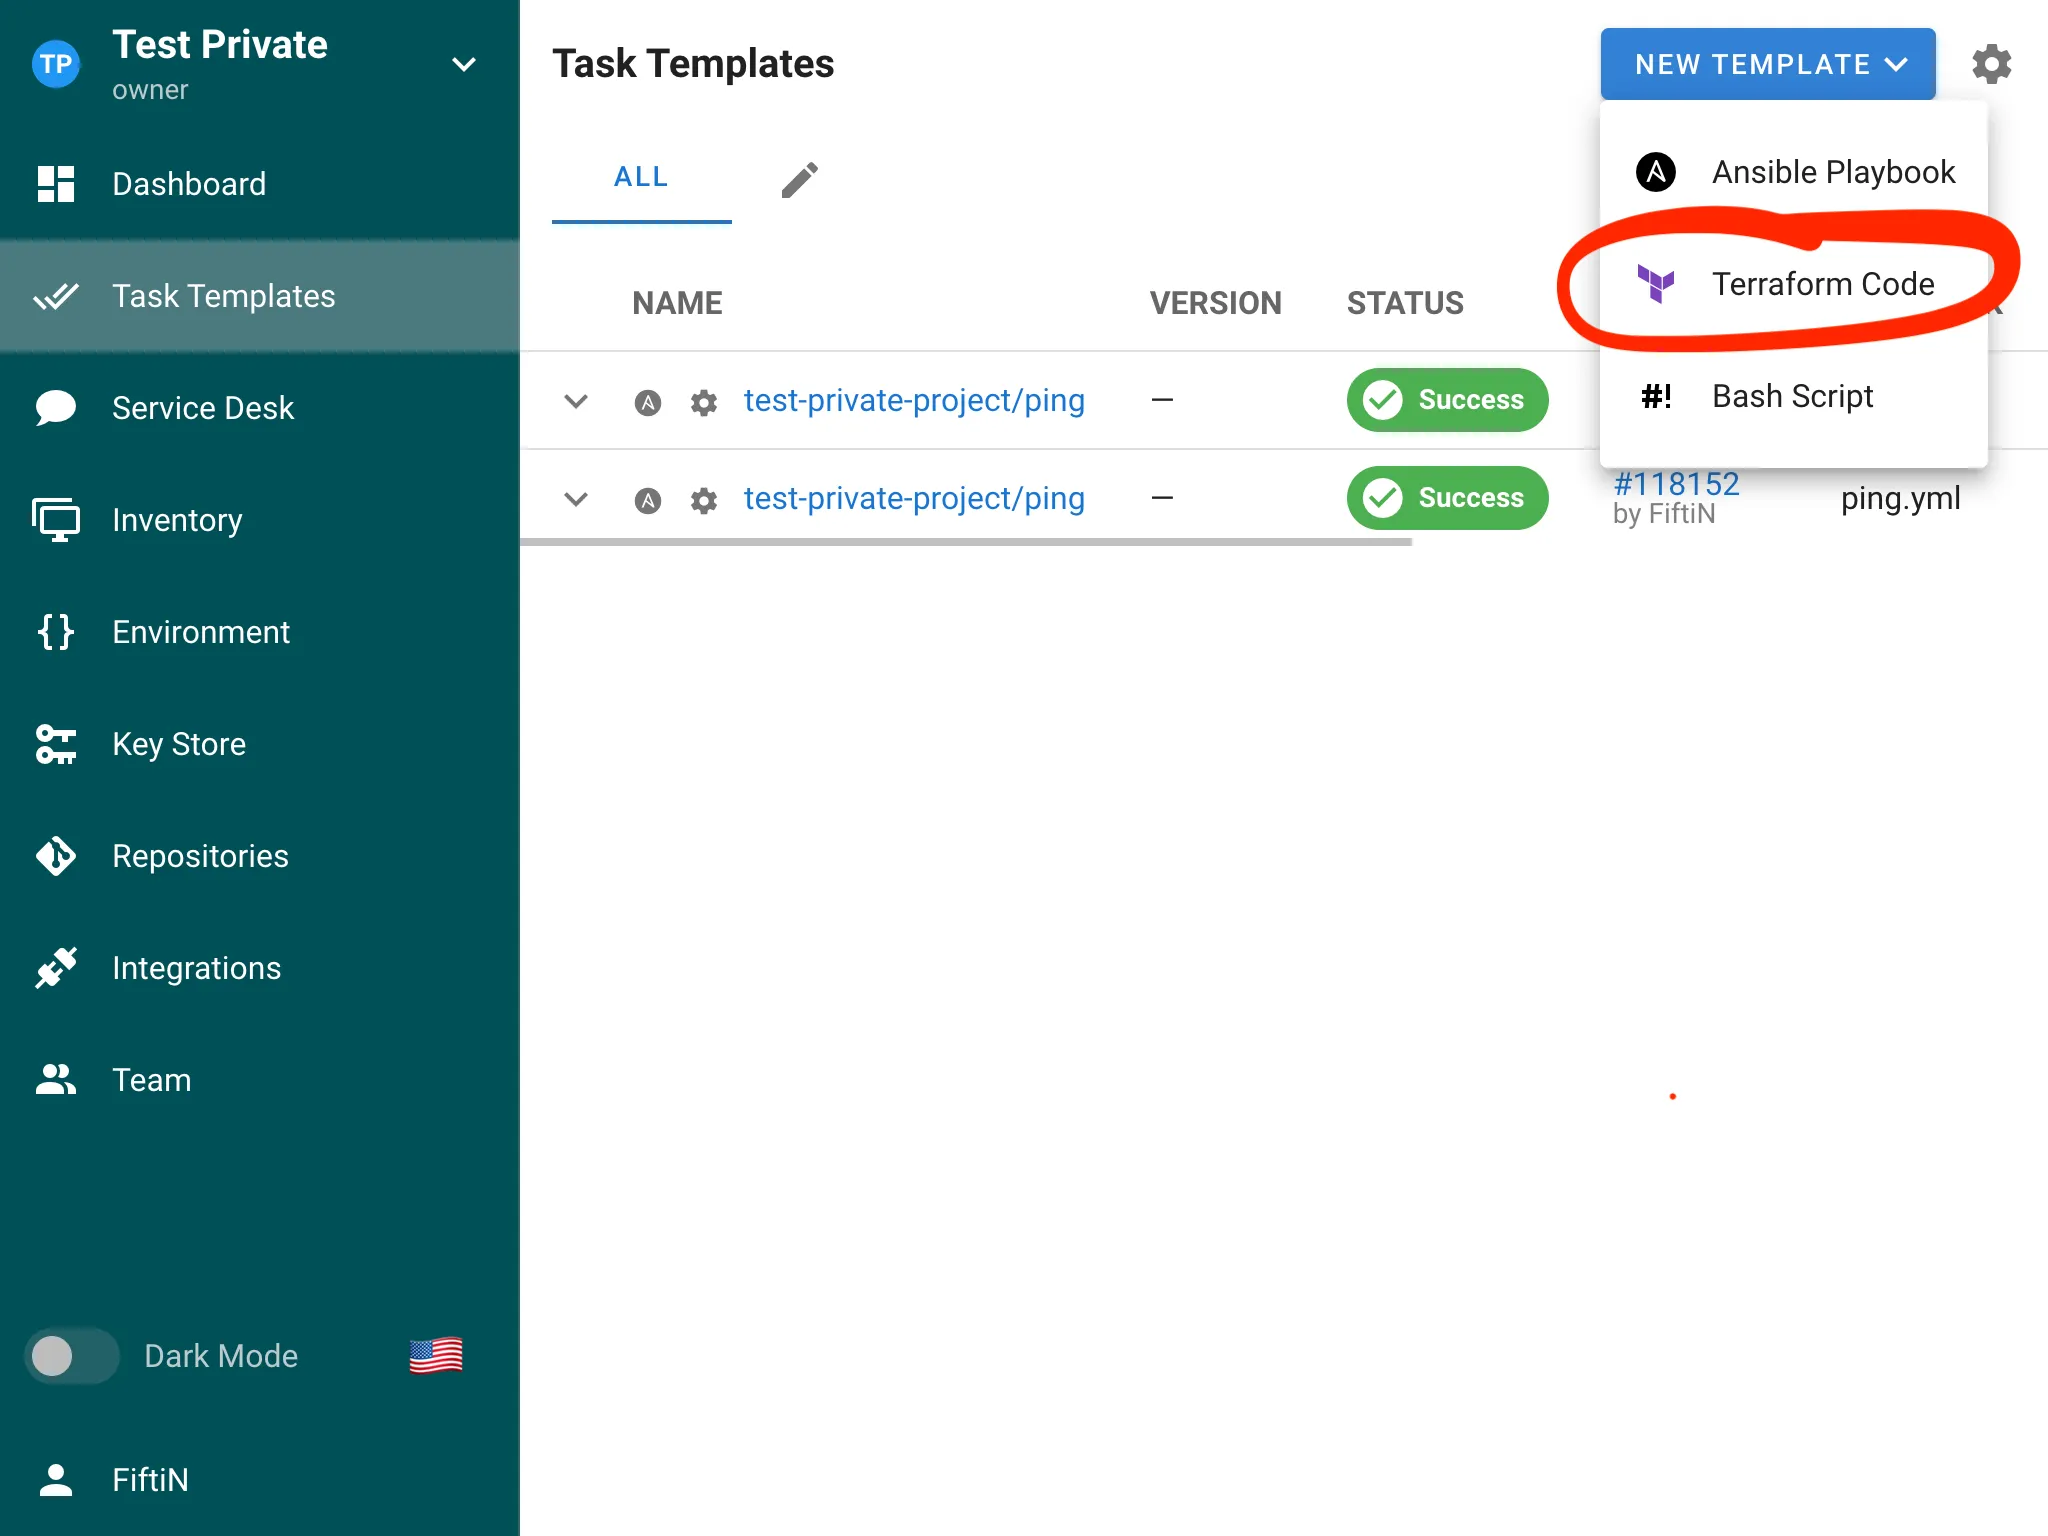
- Set up the template and click the Create button.
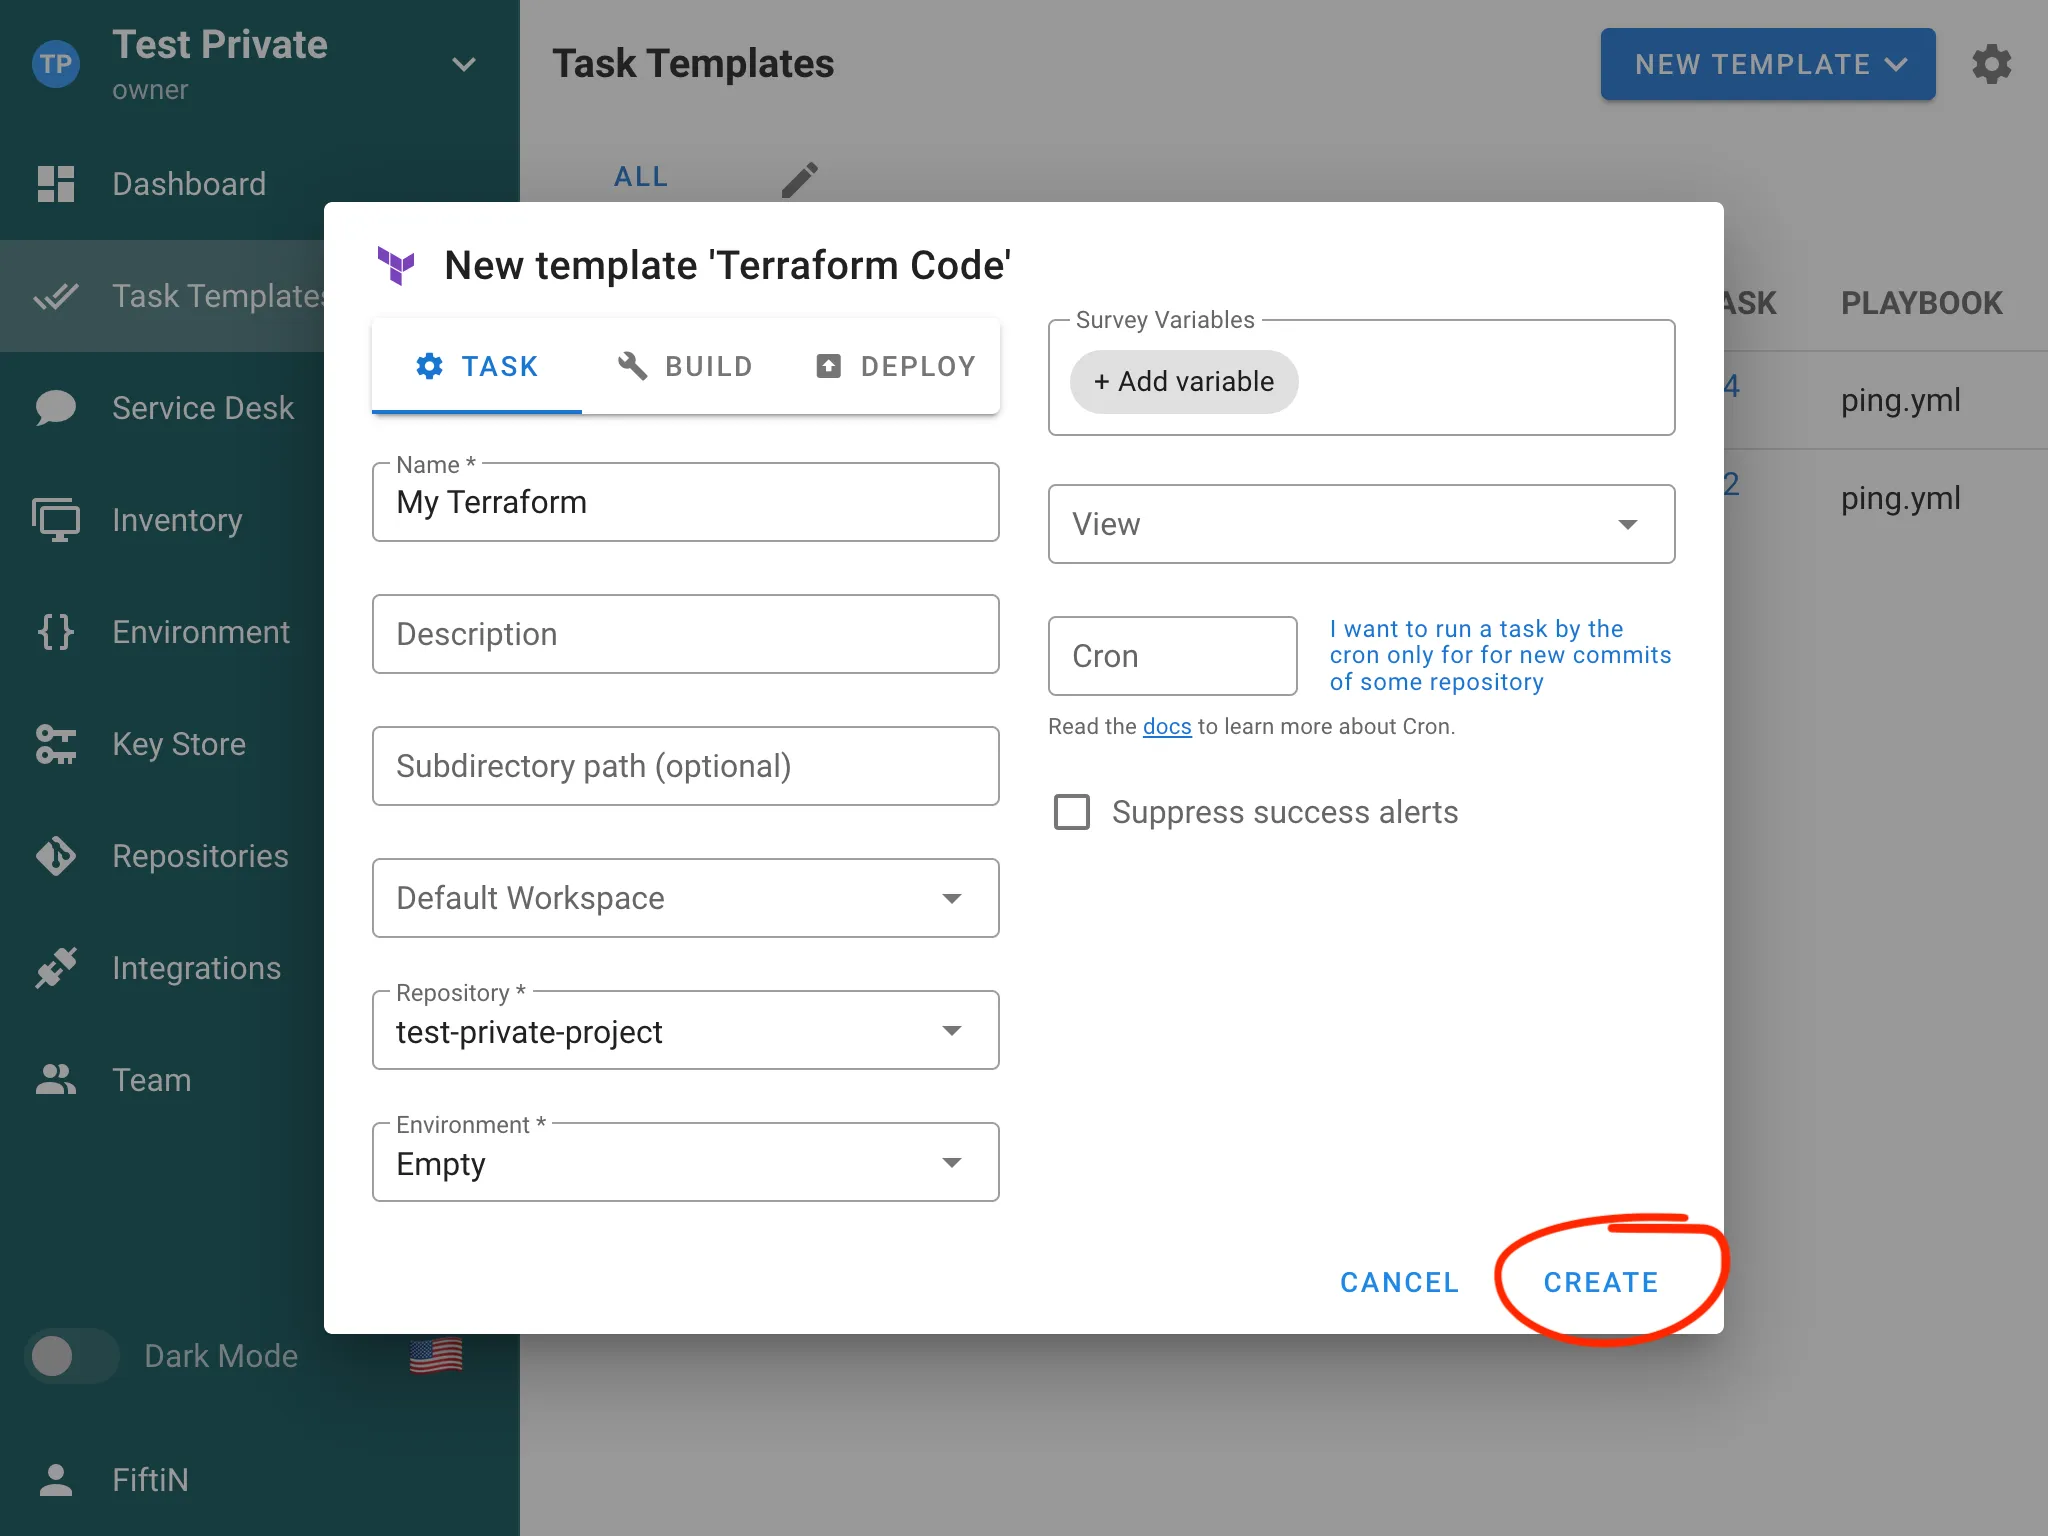
- You can now run your Terraform code.
Workspaces
Semaphore supports Terraform/OpenTofu workspaces natively. See Workspaces for creating and switching workspaces and integrating SSH keys for private modules.
Backend override and HTTP backend (Pro)
You can enable the option to override backend settings in a template to use the built-in HTTP backend without modifying your Terraform code. For using the HTTP backend outside of Semaphore, create a backend alias and add the generated address, username and password to your Terraform configuration. See HTTP Backend (Pro) for details.
Destroy flag and state migration
The Terraform task form supports -destroy and -migrate-state flags. Use them when planning or destroying infrastructure, or when migrating state.
Workspaces
Semaphore provides built-in support for Terraform workspaces, allowing you to manage multiple environments and configurations within a single project. This feature helps you maintain separate state files for different environments like development, staging, and production.
Features
- Workspace Management: Create, switch, and delete workspaces directly from the Semaphore UI.
- State Isolation: Each workspace maintains its own state file, preventing conflicts between environments.
- Environment Variables: Configure workspace-specific environment variables.
- Workspace Selection: Choose the target workspace when running Terraform commands.
Using Workspaces in Semaphore
Creating a Workspace
In the Workspaces section of the Terraform/OpenTofu template where you want to add a workspace, follow these steps:
- Click the ➕ button.
- In the menu that appears, select New Workspace.
- In the modal dialog, enter the workspace name and select the SSH key to be used for cloning modules.
- Click the Create button to add the new workspace to the template.
- You can now use this workspace to run tasks.
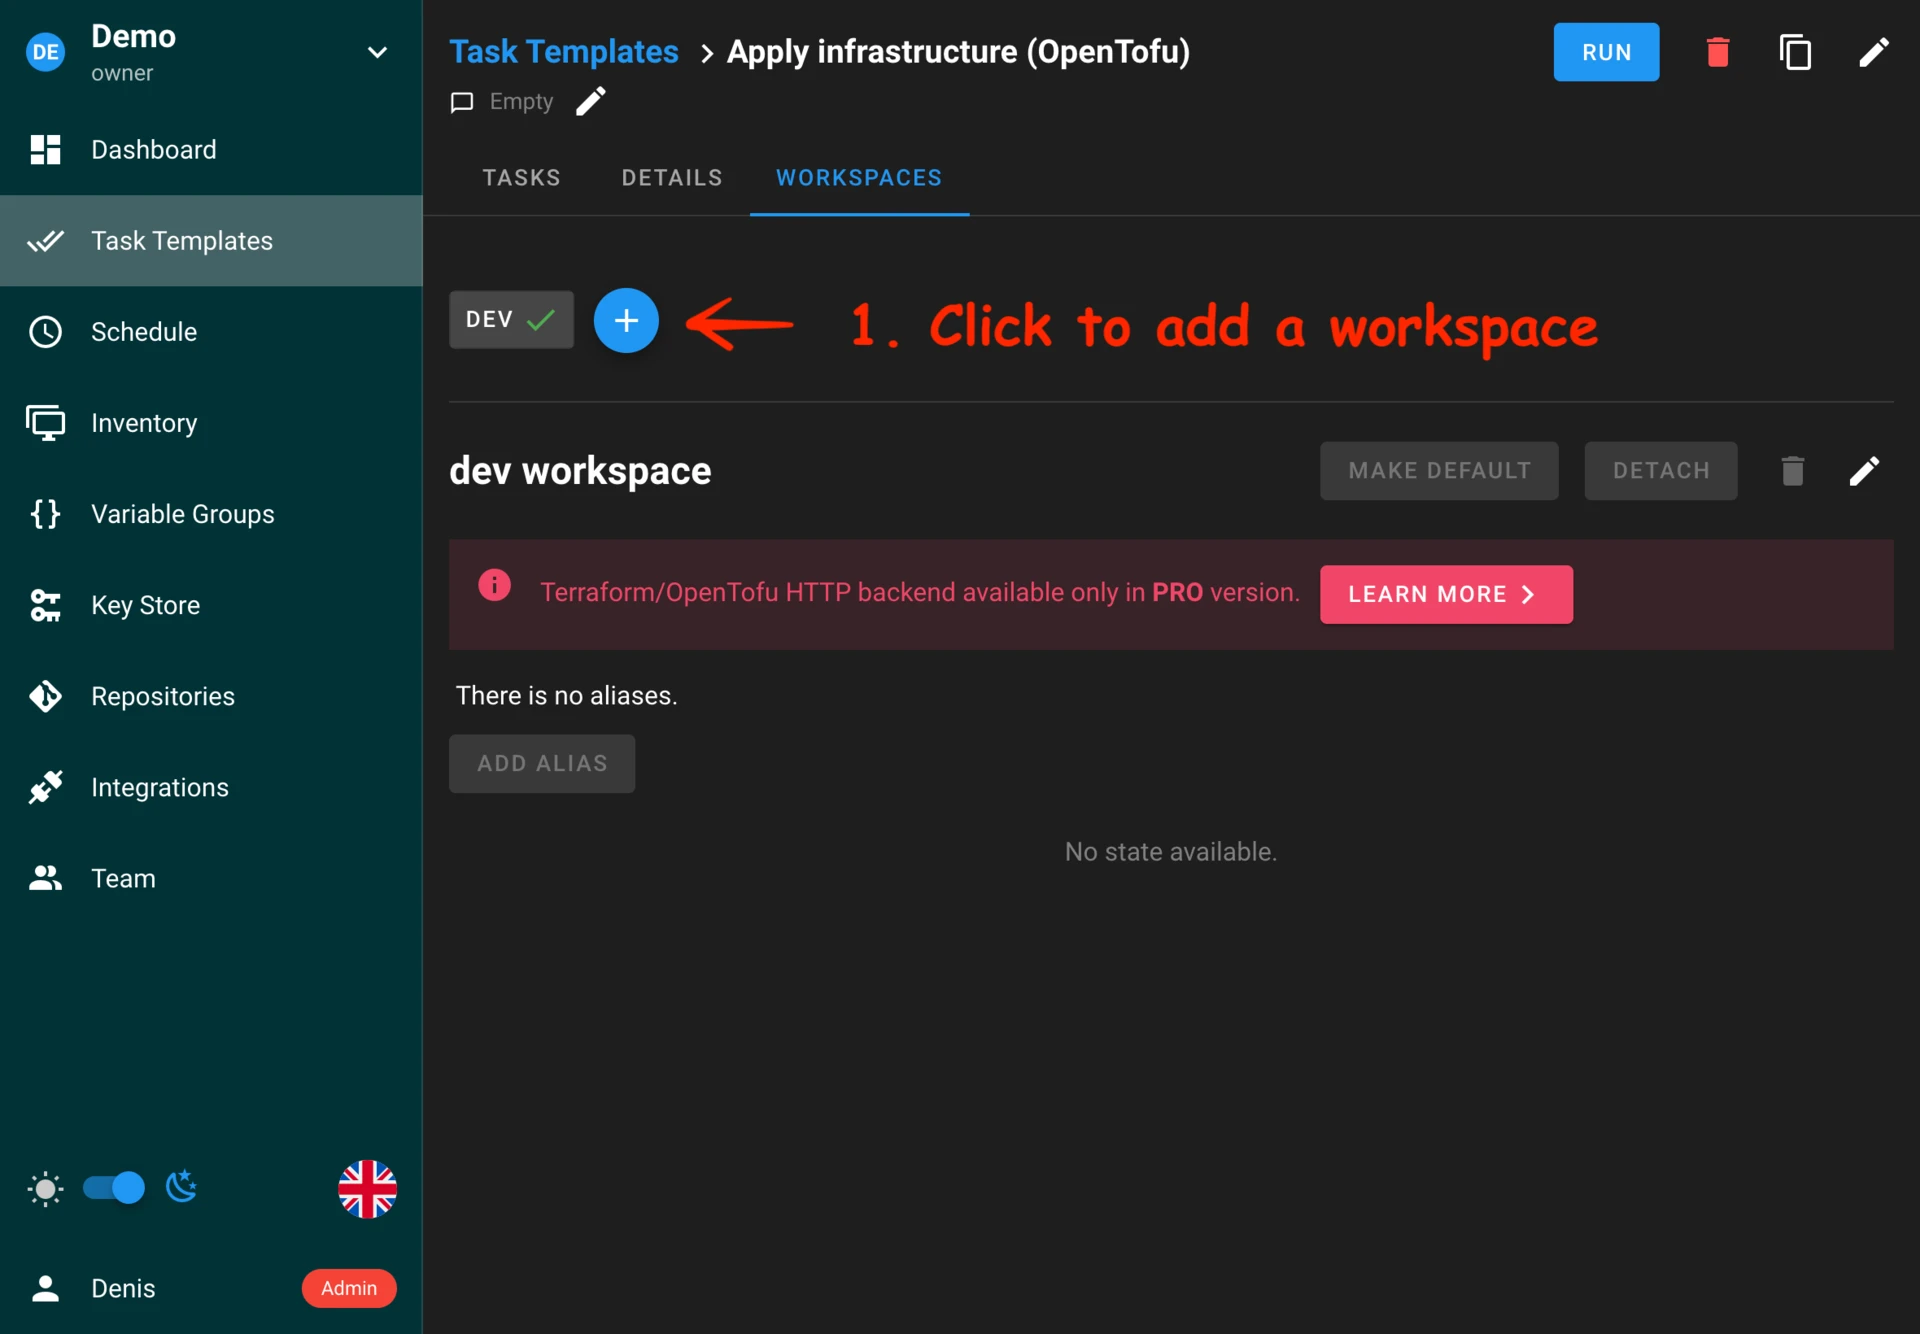
Switching workspaces
You can set the default workspace for a Terraform/OpenTofu template by clicking the MAKE DEFAULT button.
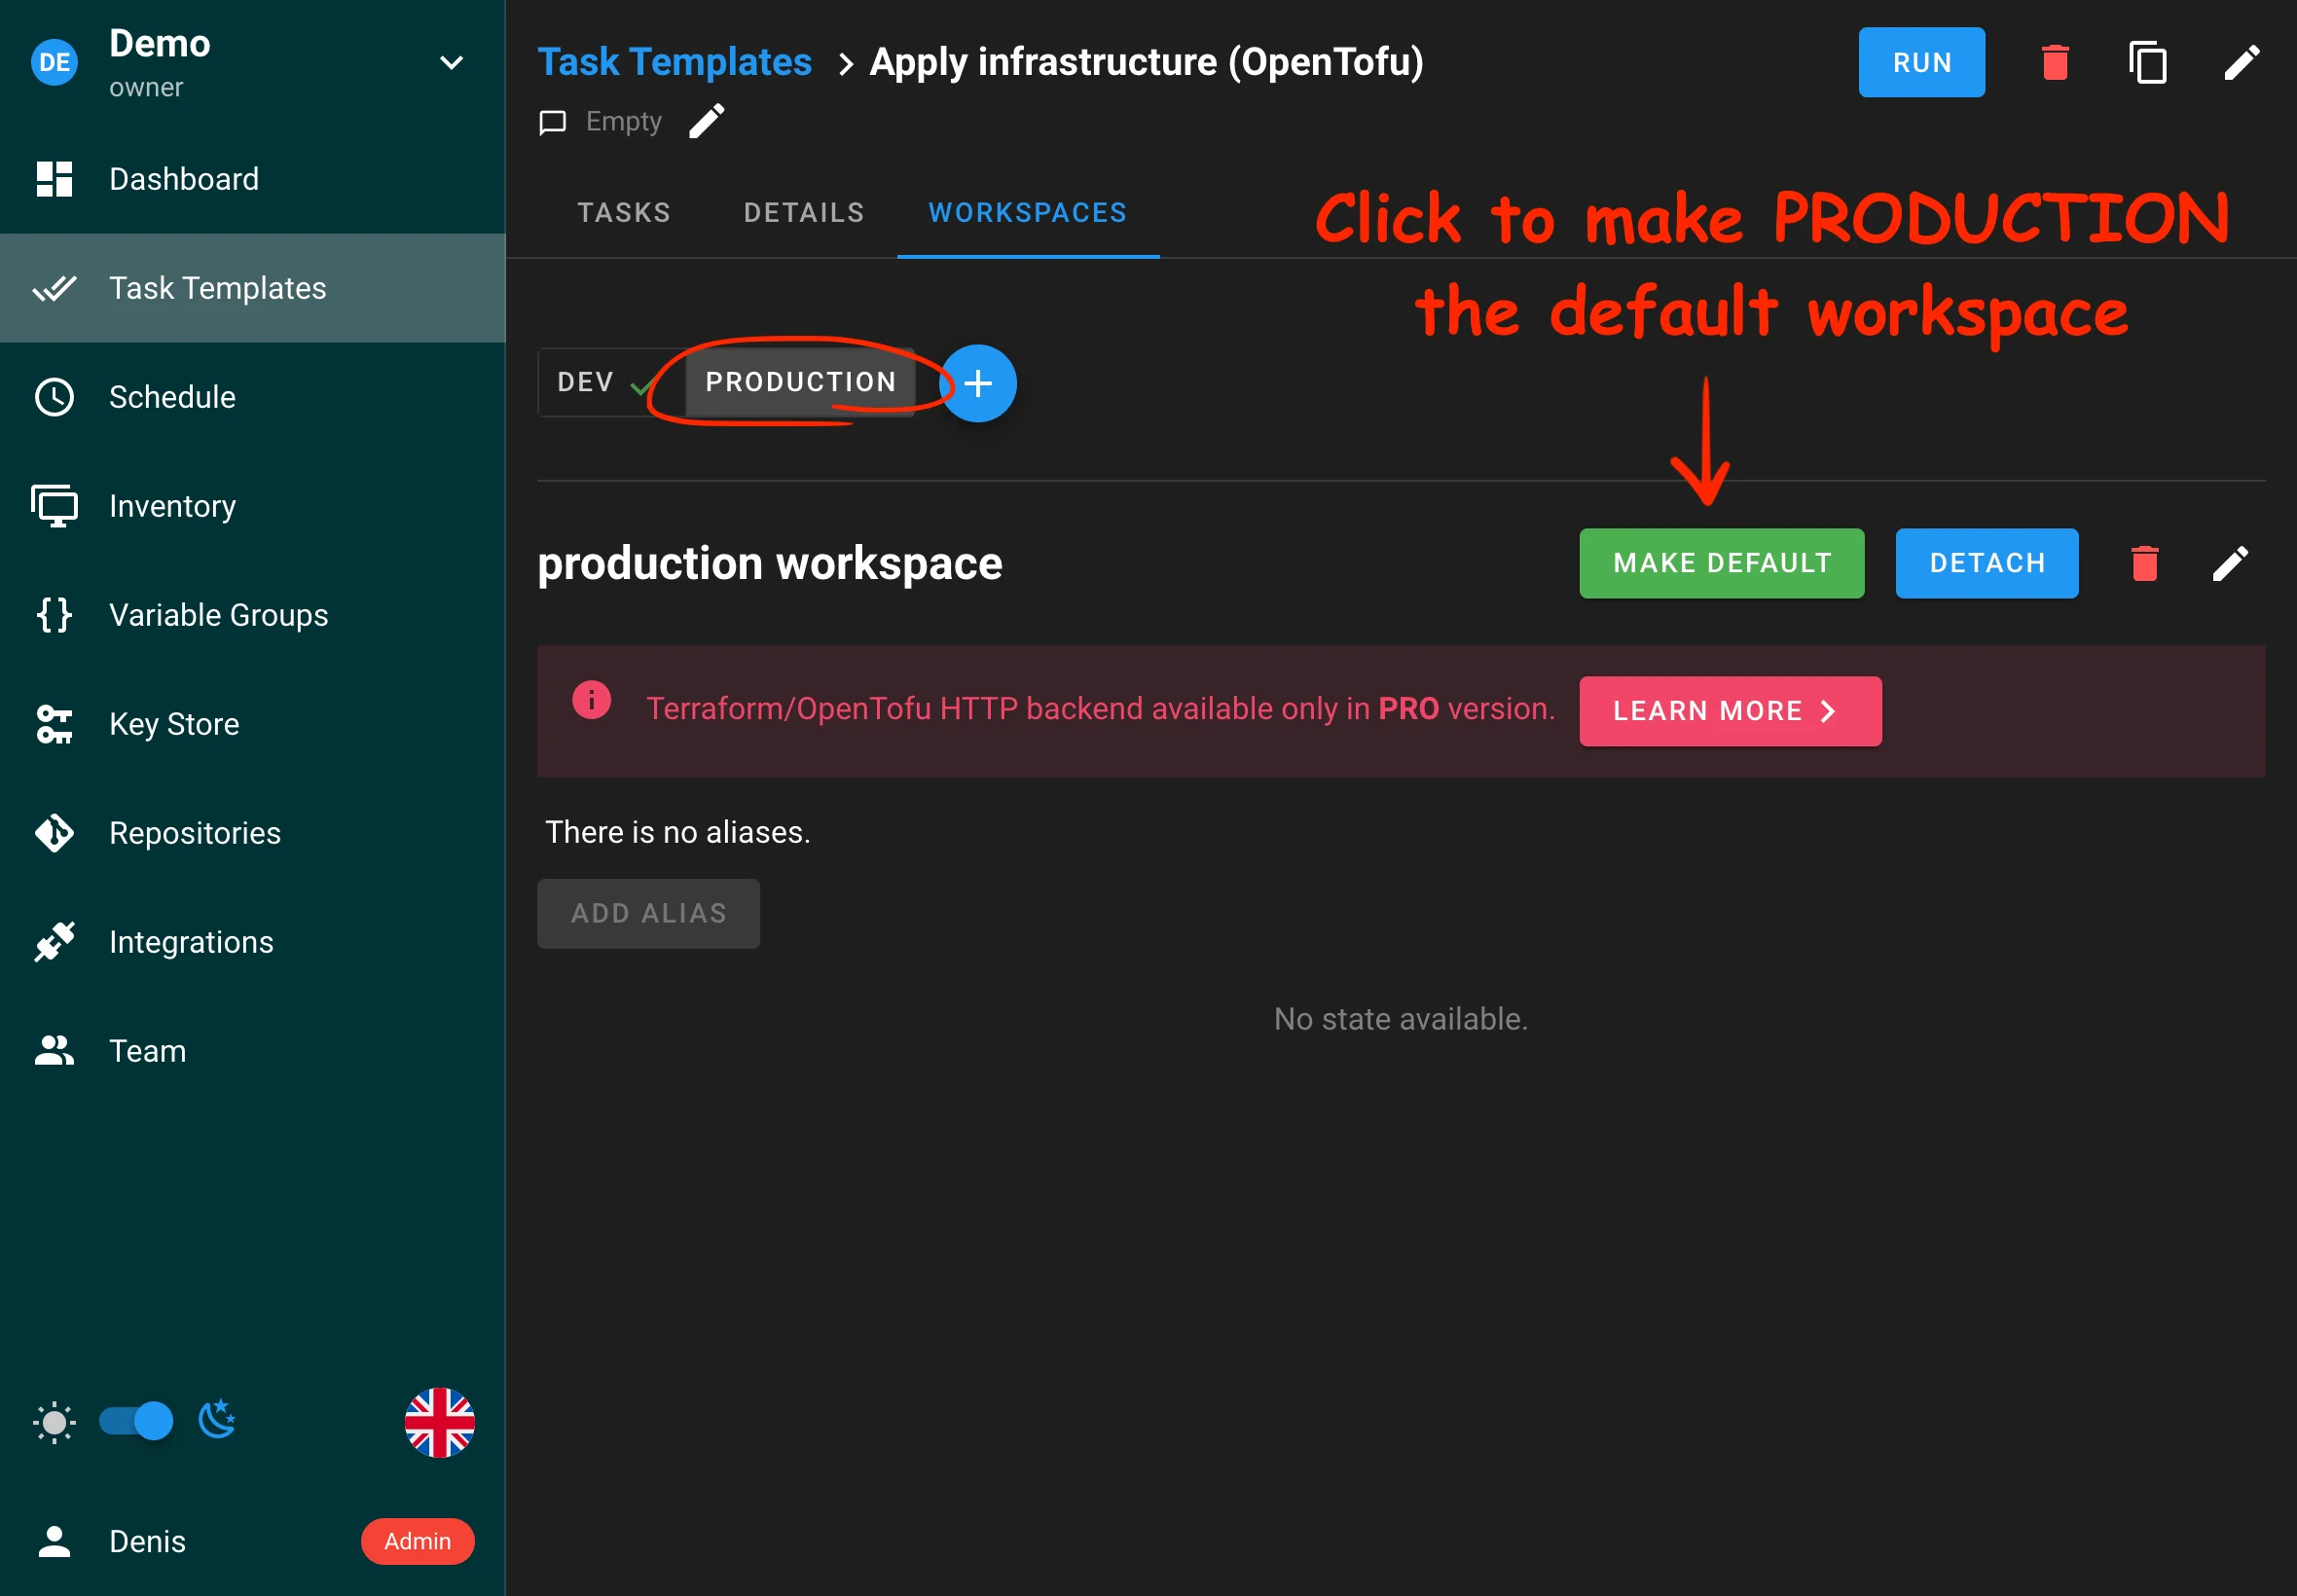
Workspace-specific variables
Semaphore currently does not support workspace-specific variables.
HTTP Backend (Pro)
The Semaphore UI HTTP backend for Terraform securely stores and manages Terraform state files directly within Semaphore. Available in the Pro plan, it offers several key advantages.
Features
- Secure State Storage: State files are stored securely within Semaphore.
- State Locking: Prevents concurrent modifications to the same state file.
- Version History: Track changes to your infrastructure state over time.
- UI Integration: Manage state files directly through the Semaphore interface.
Configuration
To start using the built-in HTTP backend, you first need to create a workspace for your Terraform task template.
To add a workspace, go to the Workspaces tab of your Terraform/OpenTofu template.
When creating a workspace, you will be prompted to select an SSH key for cloning private modules used in your Terraform code. If you do not use any private modules, simply select the None option.
Using the HTTP backend in tasks
To use the built-in HTTP backend for storing the state of your Terraform tasks, you do not need to manually configure the backend in your Terraform code. Semaphore can automatically create the configuration file during execution. To enable this, simply check the Override backend settings option in your task template settings, as shown in the screenshot below.
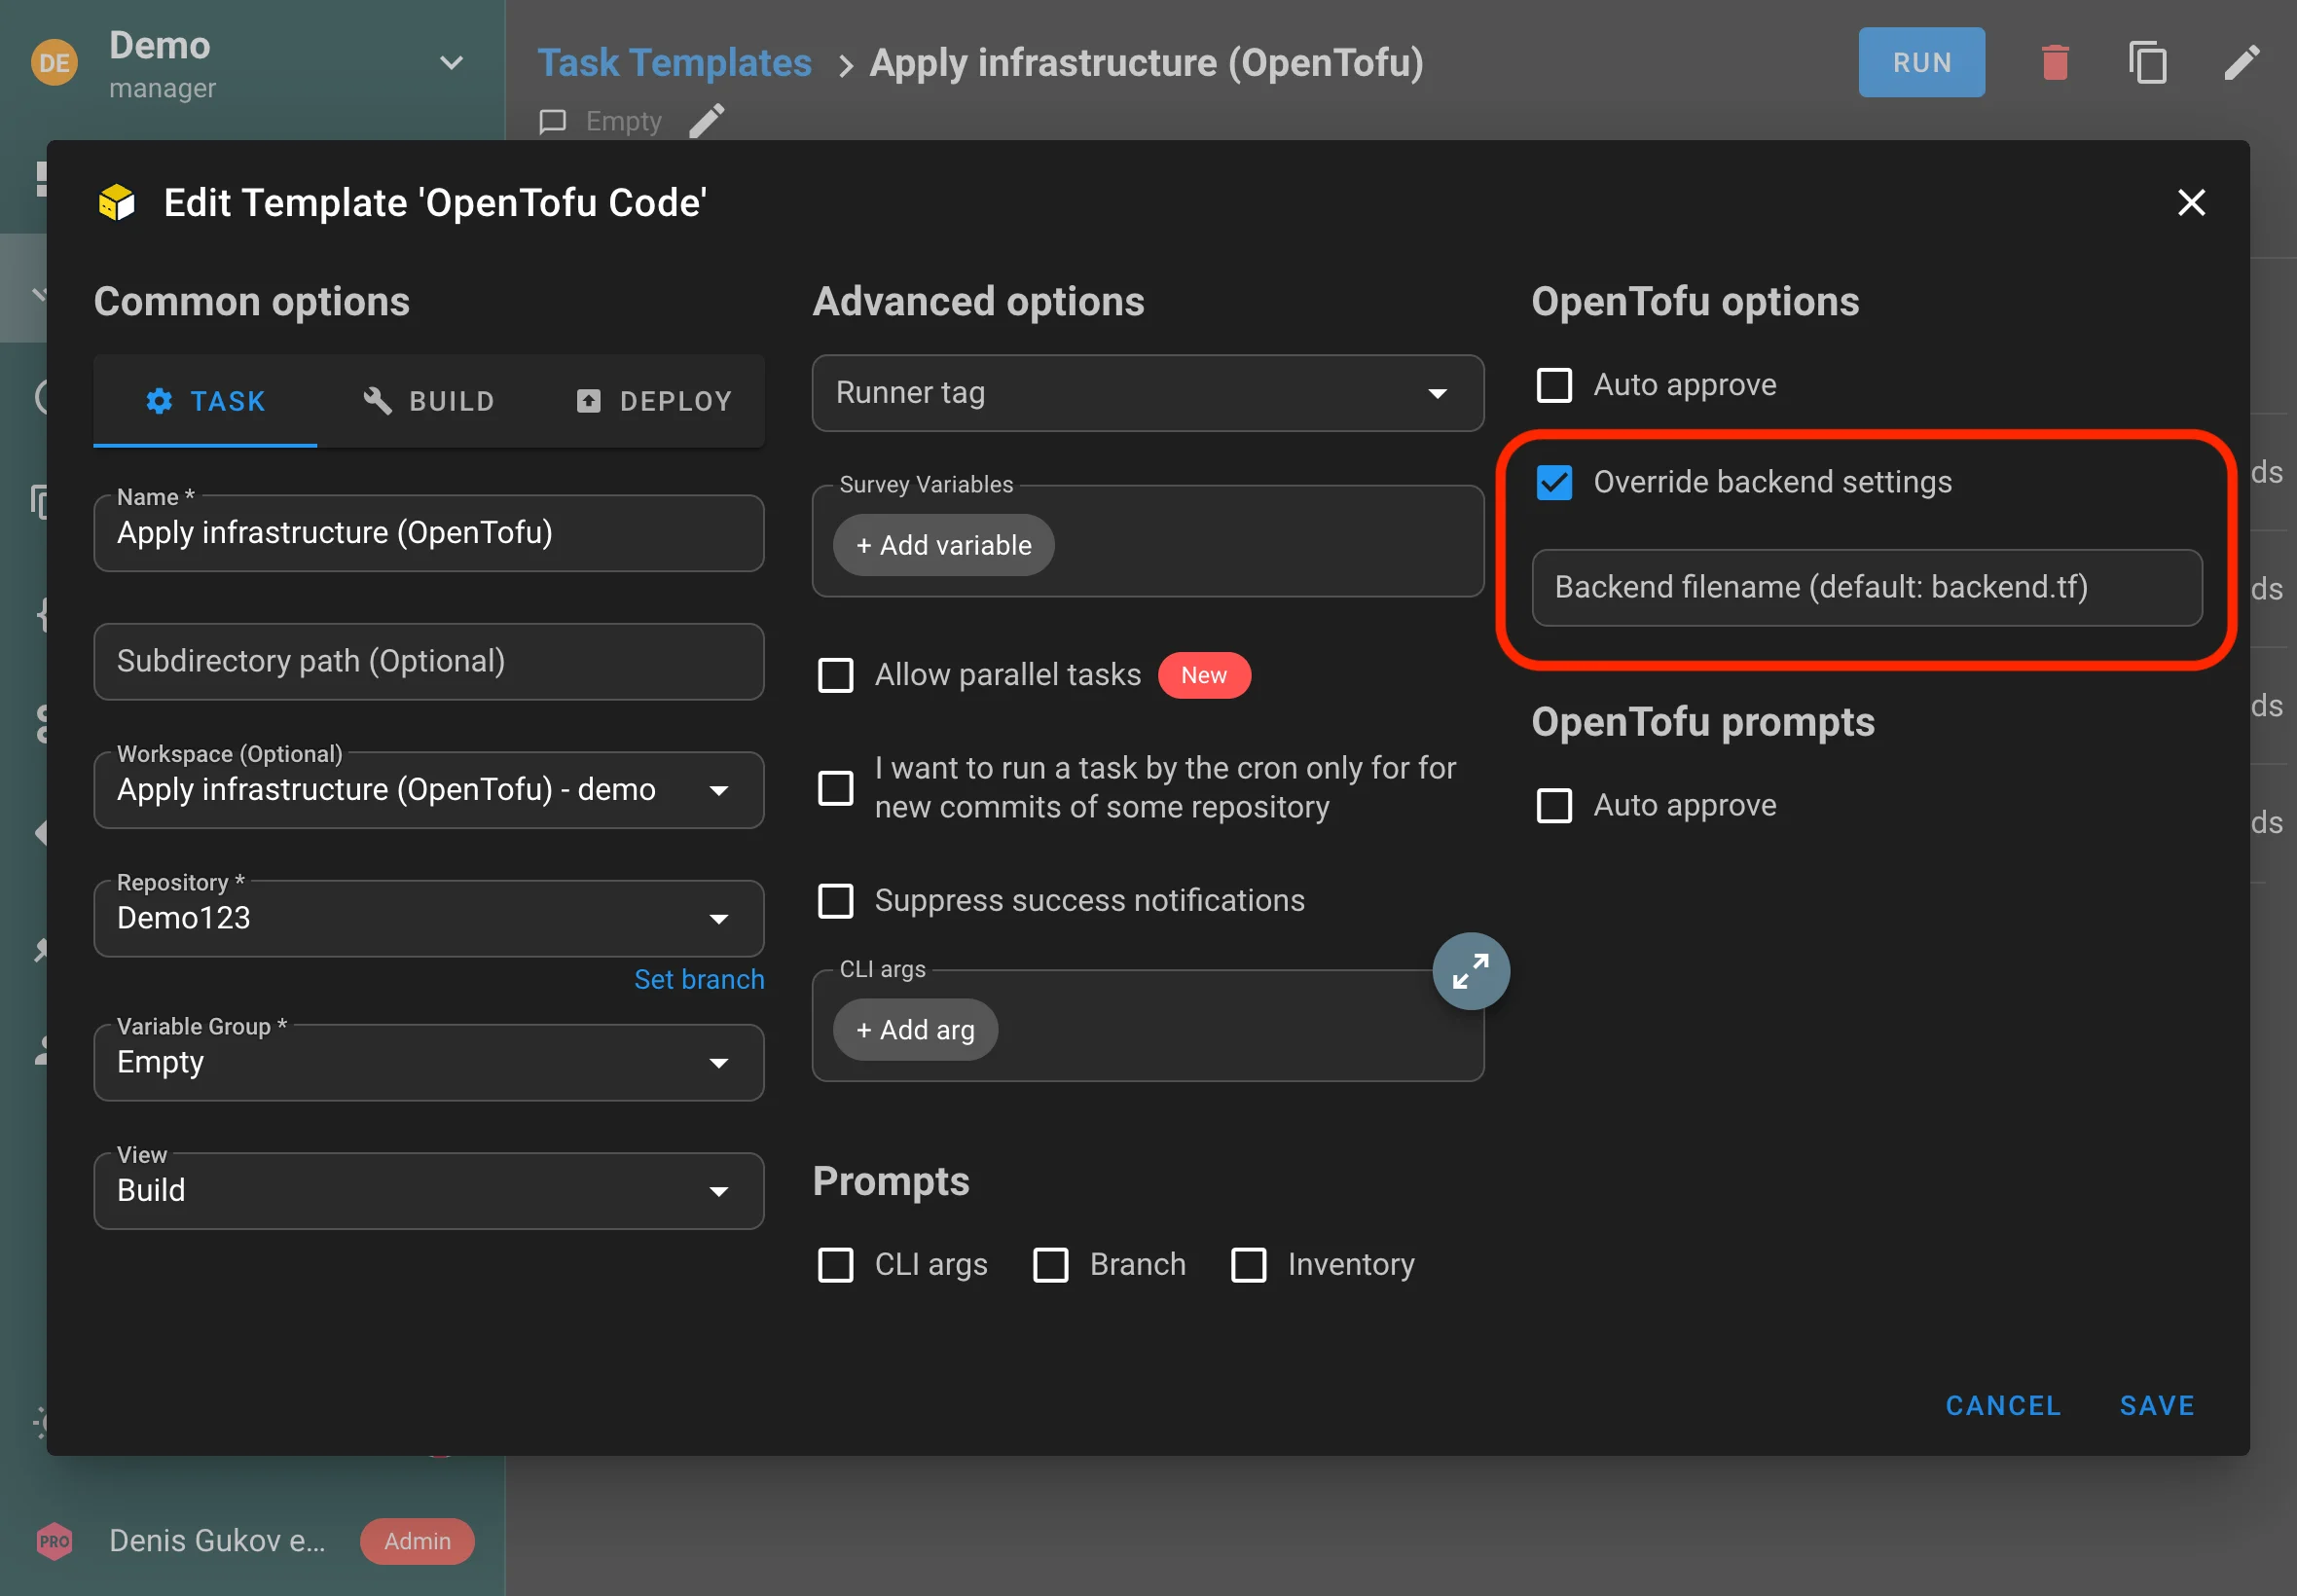
Optionally, you can specify the name of the configuration file that will be dynamically created during execution. This is useful if your code already contains a backend configuration file and you need to override it dynamically to work with Semaphore's built-in backend.
Using the HTTP backend outside Semaphore
You can use the built-in HTTP backend not only when running tasks inside Semaphore, but also when executing Terraform code outside of Semaphore, such as from your local terminal.
To enable this, Semaphore allows you to create aliases (unique HTTP endpoint) for your state storage. These aliases make it easy to reference your state files from external environments.
To set this up, go to the Workspaces tab, select the desired workspace, and add an alias. You will also need to choose a key with a username and password, which will be used to authenticate access to the backend.
After this, you need to add the backend settings to your Terraform code:
terraform {
backend "http" {
address = "http://localhost:3000/api/terraform/***"
username = "***"
password = "***"
}
}
Now Terraform will use Semaphore's built-in HTTP backend even when running from your terminal:
terraform apply
Shell/Bash scripts
Using Semaphore UI you can run Bash scripts. To do this, you need to create a Bash Script Template.
-
Go go Task Templates section and click the New Template button.
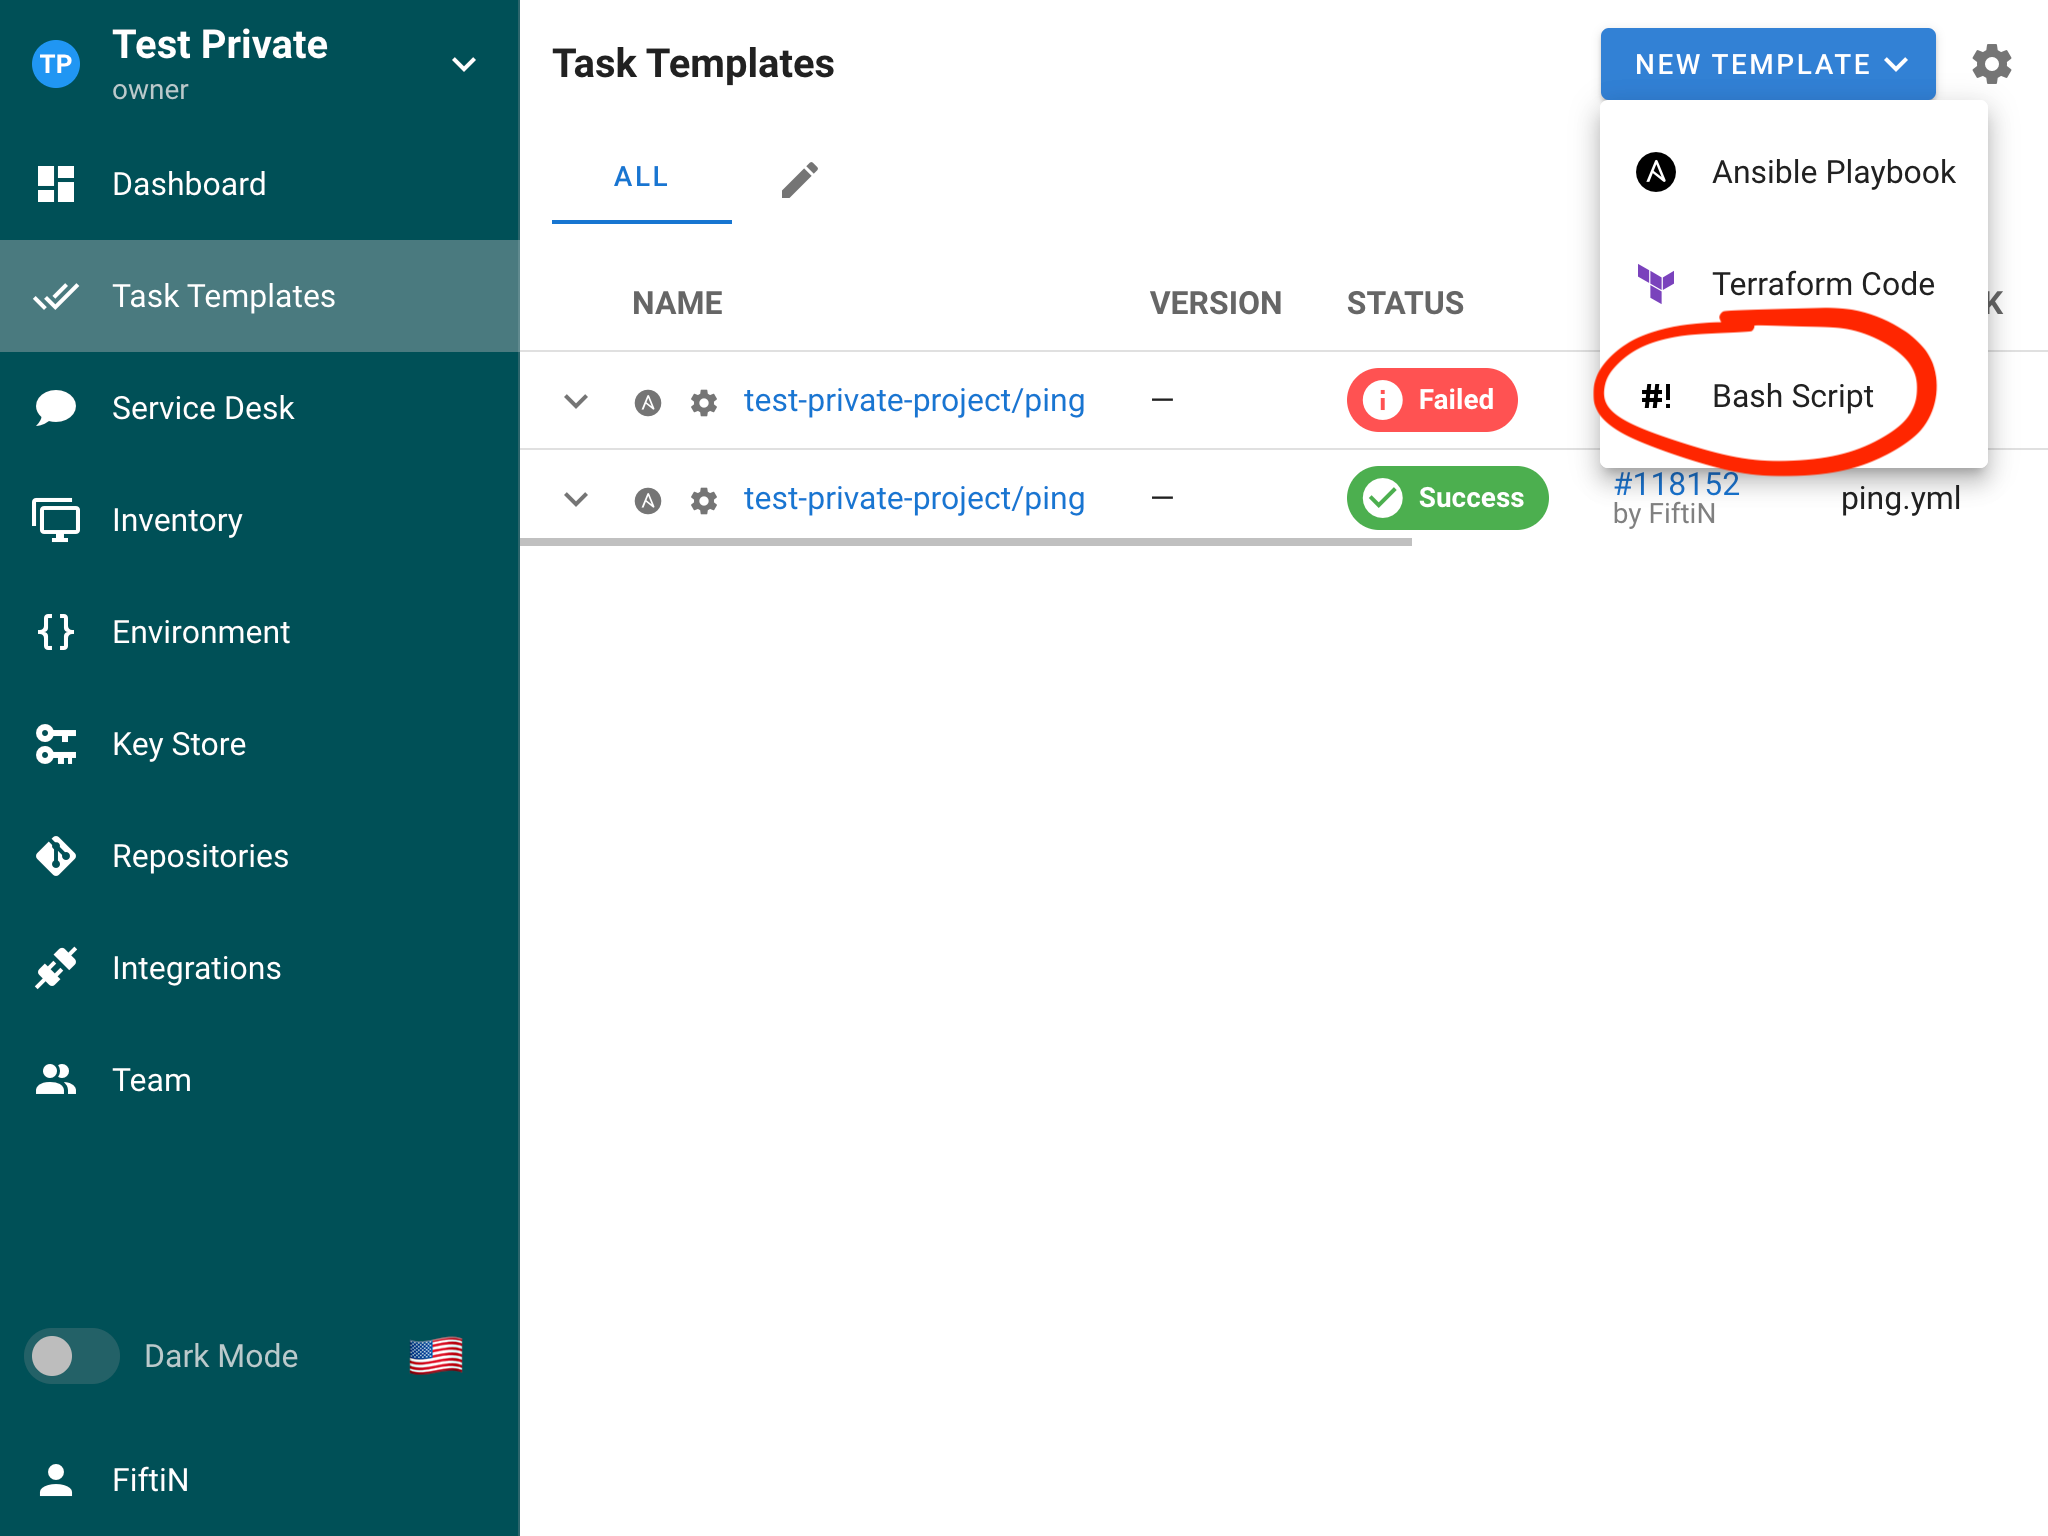
-
Set up the template and click the Create button.
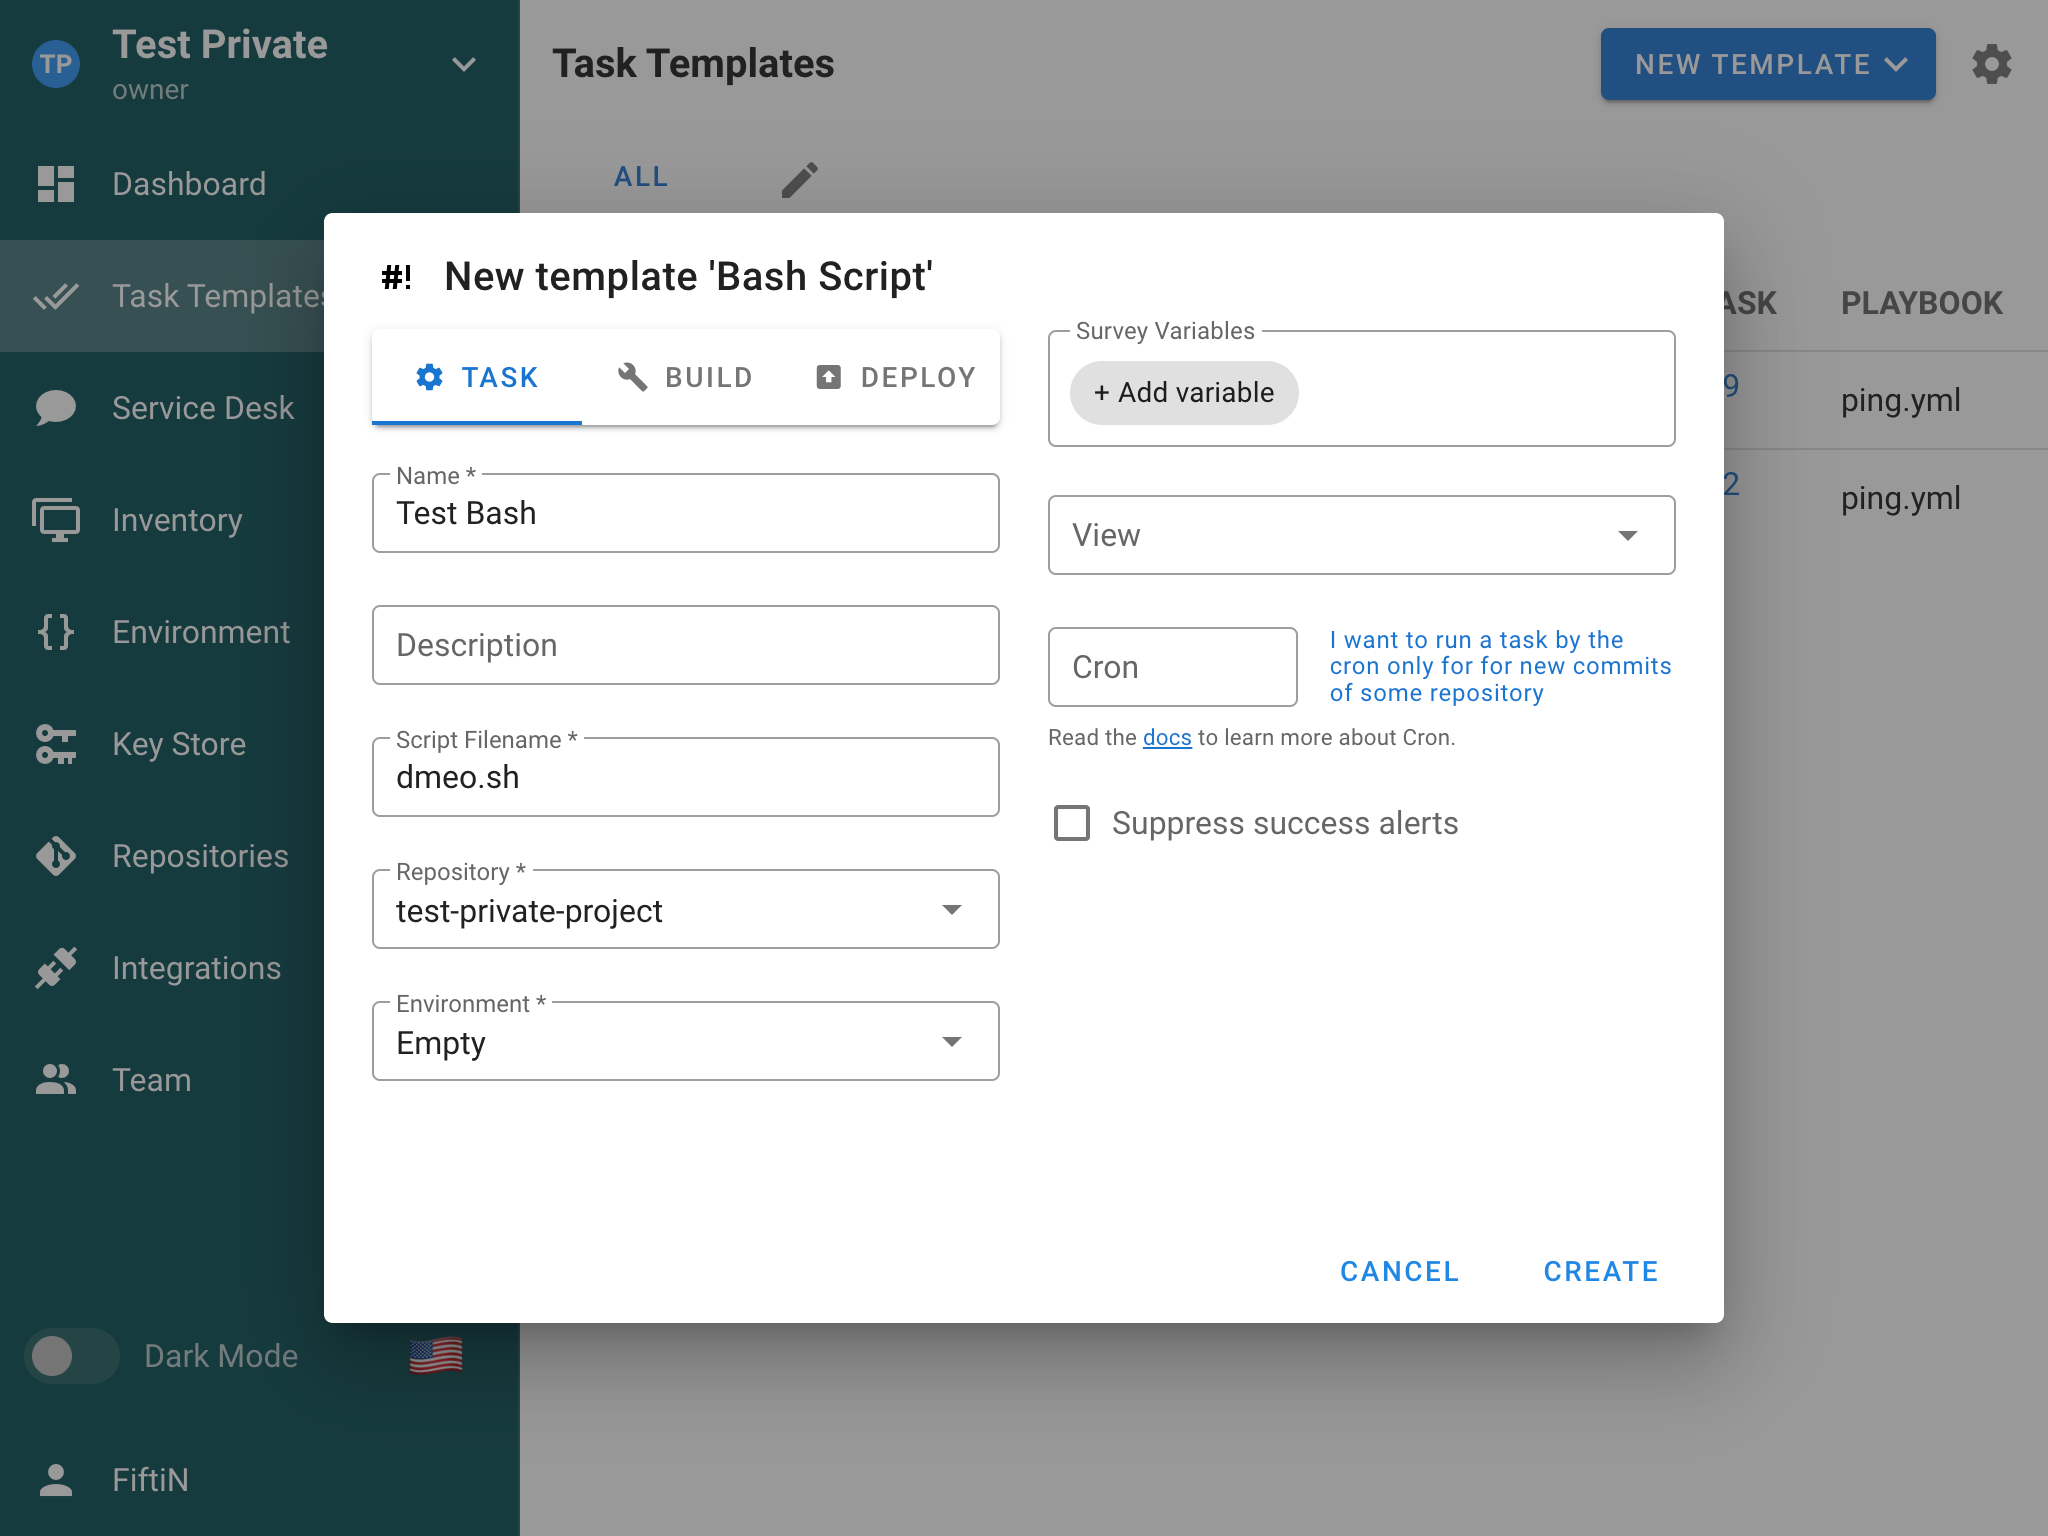
-
You can now run your Bash script.
PowerShell
Python

Tasks
A task is an instance of launching an Ansible playbook. You can create the task from Task Template by clicking the button Run/Build/Deploy for the required template.
.png)
The Deploy task type allows you to specify a version of the build associated with the task. By default, it is the latest build version.
.png)
When the task is running, or it has finished, you can see the task status and the running log.
.png)
Raw log view
You can open the unprocessed raw task log from the task log window via the RAW LOG action.
Tasks log retention
You'll notice that logs of previous runs of your tasks are available in the tasks template or in the dashboard.
However, by default, log retention is infinite.
You can configure this by using the max_tasks_per_template parameter in config.json or the SEMAPHORE_MAX_TASKS_PER_TEMPLATE environment variable.
Schedules
The schedule function in Semaphore allows to automate the execution of templates (e.g. playbook runs) at predefined intervals. This feature allows to implement routine automation tasks, such as regular backups, compliance checks, system updates, and more.
Make sure to restart the Semaphore service after making changes for them to take effect.
Setup and configuration
Timezone configuration
By default, the schedule feature operates in the UTC timezone. However, this can be customized to match your local timezone or specific requirements.
You can change the timezone by updating the configuration file or setting an environment variable:
-
Using the configuration file:
Add or update thetimezonefield in your Semaphore configuration file:{ "schedule": { "timezone": "America/New_York" } } -
Using an environment variable:
Set theSEMAPHORE_SCHEDULE_TIMEZONEenvironment variable:export SEMAPHORE_SCHEDULE_TIMEZONE="America/New_York"
For a list of valid timezone values, refer to the IANA Time Zone Database.
Accessing the schedule feature
- Log in to your Ansible Semaphore web interface
- Navigate to the "Schedule" tab in the main navigation menu
- Click the "New Schedule" button in the top right corner to create a new schedule
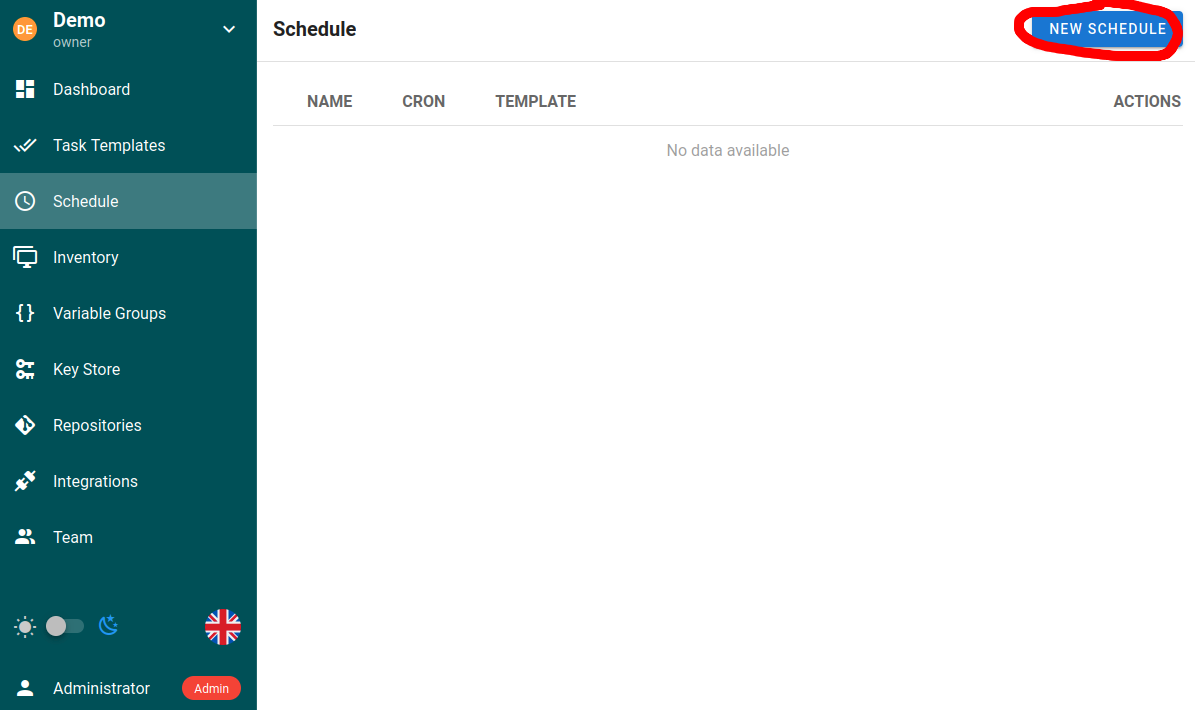
Creating a new schedule
When creating a new schedule, you'll need to configure the following options:
| Field | Description |
|---|---|
| Name | A descriptive name for the scheduled task |
| Template | The specific Task Template to execute |
| Timing | Either in cron format for more fexibility or using the built-in options for common intervals |
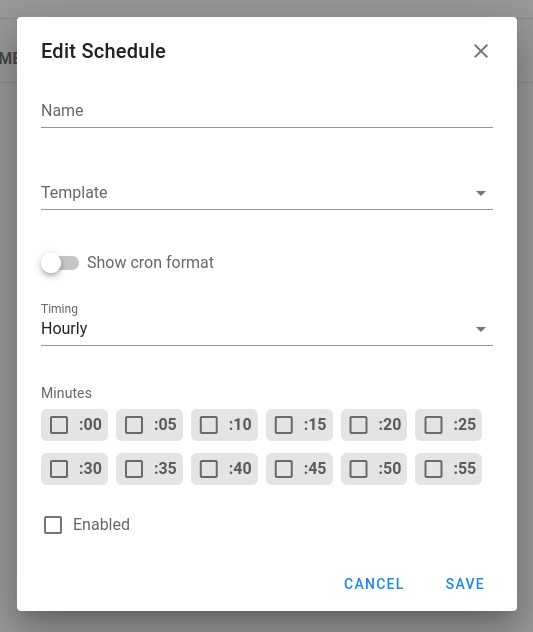
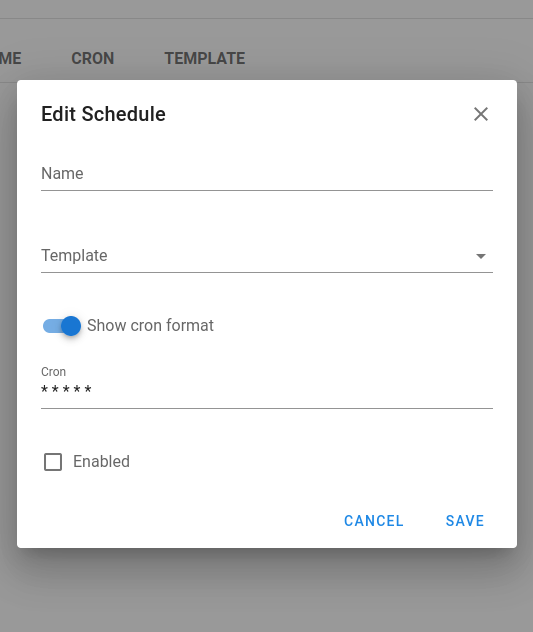
Cron format syntax
The schedule uses standard cron syntax with five fields:
┌─────── minute (0-59)
│ ┌────── hour (0-23)
│ │ ┌───── day of month (1-31)
│ │ │ ┌───── month (1-12)
│ │ │ │ ┌───── day of week (0-6) (Sunday=0)
│ │ │ │ │
│ │ │ │ │
* * * * *
Examples:
*/15 * * * *- Run every 15 minutes0 2 * * *- Run at 2:00 AM every day0 0 * * 0- Run at midnight on Sundays0 9 1 * *- Run at 9:00 AM on the first day of every month
Very helpful cron expression generator: https://crontab.guru/
Use cases
System maintenance
# Example playbook for system updates
---
- hosts: all
become: yes
tasks:
- name: Update apt cache
apt:
update_cache: yes
- name: Upgrade all packages
apt:
upgrade: yes
- name: Remove dependencies that are no longer required
apt:
autoremove: yes
Schedule this playbook to run weekly during off-hours to ensure systems stay up-to-date.
Backup operations
Create schedules for database backups with different frequencies:
- Daily backups that retain for one week
- Weekly backups that retain for one month
- Monthly backups that retain for one year
Compliance checks
Schedule regular compliance scans to ensure systems meet security requirements:
# Example compliance check playbook
---
- hosts: all
tasks:
- name: Run compliance checks
script: /path/to/compliance_script.sh
- name: Collect compliance reports
fetch:
src: /var/log/compliance-report.log
dest: reports/{{ inventory_hostname }}/
flat: yes
Environment provisioning and cleanup
For development or testing environments. Schedule cloud environment creation in the morning and teardown in the evening to optimize costs.
Best practices
- Use descriptive names for schedules that indicate both function and timing (e.g. "Weekly-Backup-Sunday-2AM")
- Avoid scheduling too many resource-intensive tasks concurrently
- Consider the effect of long-running scheduled tasks on other schedules
- Test schedules with short intervals before setting up production schedules with longer intervals
- Document the purpose and expected outcomes of scheduled tasks
Task parameters
Schedules can pass parameters to tasks. Enable prompts for the required fields in the template, then define parameter values in the schedule configuration so each run supplies the desired overrides (for example branch, variables, flags).
Key Store
The Key Store in Semaphore is used to store credentials for accessing remote Repositories, accessing remote hosts, sudo credentials, and Ansible vault passwords.
It is helpful to have configured all required access keys before setting up other resources like Inventories, Repositories, and tasks templates so you do not have to edit them later.
Types
1. SSH
SSH Keys are used to access remote servers as well as remote Repositories.
If you need assistance quickly generating a key and placing it on your host, here is a quick guide.
For Git Repositories that use SSH authentication, the Git Repository you are trying to clone from needs to have your public key associated to the private key.
Below are links to the docs for some common Git Repositories:
2. Login With Password
Login With Password is a username and password/access token combination that can be used to do the following:
- Authenticate to remote hosts (although this is less secure than using SSH keys)
- Sudo credentials on remote hosts
- Authenticate to remote Git Repositories over HTTPS (although SSH is more secure)
- Unlock Ansible vaults
3. None
This is used as a filler for Repos that do not require authentication, like an Open-Source Repository on GitLab.
GitLab
GitLab repository access token
Inventory
An Inventory is a file that contains a list of hosts Ansible will run plays against. An Inventory also stores variables that can be used by playbooks. An Inventory can be stored in YAML, JSON, or TOML. More information about Inventories can be found in the Ansible Documentation.
Semaphore UI can either read an Inventory from a file on the server that the Semaphore user has read access to, or a static Inventory that is edited via the web GUI. Each Inventory also has at least one credential tied to it. The user credential is required, and is what Ansible uses to log into hosts for that Inventory. Sudo credentials are used for escalating privileges on that host. It is required to have a user credential that is either a username with a login, or SSH configured in the Key Store to create an Inventory. Information about credentials can be found in the Key Store section of this site.
Creating an Inventory
- Click on the Key Store tab and confirm you have a key that is a login_password or ssh type
- Click on the Inventory tab and click New Inventory
- Name the Inventory and select the correct user credential from the dropdown. Select the correct sudo credential, if needed
- Select the Inventory type
- If you select file, use the absolute path to the file. If this file is located in your git repo, then use relative path. Ex.
inventory/linux-hosts.yaml - If you select static, paste in or type your Inventory into the form
- Click Create.
Updating an Inventory
- Click on the Inventory tab
- Click the Pencil Icon next to the Inventory you want to edit
- Make your changes
- Click Save
Deleting an Inventory
Before you remove an Inventory, you must remove all resources tied to it. If you are not sure which resources are being used in an environment, follow steps 1 and 2 below. It will show you which resources are being used, with links to those resources.
- Click on the Inventory tab
- Click the trash can icon next to the Inventory
- Click Yes if you are sure you want to remove the Inventory
Kerberos authentication
Semaphore supports Kerberos authentication when running playbooks against Windows hosts via WinRM.
Inventory configuration
[windows]
hostname
[windows:vars]
ansible_port=5985
ansible_connection=winrm
ansible_winrm_server_cert_validation=ignore
ansible_winrm_transport=ntlm
ansible_winrm_kinit_mode=managed
ansible_winrm_scheme=http
Also make sure:
- A username and password are provided (Semaphore credentials)
- The user format is
domain\\username(e.g.,CORP\\admin) if needed
The key setting is:
ansible_winrm_kinit_mode=managed
This tells Ansible to automatically acquire a Kerberos ticket using the provided username/password without requiring you to manually run kinit.
Example Playbook
- hosts: all
gather_facts: false
tasks:
- win_ping:
This verifies basic connectivity using WinRM + Kerberos.
Semaphore UI host requirements
On the Semaphore host, install the following packages:
sudo apt install libkrb5-dev krb5-user
Then edit /etc/krb5.conf and set your default realm (domain name):
[libdefaults]
default_realm = YOUR.DOMAIN.NAME
This must match your Active Directory domain.
Notes
-
You do not need to run kinit manually — Ansible handles ticket acquisition when
ansible_winrm_kinit_mode=managedis set. -
Works with the default NTLM transport (no SSL needed if using HTTP and
cert_validation=ignore).
Netbox Dynamic Inventory Integration with Semaphore
![]()
![]()
![]()
🛠 Key Features
This repository demonstrates the use of the netbox.netbox.nb_inventory plugin to create a dynamic inventory in Semaphore. It enables automatic synchronization of data from Netbox, simplifying the management of your infrastructure and the execution of Ansible playbooks.
🔧 Setup
Requirements
- Access to Semaphore
- Access to Netbox with configured API
🔑 Netbox Setup
Ensure your Netbox is configured and accessible for API interaction. Obtain an API token which will be used to authenticate requests.
📡 Configuration in Semaphore
-
In Semaphore, go to the inventory section.
-
Create a new inventory.
-
Enter the following settings for the plugin configuration:
plugin: netbox.netbox.nb_inventory api_endpoint: http://your_netbox_url_here token: YOUR_NETBOX_API_TOKEN validate_certs: False config_context: FalseReplace
http://your_netbox_url_hereandYOUR_NETBOX_API_TOKENwith the actual data from your Netbox.
🚀 Usage
Once configured, you can run Ansible playbooks in Semaphore using the dynamic inventory which automatically updates host data from your Netbox.
📚 Further Documentation
Learn more about the netbox.netbox.nb_inventory plugin and its capabilities in the official Ansible documentation.
Variable Groups
The Variable Groups section of Semaphore is a place to store additional variables for an inventory and must be stored in JSON format.
All task templates require a variable group to be defined even if it is empty.
Create a variable group
- Click on the Variable Group tab.
- Click on the New Variable Group button.
- Name the Variable Group and type or paste in valid JSON variables. If you just need an empty Variable Group type in
{}.
Updating a variable group
- Click on the Variable Groups tab.
- Click the pencil icon.
- Make changes and click save.
Deleting the variable group
Before you remove a variable proup, you must remove all resources tied to it. If you are not sure which resources are being used in a variable group, follow steps 1 and 2 below. It will show you which resources are being used, with links to those resources.
- Click on the Variable Group.
- Click the trash can icon next to the Variable Group.
- Click Yes if you are sure you want to remove the variable group.
Using Variable Groups - Terraform/OpenTofu
When you want utilize a stored variable group variable or secret in your terraform template you must prefix the name with TF_VAR_ for the terraform script to use it.
Example Passing Hetzner Cloud API key to OpenTofu/Terraform playbook.
- Click on Variable Group
- Click
New Group - Click on
Secretstab - Add
TF_VAR_hcloud_tokenand add yousecretin the hidden field - Click Save
We will call our secret TF_VAR_hcloud_token as var.hcloud_token in
hetzner.tf
terraform {
required_providers {
hcloud = {
source = "hetznercloud/hcloud"
version = "~> 1.45"
}
}
}
# Declare the variable
variable "hcloud_token" {
type = string
description = "Hetzner Cloud API token"
sensitive = true # This prevents the token from being displayed in logs
}
provider "hcloud" {
token = var.hcloud_token
}
# Create a new server running debian
resource "hcloud_server" "webserver" {
name = "webserver"
image = "ubuntu-24.04"
server_type = "cpx11"
location = "ash"
ssh_keys = [ "mysshkey" ]
public_net {
ipv4_enabled = true
ipv6_enabled = true
}
}
Repositories
A Repository is a place to store and manage Ansible content like playbooks and roles.
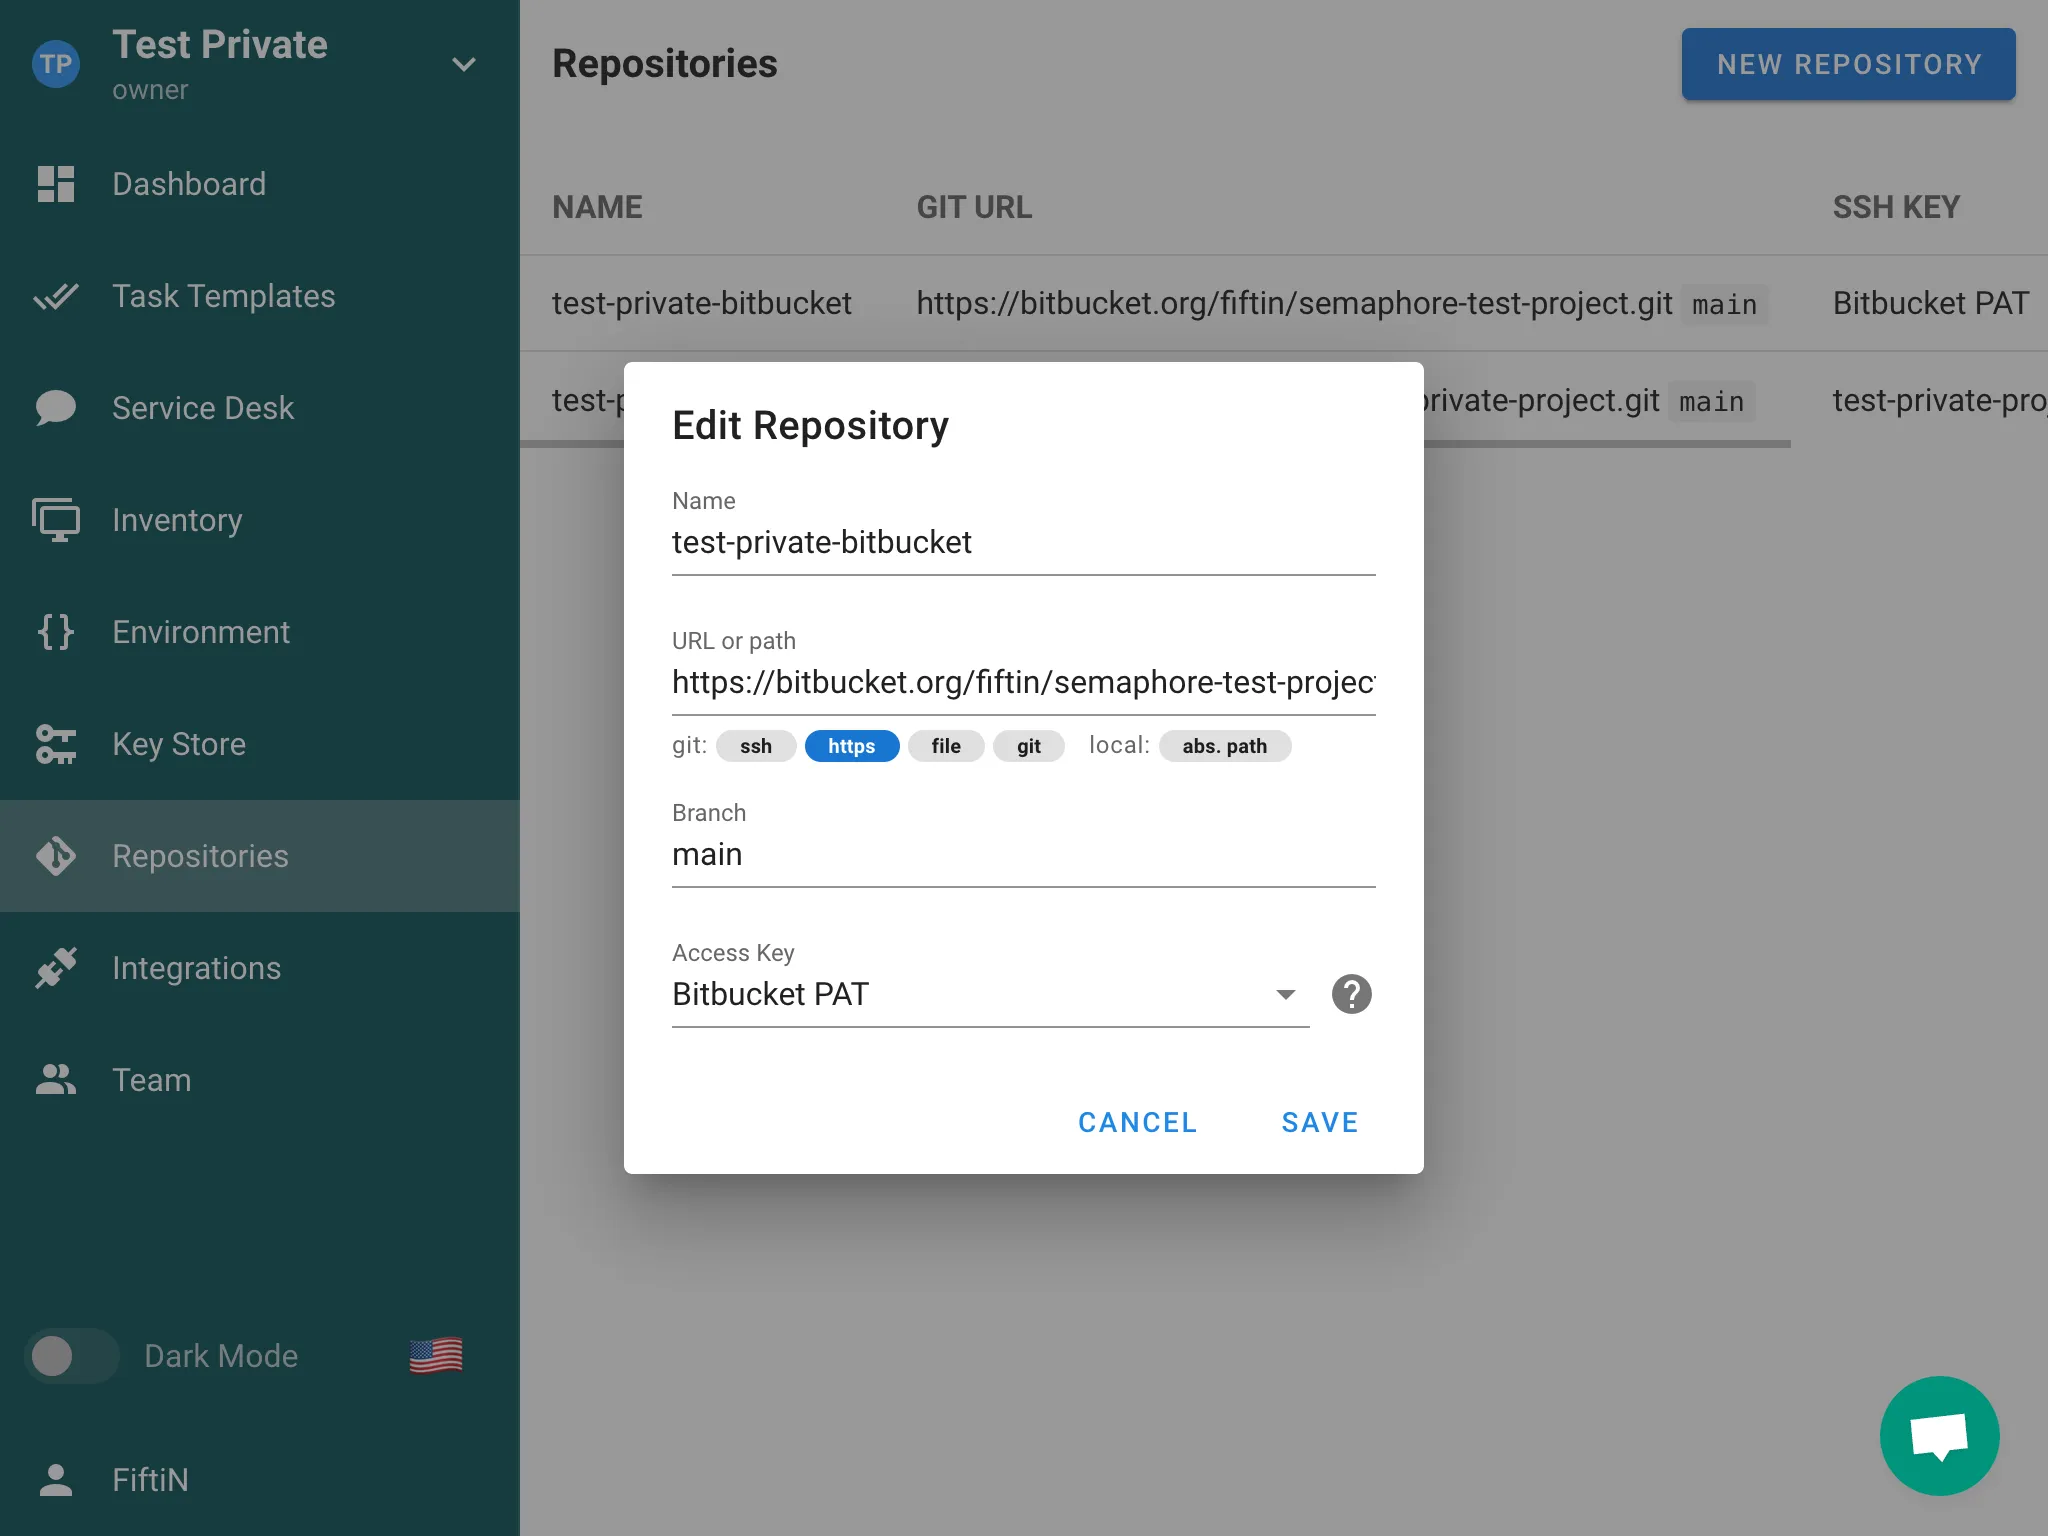
Semaphore understands Repositories that are:
- a local file system (
/path/to/the/repo) - a local Git repository (
file://) - a remote Git Repository that is accessed over HTTPS (
https://), SSH(ssh://) git://protocol supported, but it is not recommended for security reasons.
All Task Templates require a Repository in order to run.
Authentication
If you are using a remote Repository that requires authentication, you will need to configure a key in the Key Store section of Semaphore.
For remote Repositories that use SSH, you will need to use your SSH key in the Key Store.
For Remote Repositories that do not have authentication, you can create a Key with the type of None.
Creating a New Repository
-
Make sure you have configured the key for the Repository you are about to add in the key store section.
-
Go to the Repositories section of Semaphore, click the New Repository button in the upper right hand corner.
-
Configure the Repository:
- Name Repository
- Add the URL. The URL must start with the following:
/path/to/the/repofor a local folder on the file systemhttps://for a remote Git Repository accessed over HTTPSssh://for a remote Git Repository accessed over SSHfile://for a local Git Repositorygit://for a remote Git Repository accessed over Git protocol
- Set the branch of the Repository, if you are not sure what it should be, it is probably master or main
- Select the Access Key you configured prior to setting up this Repository.
-
Click Save once everything is configured.
Editing an Existing Repository
-
Go to the Repositories section of Semaphore.
-
Click on the pencil icon next to the Repository you wish to change, then you will be presented with the Repository configuration.
Deleting a Repository
Make sure the Repository that is about to be delete is not in use by any Task Templates. A Repository cannot be deleted if it is used in any Task Templates:
-
Go to the Repositories section of Semaphore.
-
Click on the trash can icon on of the Repository you wish to delete.
-
Click Yes on the confirmation pop-up if you are sure you want this Repository to be deleted.
Requirements
Upon project initialization Semaphore searches for and installs Ansible roles and collections from requirements.yml in the following locations and order.
Roles
- <playbook_dir>/roles/requirements.yml
- <playbook_dir>/requirements.yml
- <repo_path>/roles/requirements.yml
- <repo_path>/requirements.yml
Collection
- <playbook_dir>/collections/requirements.yml
- <playbook_dir>/requirements.yml
- <repo_path>/collections/requirements.yml
- <repo_path>/requirements.yml
Processing Logic
- Each file is processed independently
- If a file exists, it will be processed according to its type (role or collection)
- If any file processing results in an error, the installation process stops and returns the error
- The same requirements.yml file in the root directories (<playbook_dir>/requirements.yml and <repo_path>/requirements.yml) is processed twice - once for roles and once for collections
Semaphore will attempt to process all these locations regardless of whether previous locations were found or successfully processed, except in the case of errors.
Bitbucket Access Token
You can use a Bitbucket Access Token in Semaphore to access repositories from Bitbucket.
First, you need to create an Access Token for your Bitbucket repository with read access permissions.

After creation, you will see the access token. Copy it to your clipboard as it will be required for creating an Access Key in Semaphore.

-
Go to to the Key Store section in Semaphore and click the New Key button.
-
Choose
Login with passwordas the type of key. -
Enter
x-token-authas Login and paste the previously copied key into the Password field. Save the key.
-
Go to the Repositories section and click the New Repository button.
-
Enter HTTPS URL of the repository (
https://bitbucket.org/path/to/repo), enter correct branch and select previously created Access Key.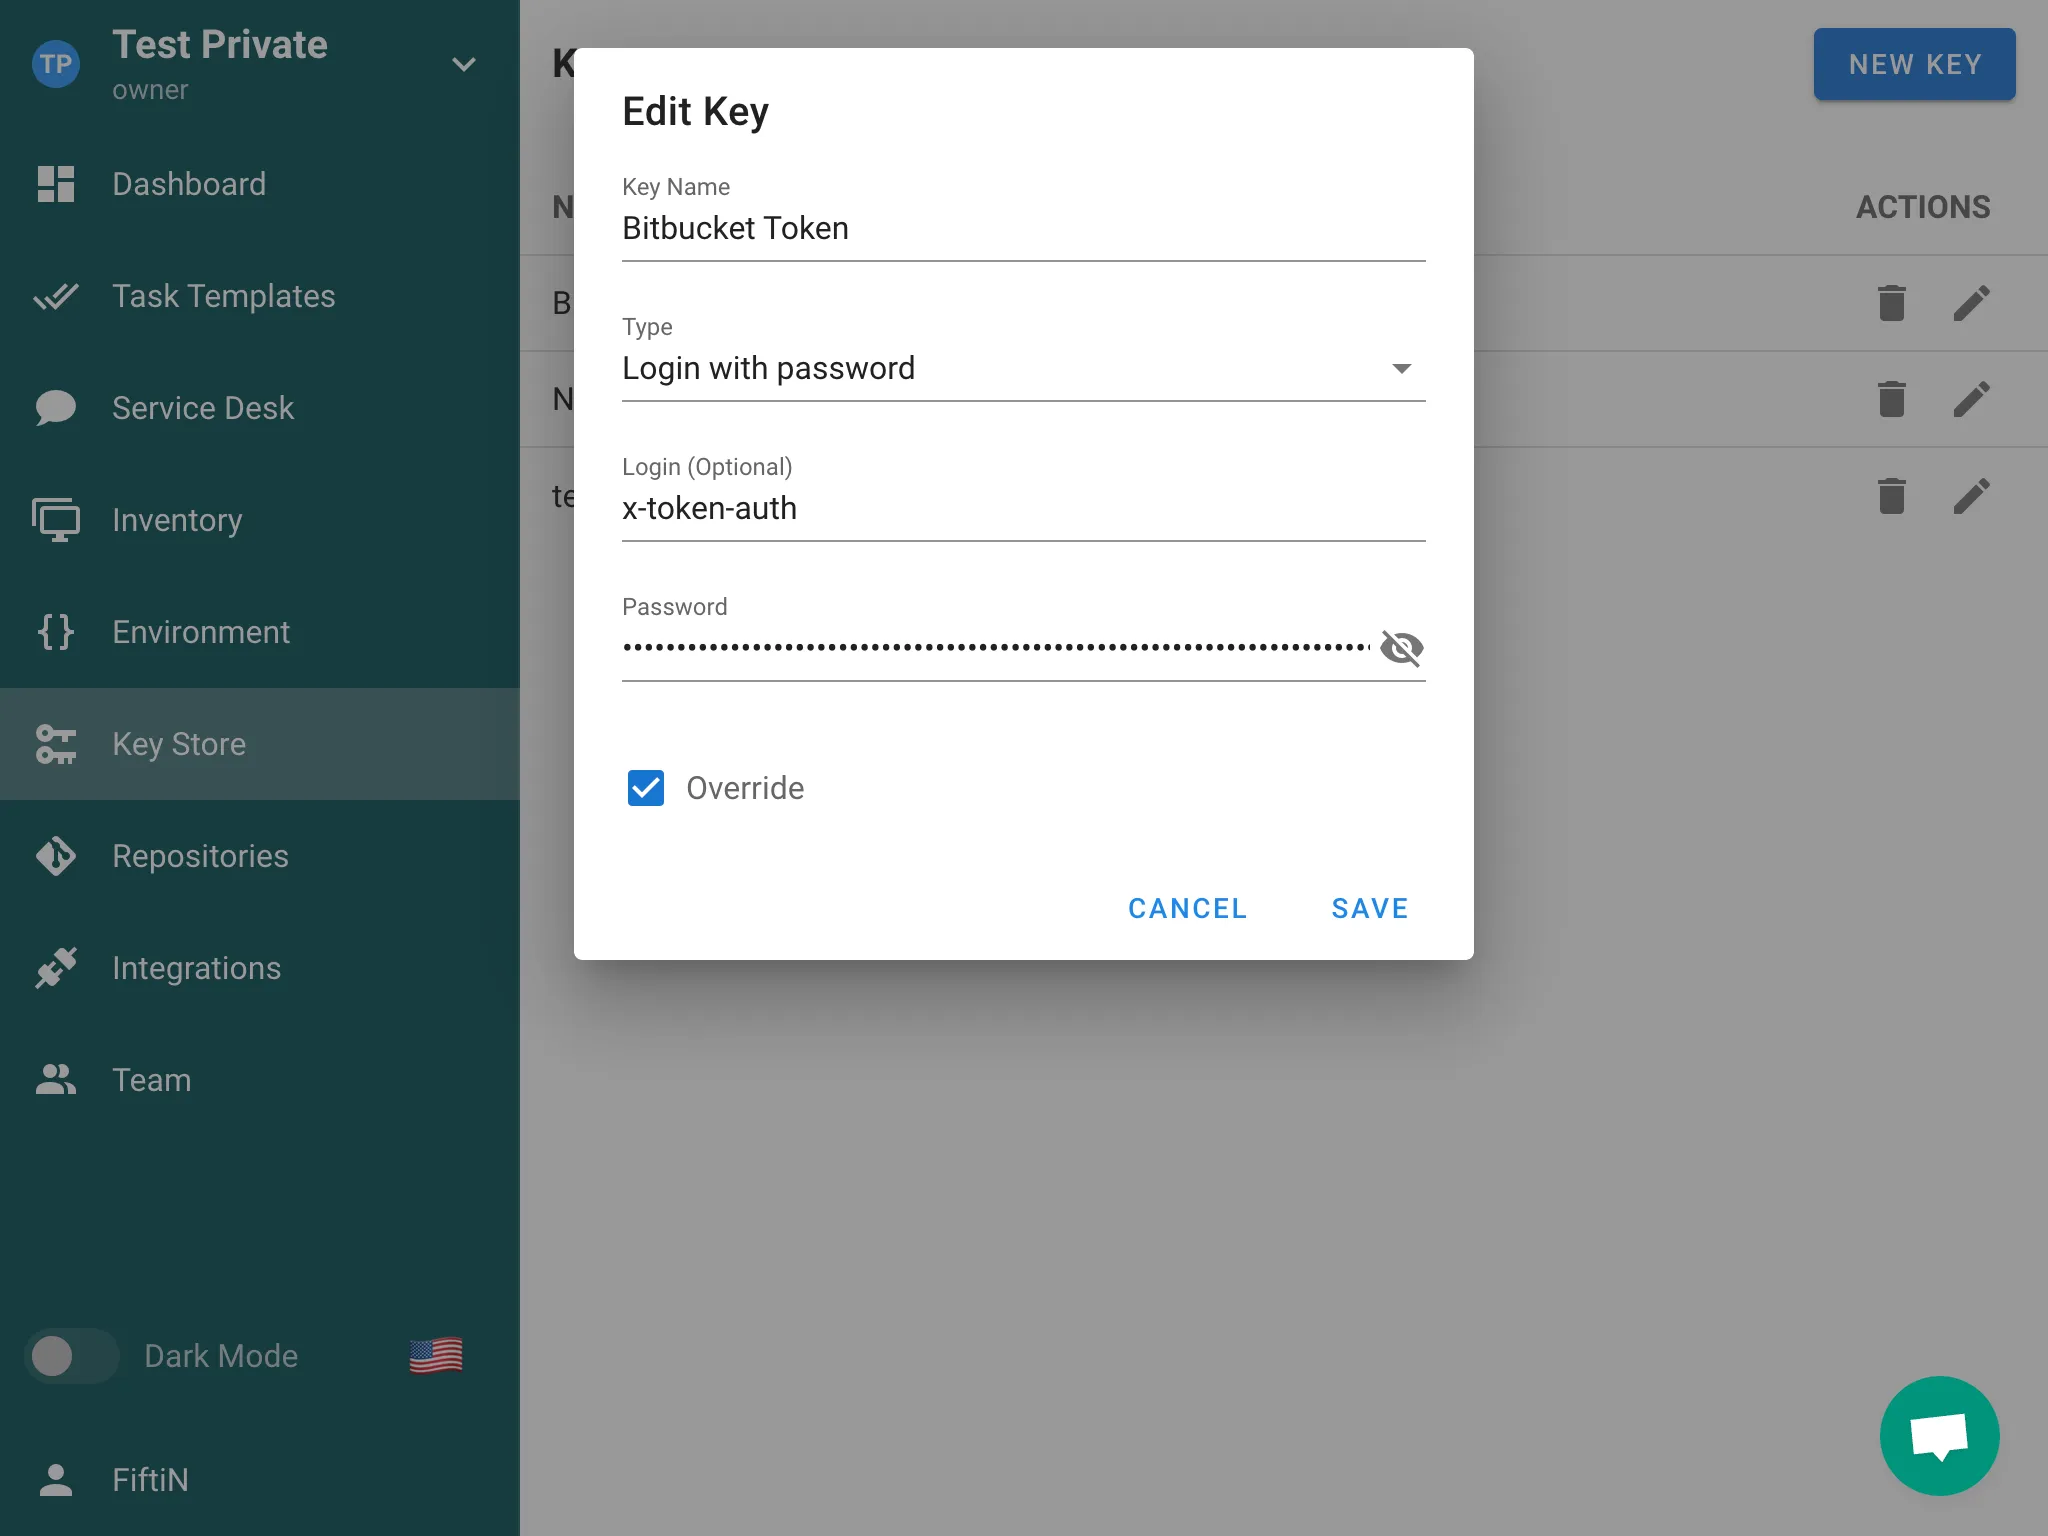
Integrations
Integrations allow establishing interaction between Semaphore and external services, such as GitHub and GitLab.
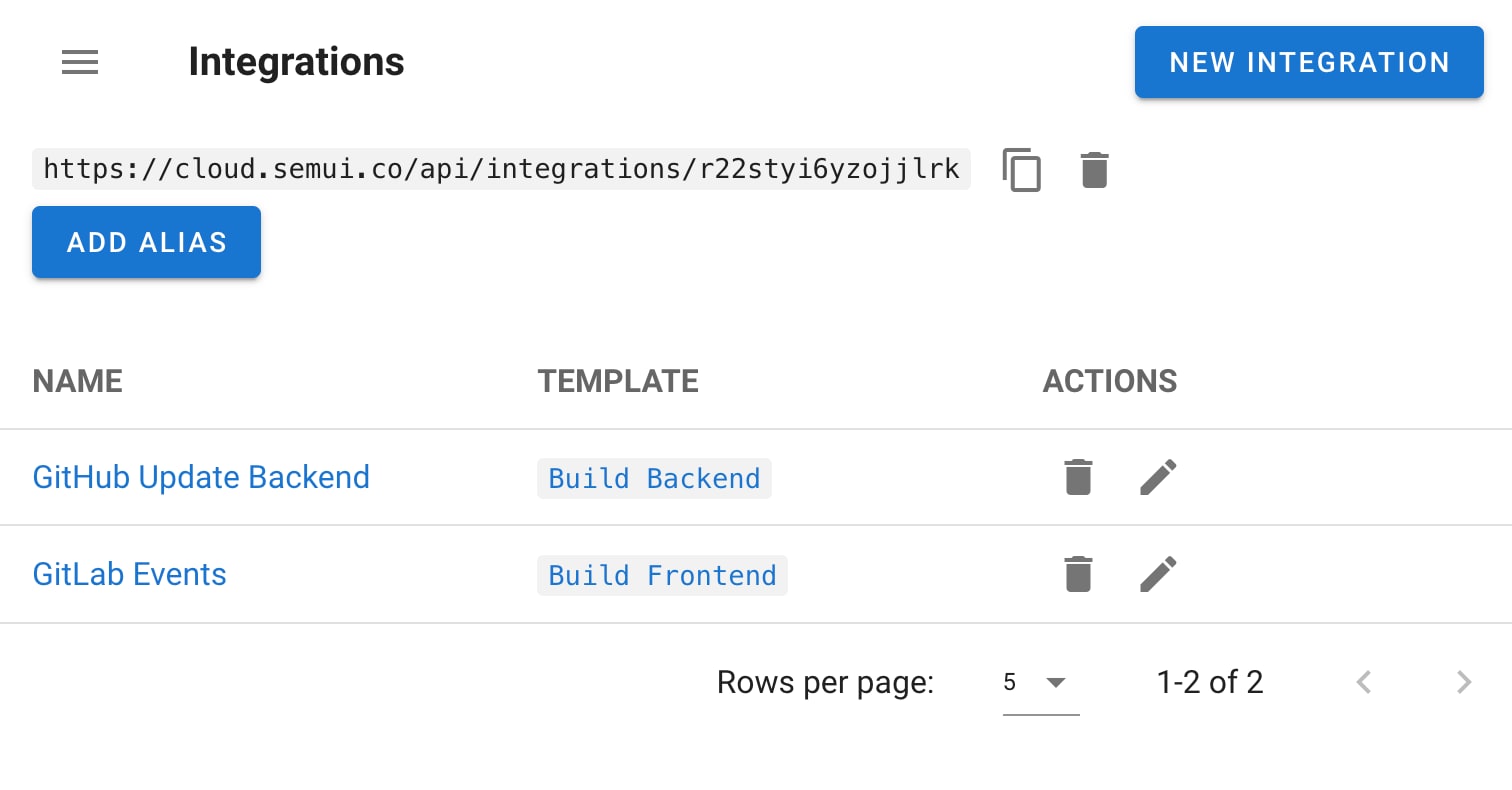
Using integration, you can trigger a specific template by calling a special endpoint (alias), for which you can configure one of the following authentication methods:
- GitHub Webhooks
- Token
- HMAC
- No authentication
The alias represents a URL in the following format: /api/integrations/<random_string>. Supports GET and POST requests.
Matchers
With matchers, you can define parameters of the incoming request. When these parameters match, the template will be invoked.
Value Extractors
With an extractor, you can extract the necessary data from the incoming request and pass it to the task as environment variables. For the extracted variables to be passed to the task, you must create an environment with the corresponding keys. Ensure that the environment keys match the variables defined in the extractor, as this allows the task to receive and use the correct environment variables.
Task parameters
Integrations can trigger tasks with parameters. Use value extractors to build a JSON payload for task parameters and configure the template to accept prompted values.
Notes on aliases and matchers
For integrations configured with an alias endpoint, matchers are not used. Prefer token/HMAC authentication as needed and pass parameters via extractors.
Teams
In Semaphore UI, every project is associated with a Team. Only team members and admins can access the project. Each member of the team is assigned one of four predefined roles, which govern their level of access and the actions they can perform.
Team roles
Every team member has exactly one of these four roles:
- Owner
- Manager
- Task Runner
- Guest
Below are detailed descriptions of each role and its permissions.
Owner
-
Full permissions
Owners can do anything within the project, including managing roles, adding/removing members, and configuring any project settings. -
Multiple owners
A project can have multiple Owners, ensuring there is more than one person with full privileges. -
Restrictions on self-removal
An Owner cannot remove themselves if they are the only Owner of the project. This prevents the project from being left without an Owner. -
Managing other owners
Owners can manage (including remove or change roles of) all team members, including other Owners.
Manager
-
Broad project control: Managers have almost the same permissions as Owners, allowing them to handle most day-to-day tasks and manage the project environment.
-
Managers cannot:
- Remove the project.
- Remove or change the roles of Owners.
-
Typical use case: Assign the Manager role to senior team members who need extensive access but don’t require the authority to delete the project or manage Owners.
Task Runner
-
Run tasks: Task Runners can execute any task template that exists within the project.
-
Read-only for other resources: While they can run tasks, they only have read‐only access to other resources such as inventory, variables, repositories, etc.
-
Typical use case: Developers or QA engineers who need to trigger and monitor tasks but do not need the ability to modify project settings or manage team membership.
Guest
-
Read-only access: Guests have read-only access to all project resources (e.g., viewing logs, inventories, dashboards).
-
No write permissions: They cannot modify settings, run tasks, or change roles.
-
Typical use case: Stakeholders or other collaborators who only need to view project status and details without making changes.
Managing team members
-
Inviting new members: Owners and Managers can invite new users to join the team and assign them an initial role.
-
Changing roles: Owners can always change the roles of any team member. Managers can change the roles of Task Runners and Guests, but not other Managers or Owners.
-
Removing members: Owners and Managers can remove team members with lower roles.
- An Owner can remove anyone (including other Owners), but cannot remove themselves if they are the sole Owner.
- A Manager can remove Task Runners and Guests, but not other Managers or Owners.
Best practices
- Maintain redundancy: Assign the Owner role to at least two people to ensure continuous access and prevent a single point of failure.
- Follow principle of least privilege:
- Give team members the minimum role necessary for their tasks.
- Use Task Runner or Guest roles for those who only need limited permissions.
- Review membership regularly:
- As team structures change, re‐evaluate roles.
- Revoke access or downgrade roles for users who no longer need high‐level privileges.
- Use managers for day-to-day administration:
- Reserve the Owner role for a smaller group with ultimate authority.
- Delegate routine project management tasks to Managers to reduce the risk of accidental major changes or project deletions.
Frequently asked questions
1. Can an Owner remove another Owner?
Yes, an Owner can remove or change the role of any other Owner, unless they are the only remaining Owner in the project.
2. Who can delete the project?
Only Owners can delete a project.
3. Can Managers add or remove other Managers?
No. Managers can only add or remove users with Task Runner or Guest roles. To manage Owners or other Managers, you must be an Owner.
4. What happens if I remove all Owners by accident?
Semaphore UI prevents the removal of an Owner if it would leave the project with no Owners at all. There must be at least one Owner at all times.
5. Can Guests run tasks?
No. Guests only have read‐only access and cannot trigger or manage tasks.
Troubleshooting
1. Renner prints error 404
How to fix
Getting 401 error code from Runner
2. Gathering Facts issue for localhost
The issue can occur on Semaphore UI installed via Snap or Docker.
4:10:16 PM
TASK [Gathering Facts] *********************************************************
4:10:17 PM
fatal: [localhost]: FAILED! => changed=false
Why this happens
For more information about localhost use in Ansible, read this article Implicit 'localhost'.
Ansible tries to gather facts locally, but Ansible is located in a limited isolated container which doesn't allow this.
How to fix this
There are two ways:
- Disable facts gathering:
- hosts: localhost
  gather_facts: False
  roles:
    - ...
- Explicitly set the connection type to ssh:
[localhost]
127.0.0.1 ansible_connection=ssh ansible_ssh_user=your_localhost_user
4. panic: pq: SSL is not enabled on the server
This means that your Postgres doesn't work by SSL.
How to fix this
Add option sslmode=disable to the configuration file:
	"postgres": {
		"host": "localhost",
		"user": "pastgres",
		"pass": "pwd",
		"name": "semaphore",
		"options": {
			"sslmode": "disable"
		}
	},
5. fatal: bad numeric config value '0' for 'GIT_TERMINAL_PROMPT': invalid unit
This means that you are trying to access a repository over HTTPS that requires authentication.
How to fix this
- Go to Key Store screen.
- Create a new key
Login with passwordtype. - Specify your login for GitHub/BitBucket/etc.
- Specify the password. You can't use your account password for GitHub/BitBucket, you should use a Personal Access Token (PAT) instead of it. Read more here.
- After creating the key, go to the Repositories screen, find your repository and specify the key.
6. unable to read LDAP response packet: unexpected EOF
Most likely, you are trying to connect to the LDAP server using an insecure method, although it expects a secure connection (via TLS).
How to fix this
Enable TLS in your config.json file:
...
"ldap_needtls": true
...
7. LDAP Result Code 49 "Invalid Credentials"
You have the wrong password or binddn.
How to fix this
Use ldapwhoami tool and check if your binddn works:
ldapwhoami\
  -H ldap://ldap.com:389\
  -D "CN=/your/ldap_binddn/value/in/config/file"\
  -x\
  -W
It will ask interactively for the password and should return code 0 and echo out the DN as specified.
You also can read the following articles:
8. LDAP Result Code 32 "No Such Object"
Coming soon.